
You are here:
Create a Bring Your Own Channel for CCaaS Messaging Channel
To create a Bring Your Own Channel for Contact Center as a Service (CCaaS) messaging channel as part of a contact center, follow the setup flow.
Required Editions
| View supported editions. | |
 This article applies to:
|
Bring Your Own Channel for CCaaS |
 This article doesn’t apply to:
|
Enhanced In-App Chat, Enhanced Web Chat v1, Enhanced Web Chat v2, Enhanced WhatsApp, Standard and Enhanced Facebook Messenger, Standard and Enhanced SMS, Enhanced Apple Messages for Business, Enhanced LINE, and Bring Your Own Channel for Messaging |
| User Permissions Needed | |
|---|---|
| To install packages: | Download AppExchange Packages |
| To set up and edit Messaging channels: | Configure Messaging |
Install a Managed Package
Install the managed package for Bring Your Own Channel
for CCaaS from your preferred CCaaS vendor.
Add a Bring Your Own Channel for CCaaS Messaging Channel
- From Setup, in the Quick Find box, enter Messaging Settings, and then select Messaging Settings.
- Click New Channel.
- Select the Conversation Channel Definition tile that represents the Managed Package that you installed, and click Next.
-
Choose whether to create a contact center or use an existing one.
- Create a contact center if setting up a new contact center for Bring Your Own Channel for CCaaS.
- Use an existing contact center to add Bring Your Own Channel for CCaaS Messaging capabilities to a partner telephony contact center.
-
If you create a contact center, enter the requested details.
- If your partner messaging provider supports it, enter your contact center display and API names, or upload the .xml file that contains your contact center definition.
- Complete the details required by your CCaaS provider.
- Give your Bring Your Own Channel messaging channel a name.
- Click anywhere to populate the API Name field, and save your changes.
-
If required for your Messaging channel, turn on Event-Driven
Settings. These options appear if your Messaging partner supports them in
the Conversation Channel Definition. Usage counts towards your high volume platform
event allocation. See Considerations and Limitations for Bring Your Own Channel and Bring Your
Own Channel for CCaaS for more information.
- To show messaging end users an indicator when a rep is typing, select Show agent typing indicator.
- To send end users acknowledgments when their inbound messages are read or delivered, select Show messaging users read and delivered receipts.
- To show end users loading text and progress animations while an Agentforce Service agent is processing, select Show Agentforce agent progress indicator.
-
If supported by your CCaaS partner, set up routing for this Messaging channel. Check
with your CCaaS partner for their recommendation based on how their integration works.
Routing information passed by your CCaaS partner through an Interaction Service API call
takes precedence over your Messaging channel Omni-Channel Routing setting, if both are
set.
- Under Omni-Channel Routing, click Edit.
- To route messages with an Omni-Channel flow, select Omni-Channel Flow in the Routing Type field, and then enter the names of the Omni-Channel flow and fallback queue that you created previously.
- To route messages to a queue, select Queue in the Routing Type field, and then enter the name of the queue that you created previously.
- Save your changes.
- Click Activate.
Create and Configure an External Client App or Connected App for OAuth Integration
If it’s required by your CCaaS provider, set up and configure your own OAuth
app.
Add Users to Your Partner Contact Center
Add Messaging users or Voice users as service reps or admins to a partner contact center.
- From Setup, in the Quick Find box, enter Contact Centers. Select Partner Contact Centers or Partner Telephony Contact Centers, depending on your setup.
- Select the contact center.
-
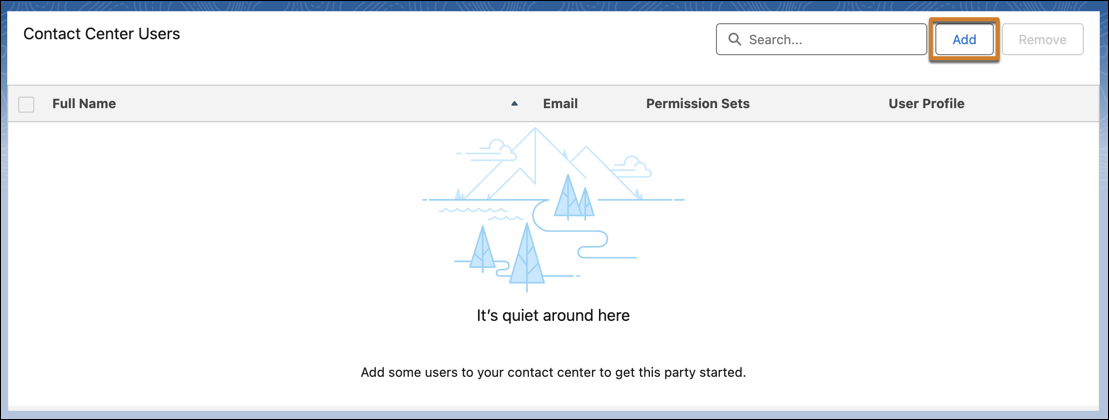
On the Contact Center details page, in the Contact Center Users section, add users to the
partner contact center.
Test Your Bring Your Own Channel Messaging Channel
- Open the Service Console app, and go to the Omni-Channel utility bar at the bottom of the console, provided it’s installed. Go online as the service rep assigned to the messaging button.
- Open the app where your customers initiate Bring Your Own Channel, and start a conversation.
- In the console tab, verify that you received a conversation request. Accept the request and try sending a message.
Did this article solve your issue?
Let us know so we can improve!