
You are here:
Add Functionality to the Case Feed in Salesforce Classic
Customize the case feed in Salesforce Classic to meet the needs of your support reps. You can give them access to productivity tools, like quick text, and even enable email drafts and approval processes.
Required Editions
| View supported editions. |
| User Permissions Needed | |
|---|---|
| To create and send actions: | Customize Application |
| To add custom console components: | Customize Application |
| To edit Case Feed settings or support settings: | Manage Cases AND Customize Application |
| To create and edit profiles and permission sets: | Manage Profiles and Permission Sets |
| To enable default email templates: | Customize Application |
| To create approval processes: | Customize Application |
Add Custom Actions in Case Feed
Include custom actions in the Case Feed publisher to give support reps easy access to the additional tools and functionality they need when working with cases.
Actions in Case Feed let support reps perform tasks like emailing customers, writing case notes, and changing the status of a case. Using Visualforce pages, you can create custom actions that offer support reps more functionality. For example, you create a Map and Local Search action that lets support reps look up the customer's location and find nearby service centers. You can use any Visualforce page that uses the standard case controller as a custom action.
If you've opted to use the advanced page layout editor to configure the publisher for a Case Feed layout, see Case Feed Page Layouts in Salesforce Classic for instructions on adding actions.
- From the object management settings for cases, go to Page Layouts.
- How you access the Case Feed Settings page depends on what kind of page layout you're working with.
- Click + Add a Visualforce Page in the list of custom actions.
- Select the page you want to add as an action.
- Specify the height of the action in pixels and click Save.
Add Custom Components to Case Feed
Use Visualforce pages as custom components in Case Feed to give support reps easy access to special tools or functionality while they're working with cases.
For example, you create a map component that lets support reps see where a customer is located, or a tool that support reps can use to look up the products related to cases they're working on. You can use any Visualforce page that includes the standard case controller as a custom component.
After you've created a Visualforce page to use as a custom component, add it to the Case Feed layout.
-
How you access the Case Feed Settings page depends on what
kind of page layout you're working with.
- For a layout in the Case Page Layouts section, click Edit, and then click Feed View in the page layout editor.
- For a layout in the Page Layouts for Case Feed Users section, click
 and choose Edit feed view. (This section appears only
for organizations created before Spring '14.)
and choose Edit feed view. (This section appears only
for organizations created before Spring '14.)
- In the Other Tools and Components section, click + Add a Visualforce page and choose the page you want. The width of the component is determined by the width of the column it's in. To make the component look best, we recommend setting the width to 100%.
- Set the height of the component.
- Choose where you want the component to appear on the page.
Components in the right column are hidden when suppprt reps view the Case Detail page, so use the left column for any components you want to be accessible all the time.
Add Global Actions and Custom Quick Actions as Components to the Console Sidebar
You can add global actions and custom quick actions as components to the Service Console sidebar, so support reps can create records, update case info, search for related info, and link to parent records—all without ever leaving the current tab. You can use quick actions to replace the Case Detail Page, so support reps can see case-related information, such as contacts and assets, in their main workflow.
-
Create the global action (for the Create action) and the custom quick action (for the
Update action).
Create actions must be global quick actions. Update actions must be object-specific quick actions that are based on the lookup field object type. For example, to update a contact lookup field, you must have a contact-specific update action.
-
Add the actions as components to the case page layouts so that the quick actions are
available for your support reps to use.
- From Setup, enter “Case” in the Quick Find box, then select Page Layouts.
- Select the page to which you want to add the quick actions and click Edit.
- In the Case Layout page, select Custom Console Components.
- Go to the Sidebar section where you want to add the component (for example, go to the Left Sidebar section).
- For Type, select Lookup.
- For Field, select the related field that the quick action acts on.
- Select Enable Linking to allow support reps to search for a record and link it to a related record. For example, a support rep can link a contact name to a case.
- For Create Action, select the global action that creates a record. For example, a global action can create a contact.
- For Update Action, select the quick action the updates a record. For example, a quick action can update a field on the contact.
- Click Save.
Enable Email Drafts for Cases
Draft emails let support reps who use the case feed write and save messages without having to send them immediately. This option makes it possible to implement approval processes so messages can be reviewed by supervisors or senior support reps before they’re sent to customers.
Before enabling email drafts, set up Email-to-Case. In Salesforce Classic, you must also enable Case Feed.
- From Setup, enter Support Settings in the Quick Find box, then select Support Settings.
- Click Edit.
- Select Enable Email Drafts.
- Click Save.
Keep in mind these considerations.
- Salesforce Classic: Changes to fields other than To, From, CC, BCC, and Subject in the Email action aren’t saved when a message is saved as a draft. If you plan to use draft emails, we recommend removing any additional fields from the Email action.
- Lightning Experience: If you plan to use private email drafts, we recommend removing any additional fields from the Email action. Changes to custom email message fields aren't saved immediately. However, when a standard field is modified, the previous custom field changes are also saved. If you enable email drafts, then the popout-to-docked view button is disabled in the email composer toolbar.
- Email drafts are supported only from a case’s Send Email quick action and aren’t available from the email composer.
- Email approval limitations don’t apply to sending emails from the email composer or from other objects.
- If Email Drafts is enabled for Case, the delete icon, refresh button, and popout icon are removed from the email composer.
Enable Default Email Templates in Case Feed
Use default email templates in Case Feed to give support reps easy access to the templates they need based on the types of cases they're working on. Before you can enable default email templates, you must create text, HTML, or Visualforce templates, and create an Apex class that contains template selection logic.
Default email templates make it easy for support reps to respond to customers more quickly, more accurately, and with greater consistency. The email templates are preloaded, so support reps don't need to browse for the templates they need before writing an email. You can create as many templates as needed and assign them based on your company's needs. For example, if your support center handles issues related to multiple products, you can create a specific template for each product and preload the appropriate template based on a case's origin, subject, or other criteria.
- From Setup, enter Support Settings in the Quick Find box, then select Support Settings.
- Click Edit.
- Select Enable default email templates.
- Choose the Apex class that contains your template selection logic.
- Click Save.
Create Approval Processes for Email Drafts
Approval processes determine how your organization handles draft email messages—specifying, for example, which messages require approval and whether approvers are automatically assigned. Create customized approval processes based on your company's needs.
-
Enable draft emails.
Though you can create approval processes for email messages without this step, those processes aren’t triggered until your organization has email drafts available.You can’t use email draft approval processes in Experience Cloud sites.
-
Create a send action.
Send actions ensure that email messages are sent after they’ve been approved.
-
Create approval processes.
Be sure to choose Email Message from the Manage Approval Processes For: dropdown list.
- To give certain users, such as senior support reps, the ability to choose whether to submit an email message for approval or simply send the message, assign them to a profile that has the Bypass Email Approval permission selected.
If you use Apex to create customized approval processes for email message drafts, the from address in the message defaults to the organization-wide address instead of the user’s email address. To set an Email-to-Case routing address as the from address, define an organization-wide address that matches the Email-to-Case routing address.
Create Send Actions for Email Approval Processes
Use send actions to save your support reps time by ensuring that email messages are sent automatically at the end of an approval process. Send actions are available only in organizations that have email drafts enabled.
- From Setup, enter Send Actions in the Quick Find box, then select Send Actions.
- Click New Send Action.
- Select Email Message from the object dropdown list.
- Enter a unique name for the action.
- Optionally, enter a description for the action.
- Click Save.
After you create a send action, create an approval process that includes it.
Highlight Externally Visible Feed Items in Case Feed
You can mark feed items in the case feed that are visible to external users. That way support reps can easily distinguish between feed items that are visible to your customers and ones that are visible only to internal users, like support reps.
By default, the case feed doesn’t distinguish feed items according to who can see them.
To mark this distinction, enable both the Highlight Externally Visible Feed Items and Enable Experience Case Feed settings. After the settings are enabled, the following types of posts are marked as publicly visible in the case feed:
- Public emails sent to or received from the email address for a case contact
- Public case comments
- All social posts, such as Facebook posts
- Questions escalated from Experience Cloud sites
- Tasks that have the All with Access or Public settings
- Events that have the All with Access or Public settings
- Chatter posts that have the All with Access or Public settings
- Logged Calls
If you only enable Highlight Externally Visible Feed Items, then only email feed items that are sent to, or received from, the email address for a case contact are marked.
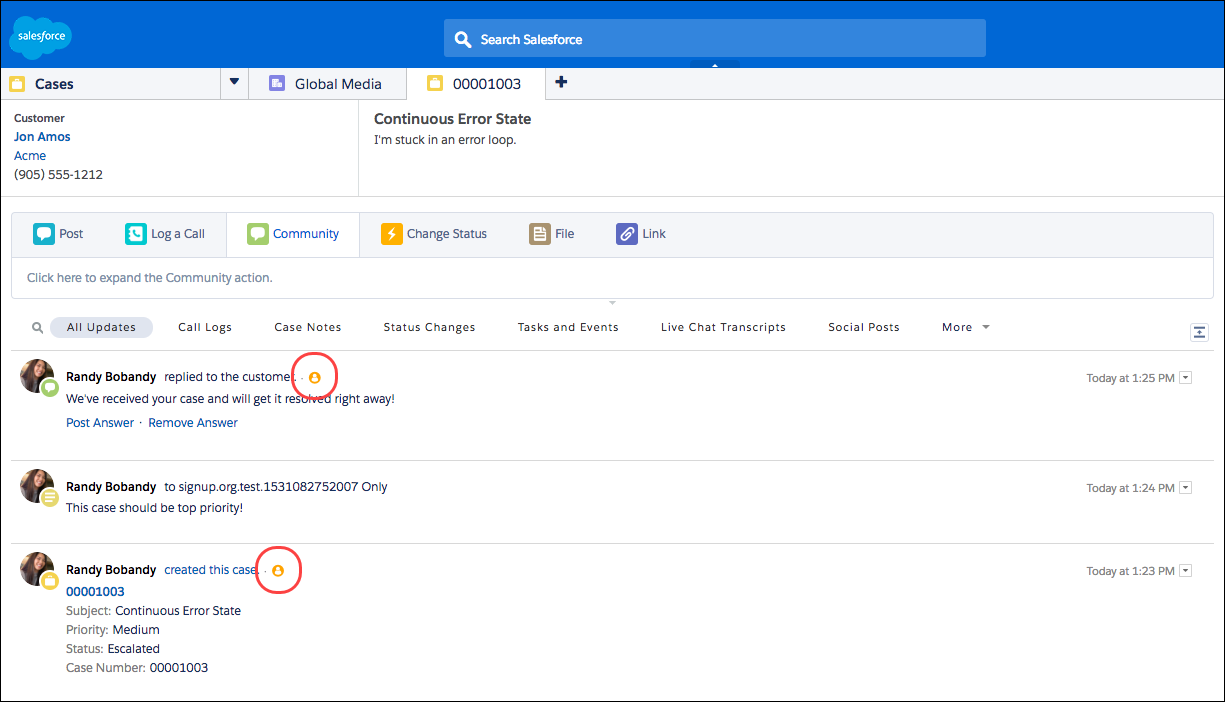
To mark your case feed items, complete the following steps.
-
Enable the Highlight Externally Visible Feed Items setting.
- From your object management settings for cases, go to Page Layouts.
- Select the feed-based page layout that you want to edit, and click Edit.
- Scroll to the Feed View settings and select Highlight Externally Visible Feed Items.
-
Enable the Enable Experience Case Feed setting.
- From Setup, enter Support Settings in the Quick Find box and click Service | Support Settings.
- Select Enable Experience Case Feed.
Enable Portal Reply Email Notifications in Case Feed
If your org uses a portal or Experience Cloud site, support reps can use the action in Case Feed to respond to customers. Enabling reply email notifications gives support reps access to the Send Email option.
- From Setup, enter Support Settings in the Quick Find box, then select Support Settings.
- Click Edit.
- Select Enable Case Comment Notification to Contacts.
- Select a template for email notifications.
- Click Save.
Emails sent to external users include a link to the site. If the user receiving the email is a member of multiple active Experience Cloud sites, the link goes to the oldest active site. If the user is already logged in to a site and clicks the link in the email, the link goes to that site. If the user isn't a member of any site, the link goes to the internal org. If the user is a member of a portal and a site, the link goes to the site.
