
You are here:
Send and Reply to Email in the Salesforce Classic Case Feed
Use the features of the Case Feed email action to save time when writing messages and customize the emails you send to customers.
Required Editions
| View supported editions. |
| User Permissions Needed | |
|---|---|
| To send emails: | Send Email |
The email action in Case Feed is available only if your organization uses Email-to-Case and if the Enable Case Feed Actions and Feed Items setting is enabled.
Here's how to use the email action.
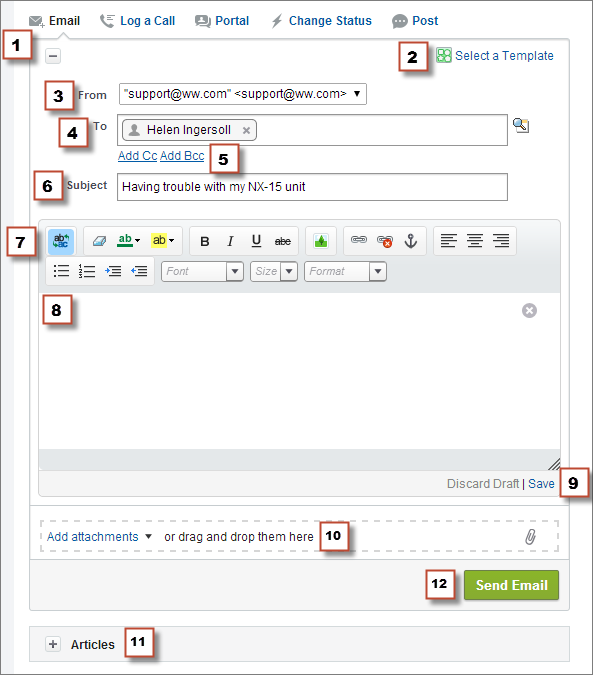
- In the feed for the case, click Email. Depending on how your administrator has set up Case Feed, some of the options described in the screenshot aren’t available to you or look different. To write a reply to a message, click Reply or Reply All below an email message in the feed.
- If your department uses email templates, choose one for your message.
-
Select a From address.
 Note If this field doesn't appear as a picklist, your administrator has already defined a From address.
 -
The email address of the contact who created the case automatically appears in the
To field, as long as the creator is an existing contact. To add
more recipients, click
 to look up
an address, or type or paste email addresses or names in the To
field.
to look up
an address, or type or paste email addresses or names in the To
field.
- When you enter an email address or name that matches one contact or user, the address appears as a button with the person's name.
- To add several addresses at once, copy and paste them separated by spaces or commas. These email addresses appear as buttons, and, if they're associated with a contact or user, show the contact's name.
- When you enter an email address that matches multiple contacts or users, the address appears as a button. Click the button to see a list of people associated with the email address. Choose the contact or user that you want to associate with the message.
- If you want to copy other people on the message, click Add Cc or Add Bcc.
- By default, the email subject is the name of the case it's related to. If you apply an email template that includes a subject, then the template subject is shown. You can edit the subject if you want to.
- Use the rich text editor to add formatting to your message.
- Create your message. If your department uses quick text messages, type ;; to insert one.
- If your administrator has enabled email drafts, you can click Save to save a copy of your message without sending it. When you save a message as a draft, any support rep with access to the case can edit it.
- Click Attach File or drag files in the attachments pane to add files to the message.
- Optionally, attach an article to the message.
- Click Send Email.
Click and drag  in the
bottom right corner to change the height of the message pane. Make it larger so you can see
more of what you're writing. Make it smaller so you can see more of the case history in the
feed without scrolling. After you resize the message pane, it appears in the new size each
time you write an email, until you resize it again.
in the
bottom right corner to change the height of the message pane. Make it larger so you can see
more of what you're writing. Make it smaller so you can see more of the case history in the
feed without scrolling. After you resize the message pane, it appears in the new size each
time you write an email, until you resize it again.
Did this article solve your issue?
Let us know so we can improve!
