
Set Up Customer-Initiated Scheduling with Email in the Legacy Agentforce Builder
Set up a Customer-Initiated Scheduling agent that connects to email.
Required Editions
| Available in: Lightning Experience |
| Available in: Enterprise, Performance, Unlimited, and Developer Editions with Field Service and Foundations, or Einstein 1 Field Service Edition or Agentforce 1 Field Service Edition. |
Now that you’ve set up Email-to-Case and reviewed the information about getting started with Autonomous Scheduling, you’re ready to create an agent that will connect to email.
Create the Agent
Agents that connect to email require a specific setup. If you have already created a Scheduling agent, we recommend creating a separate agent for this purpose.
Get started by following the steps to set up a Customer-Initiated Scheduling agent. Then follow these steps to create a flow and configure the agent that you created.
Create a Flow
Create a flow that maps the end user’s contact ID to the contactID variable.
- In Setup, find and select Flows.
- Click New Flow.
- Select Autolaunched Flow (No Trigger).
- In Flow Builder, open the Toolbox.
- Click New Resource.
-
Create these variables.
- API Name: endUserContactId
Data Type: Text
Available for input
- API Name: contactId
Data Type: Text
Available for output
- API Name: endUserContactId
-
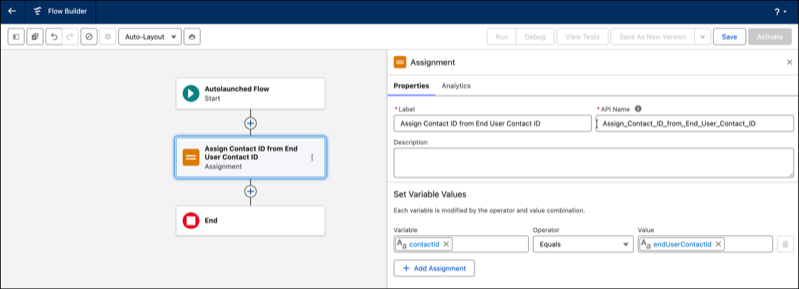
After the Start element, add an Assignment element.
- Label: Assign Contact ID from End User Contact ID
- Variable: contactId, Operator: Equals, Value: endUserContactId
- Save the flow.
- Give the flow a name, for example, enter Field Service: Map End User Contact ID to Contact ID.
- Activate the flow.
Create the Context Variable
Create a context variable to store the end user's contact ID.
- In Setup, find and select Agentforce Agents.
- Open the agent that you created.
- Click Open in Builder.
- In Agentforce Builder, click Context.
- Click New Variable.
-
Enter these details.
- Name: endUserContactId
- Data Type: Text
- Allow value to be set by API
- Allow LLM to use this value
Create an Action
Create an action that maps the contact ID variables.
- In Agentforce Builder, click Subagents and open the Appointment Management for Field Service subagent.
- Click This Subagent’s Actions.
- Click New and select Create New Action.
- For Reference Action Type, select Flow.
- Select the flow that you created. By default, the action gets the name of the flow — Field Service: Map End User Contact ID to Contact ID.
- Click Next.
- For Agent Action Description, enter: Maps the endUserContactId to the contactId variable.
- Complete the rest of the mandatory fields and click Finish.
- From the list of actions, open the action that you created.
- Click Edit Action.
-
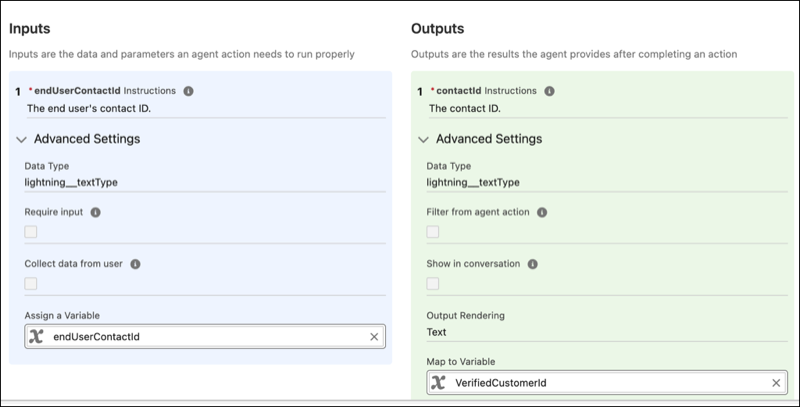
Assign these variables.
- endUserContactId input — assign the endUserContactId variable
- contactID output — assign the VerifiedCustomerID variable
- Save the action.
Update the Agent Instructions
Update the agent instructions to call the contact ID mapping action.
- In the Appointment Management for Field Service subagent, click Subagent Configuration.
-
Modify the guidelines for scheduling an appointment.
-
Search for this sentence:
Do not begin scheduling until the purpose of the service appointment is stated.
-
Add this sentence before it:
You must call the "Field Service: Map End User Contact ID to Contact ID" action.
-
Search for this sentence:
-
Modify the guidelines for rescheduling an appointment.
-
Search for this sentence:
You must call the "Update Appointment Times for Field Service" with the appointment’s ID and without arrival window start and arrival window end parameters.
-
Add this sentence before it:
You must call the "Field Service: Map End User Contact ID to Contact ID" action.
-
Search for this sentence:
-
Modify the guidelines for getting information about an appointment.
-
Search for this sentence:
This instruction governs how to retrieve, filter, format, and display appointment information to the customer using the "Get Appointment Information for Field Service" action.
-
Add this sentence at the top of the Critical Restrictions:
You must call the "Field Service: Map End User Contact ID to Contact ID" action to ground the contact ID before calling the "Get Appointment Information for Field Service" action.
-
Search for this sentence:
-
Modify the guidelines for canceling an appointment.
-
Search for this sentence:
Manages the process of canceling a customer’s service appointment.
-
Add this step after the first step:
You must call the "Field Service: Map End User Contact ID to Contact ID" action to ground the contact ID.
-
Search for this sentence:
- Activate the agent.
