
Set Up Customer Outreach with Email in the Legacy Agentforce Builder
Set up a Customer Outreach agent that connects to email.
Required Editions
| Available in: Lightning Experience |
| Available in: Enterprise, Performance, Unlimited, and Developer Editions with Field Service and Foundations, or Einstein 1 Field Service Edition or Agentforce 1 Field Service Edition. |
Create the Agent
Create a Scheduling agent for Customer Outreach.
Get started by following the steps to Create an Agentforce Service Agent and Create an Agentforce Employee Agent. Then, follow the steps listed in Customer-Initiated Scheduling for creating a flow, creating a context variable, creating an action, and updating the agent’s instructions.
Modify the Agent
By default, Customer Outreach works with Engagement Topics that are connected to messaging sessions. Email-to-Case doesn’t work with messaging sessions. Therefore, the agent that you’re setting up for connecting to email must be modified.
- In Setup, find and select Agentforce Agents.
- Open the agent that you created.
- Click Open in Builder.
- In Agentforce Builder, click Subagents.
- Open the Appointment Management for Field Service subagent.
-
Remove the action.
- Click This Subagent’s Actions.
- For the Get Engagement Topics action, click the arrow at the end of the row and select Remove From Subagent.
-
Modify the instructions.
- Click Subagent Configuration.
- Delete the DD SCENARIO GUIDELINES instruction.
- In the Mandatory Guidelines instruction, delete the first bullet that references the Get Engagement Topics action.
Set Up the Notification Flow
The notification flow is triggered when a dispatcher requests to rebook an appointment and sends the customer an SMS. Configure the flow so that it sends the customer an email instead with a predefined subject and body.
- In Setup, find and select Flows.
- Open the Field Service: Notify Customer flow.
- Click Save As New Flow and enter a label.
-
Delete unnecessary elements.
- In the Does Contact Exist? element, click the menu and select Delete Element. All of the elements under it are deleted subsequently.
- In the Get Contact element, click the menu and select Delete Element.
- Open the Toolbox.
-
Delete all of the formulas.
 Tip Start from the bottom of the list to avoid dependency errors.
 -
Create a variable.
- Click New Resource.
- For Resource Type, select Variable.
- For API Name, enter appointmentNumber.
- For Data Type, select Text.
- Click Done.
-
Create an email template for the subject of the email.
- Click New Resource.
- For Resource Type, select Text Template.
- For API Name, enter SubjectTextTemplate.
-
For Body, enter the subject of the email, for example: Your upcoming
{!workType} appointment ({!appointmentNumber}) needs to be rescheduled
 Note It’s important to include these variables in your subject. In the Case that’s created, you won’t be able to see the original email that was sent to the customer. By adding these variables to the subject, when the customer replies to the email, you’ll see the details in the subject of the email that they reply to (Re: Your upcoming {!workType} appointment ({!serviceAppointmentId}) needs to be rescheduled).
-
Create an email template for the body of the email.
- Click New Resource.
- For Resource Type, select Text Template.
- For API Name, enter BodyTextTemplate.
-
For Body, enter the body of the email, for example:
We apologize for the inconvenience, but we need to reschedule your upcoming {!workType} appointment on {!scheduledStartTime}. What date and time would be good for you?
-
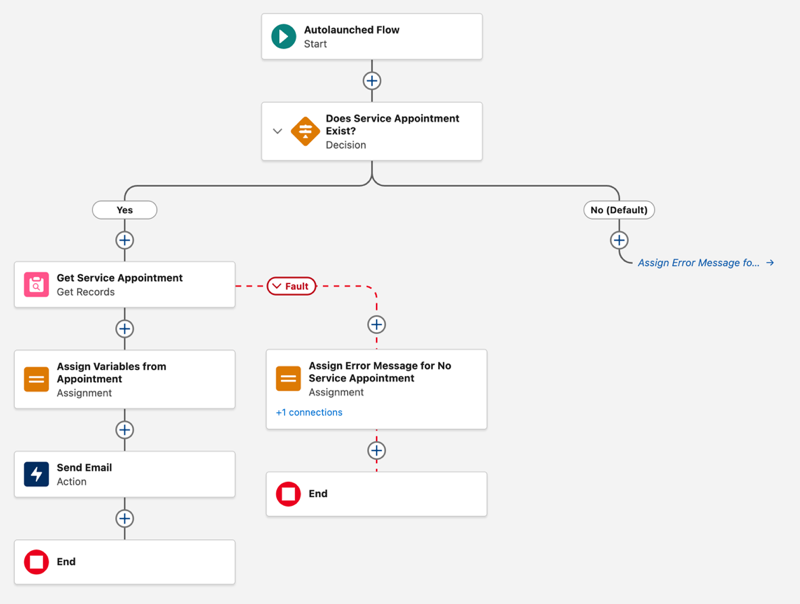
After the Get Service Appointment element, add an Assignment element with these
details.
- Label: Assign Variables from Appointment
- Variable: scheduledStartTime, Operator: Equals, Value: Service Appointment from Get Service Appointment > Scheduled Start
- Variable: workType, Operator: Equals, Value: Service Appointment from Get Service Appointment > Work Type ID > Work Type Name
- Variable: appointmentNumber, Operator: Equals, Value: Service Appointment from Get Service Appointment > Appointment Number
-
After the Assignment element, add an Action element.
- Action: Send Email
- Label: Send Email
- Recipient Addresses: Service Appointment from Get Service Appointment > Contact ID > Email
- Sender Type: OrgWideEmailAddress
- Sender Email Address: Enter the required email address
- Subject: SubjectTextTemplate
- Body: BodyTextTemplate
- Rich-Text-Formatted Body: False
-
Save the flow. Your flow should look like this.
- Activate the flow.
-
Connect the flow to your settings.
- From the App Launcher, find and select Field Service Settings.
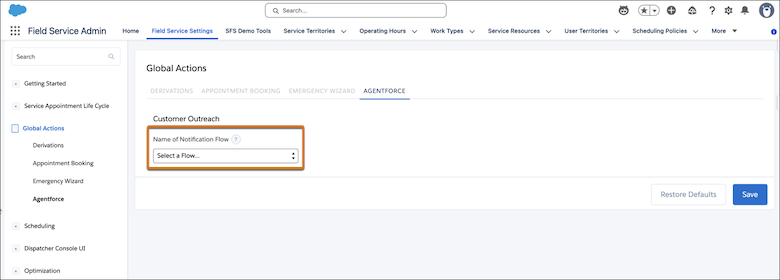
- In Global Actions, open the Agentforce tab.
-
In Name of Notification Flow, select the flow that you created.
- Save your changes.
