
Example: Create a Field Service Product Order with Agentforce
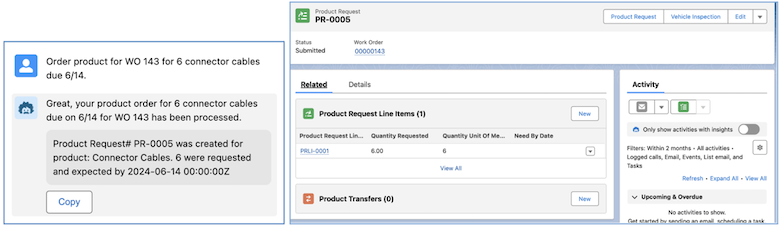
Placing a product order can be cumbersome. With Agentforce, you can create a flow that triggers an agent subagent to place the product order for you.
Required Editions
| Einstein generative AI is available in Lightning Experience. Setup for Einstein generative AI is available in Lightning Experience. |
| Available in all enhanced Messaging channels. View required editions. |
| The Field Service core features and managed package are available in Enterprise, Performance, Unlimited, and Developer Editions. |
| For purchasing options, contact your Salesforce account executive. |
| User Permissions Needed | |
|---|---|
| To build subagents and actions: | Manage Agentforce Default Agent |
Step 1: Create a Flow
Create a flow that generates a product order, which is represented in the system as a product request and a product request line item.
- From Setup, in the Quick Find box, enter Process Automation, and then select Flows.
- Click New Flow.
- Select Start From Scratch and click Next.
- Select Autolaunched Flow (No Trigger) and click Create.
-
From the Toolbox, click New Resource.
- For Resource Type, select Variable.
- For API Name, enter inputProductName.
- For Description, enter The name of the requested product.
- For Data Type, select Text.
- Select Available for Input.
-
From the Toolbox, click New Resource.
- For Resource Type, select Variable.
- For API Name, enter inputNeedDate.
- For Description, enter The date when the order must be placed.
- For Data Type, select Date.
-
From the Toolbox, click New Resource.
- For Resource Type, select Variable.
- For API Name, enter inputNeedDateText.
- For Description, enter The date entered by the user.
- For Data Type, select Text.
- Select Available for Input.
-
From the Toolbox, click New Resource.
- For Resource Type, select Variable.
- For API Name, enter inputQuantity.
- For Description, enter The requested quantity.
- For Data Type, select Number.
- For Decimal Places, enter 0.
- For Default Value, enter 1.
- Select Available for Input.
-
From the Toolbox, click New Resource.
- For Resource Type, select Variable.
- For API Name, enter inputWorkOrderNumber.
- For Description, enter The work order number that the product request is for.
- For Data Type, select Text.
- Select Available for Input.
-
From the Toolbox, click New Resource.
- For Resource Type, select Variable.
- For API Name, enter outputInfo.
- For Description, enter Additional information.
- For Data Type, select Text.
- Select Available for Output.
-
This step isn’t required, but it’s a recommended practice to ensure that the flow can
handle imperfect input and provide clear error messages. From the Toolbox, click
New Resource.
- For Resource Type, select Formula.
- For API Name, enter formulaValidateDate.
- For Description, enter Validates the date.
- For Data Type, select Boolean.
-
For Formula, enter:
REGEX({!inputNeedDateText}, '((?:19|20)\\d\\d)-(0?[1-9]|1[012])-([12][0-9]|3[01]|0?[1-9])') - To validate the formula, click Check Syntax.
-
This step isn’t required, but it’s a recommended practice to ensure that the flow can
handle imperfect input and provide clear error messages. From the Toolbox, click
New Resource.
- For Resource Type, select Formula.
- For API Name, enter formulaBadDateOutput.
- For Description, enter Error message that the user sees if the date isn’t valid.
- For Data Type, select Text.
-
For Formula, enter:
{!inputNeedDateText} + ' has the wrong format. Enter the date as YYYY-MM-DD and try again.' - To validate the formula, click Check Syntax.
-
This step isn’t required, but it’s a recommended practice to ensure that the flow can
handle imperfect input and provide clear error messages. From the Toolbox, click
New Resource.
- For Resource Type, select Formula.
- For API Name, enter formulaConvertDate.
- For Description, enter Converts the date entered by the user to the format used in the system.
- For Data Type, select Date.
-
For Formula, enter:
DATEVALUE({!inputNeedDateText}) - To validate the formula, click Check Syntax.
-
In a sequential flow line without branching, add elements to the flow. Add a Get Records
element.
- For Label, enter Get Product.
- For Description, enter Retrieves the product item by name passed to the flow.
- For Data Source, select Salesforce Object
- For Object, select Product.
-
Fill in the condition requirements.
Field: NameOperator: EqualsValue: {!inputProductName}
-
Add a Get Records element.
- For Label, enter Get Service Resource.
- For Description, enter Retrieves the ID of the mobile worker that’s running the flow.
- For Data Source, select Salesforce Object
- For Object, select Service Resource.
-
Fill in the condition requirements.
Field: RelatedRecordIdOperator: EqualsValue: {!$User.Id}
-
Add a Get Records element.
- For Label, enter Get Work Order.
- For Description, enter Retrieves a work order by the number passed to the flow.
- For Data Source, select Salesforce Object
- For Object, select Work Order.
-
Fill in the condition requirements.
Field: Work Order NumberOperator: ContainsValue: {!inputWorkOrderNumber}
-
To create a product request based on the flow inputs, add a Create Records elements to the
flow.
- For Label, enter Create Product Request.
- For How to Set Record Field Values, select Manually.
- For Object, select Product Request.
-
Add these fields and field values.
Description: Requested by TechnicianNeedByDate: inputNeedDateShipmentType: Pick UpStatus: SubmittedWorkOrderId: {!Get_Work_Order.Id}
-
To create the required product request line items based on the flow inputs, add a Create
Records elements to the flow.
- For Label, enter Create PRLI.
- For How to Set Record Field Values, select Manually.
- For Object, select Product Request Line Item.
-
Add these fields and field values.
ParentId: {!Create_Product_Request}Product2Id: {!Get_product.Id}QuantityRequested: inputQuantityQuantityUnitOfMeasure: EachWorkOrderId: {!Get_Work_Order.Id}
-
To retrieve the created product request to pass as output of the flow in the Return the
Info assignment, add a Get Records elements to the flow.
- For Label, enter Get New Product Request.
- For Data Source, select Salesforce Object
- For Object, select Product Request.
-
Fill in the condition requirements.
Field: Id (Product Request ID)Operator: EqualsValue: {!Create_Product_Request}
-
To retrieve the created product request line items to pass as output of the flow in the
Return the Info assignment, add a Get Records elements to the flow.
- For Label, enter Get New PRLI.
- For Data Source, select Salesforce Object
- For Object, select Product Request Line Item.
-
Fill in the condition requirements.
Field: Id (Product Request Line Item ID)Operator: EqualsValue: {!Create_PRLI}
-
From the Toolbox, click New Resource.
- For Resource Type, select Formula.
- For API Name, enter formulaOutput.
- For Data Type, select Text.
-
For Formula, enter:
'Product Request# ' + {!Get_New_Product_Request.ProductRequestNumber} + ' was created for product: ' + {!Get_Product.Name} + '. ' + text({!Get_New_PRLI.QuantityRequested}) + ' were requested and expected by ' + text({!Get_New_Product_Request.NeedByDate}) - To validate the formula, click Check Syntax.
-
Add an Assignment element to the flow.
- For Label, enter Return the Info.
-
Enter these conditions.
Field: outputInfoOperator: EqualsValue: formulaOutput
-
To ensure that the input text date is a valid date, add a Decision element at the top of
the flow.
- For Label, enter Is the date format valid?
- The top outcome is what happens if the date is valid. For Label, enter Yes.
-
Enter these conditions.
Resource: formulaValidDateOperator: EqualsValue: True
- For Default Outcome, change the label to No.
-
In the Yes branch, add an Assignment element.
- For Label, enter Valid Date.
-
Enter these conditions.
Variable: inputNeedDateOperator: EqualsValue: formulaConvertDate
-
In the No branch, add an Assignment element. If the date isn’t valid, the flow returns an
error message.
- For Label, enter Invalid Date.
-
Enter these conditions.
Variable: outputInfoOperator: EqualsValue: formulaBadDateOutput
- Click the Assignment element and select Connect to element.
- Select the End element.
-
Save the flow.
- For Label, enter Create Product Request.
- For Description, enter Flow that generates a Product Request and a Product Request Line Item based on the needed date, product name, quantity, and work order number.
- Click Activate.
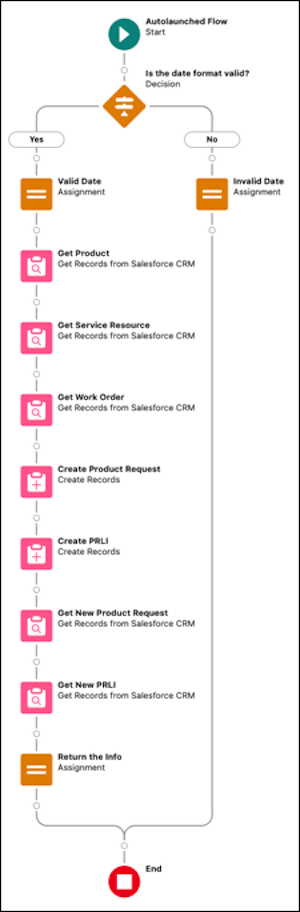
If you’ve used the suggested labels, the flow looks like this.
Step 2: Create an Agent Action
Set up an agent action that triggers the Create Product Request flow that you created.
- From Setup, in the Quick Find box, enter Agent Studio, and then select Agent Actions.
- Click New Agent Action.
- For Reference Action Type, select Flow.
- For Reference Action, select Create Product Request.
- For Agent Action Label, enter Order Product.
- For API Name, enter OrderProduct.
- Click Next.
-
For Agent Action Instructions, enter:
This action is triggered by phrases like “order product” or “order product request” or “product request”. The user will be providing the work order number, the product description, the quantity required, and the needed date. Note Instructions help your agent understand when to use a given action. The more specific the instructions are, the better the action performs and the more reliable results you receive.
 -
The action pulls the inputs from the flow that you specified. All you have to do is add
the details.
-
For inputNeedDateText, select Collect data from user and enter
these instructions.
This is the date that the product is needed by. Its format is YYYY-MM-DD. If only the month name is provided, convert this to the last day of that month. If no date is provided by the user, use the current date plus 7 days. Convert Monday, Tuesday, Wednesday, Thursday, Friday, Saturday, or Sunday into actual dates, with YYYY-MM-DD as the format. -
For inputProductName, select Collect data from user and
Require Input. Then, enter these instructions.
This is the product name. It might be referred to as the product, the part, the item. It might be several words, for example, Small Battery. -
For inputQuantity, select Collect data from user and enter these
instructions.
This is the quantity required. It’s an integer. If no value is provided, then use 1 for the value. -
For inputWorkOrderNumber, select Collect data from user and
Require Input. Then, enter these instructions.
This is the work order number. It might be referred to as
         the WO or the WO num or the WO number. It will be in the form of an integer and it may have
         leading zeroes. Important: Prepend the number with the necessary zeros to achieve the
         length of 8 digits.
-
For inputNeedDateText, select Collect data from user and enter
these instructions.
-
Add the output details.
-
For outputInfo, select Show in Conversation and enter these
instructions.
This is a text field returned from the flow. It’s a simple
         text string. Use a casual tone in the response. If the word error is present, then display
         this field in bold. Otherwise precede the text with a thumbs up emoji. If a date is
         present, present it in MM DD format.
-
For outputInfo, select Show in Conversation and enter these
instructions.
- Click Finish.
Step 3: Create a Subagent
- From Setup, in the Quick Find box, enter Agent Studio, and then select Agents.
- Click the name of your agent.
- Click Open in Builder.
- Click the arrow and select New Subagent.
- Fill in the information for the subagent and click Next.
- Select the Agent Action that you created and click Finish.
Step 4: Verify on Desktop
- From the App Launcher, find and select Field Service.
- Click the Agentforce icon in the top right corner.
-
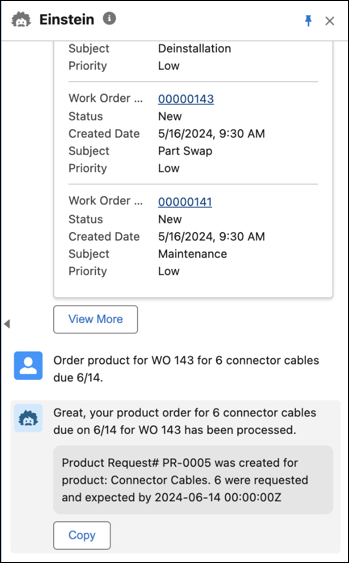
Ask Agentforce to order a product for you. Make sure you provide the number of the
work order, the product order, and the due date.
The response indicates that the action was executed and the product request was created for you.
-
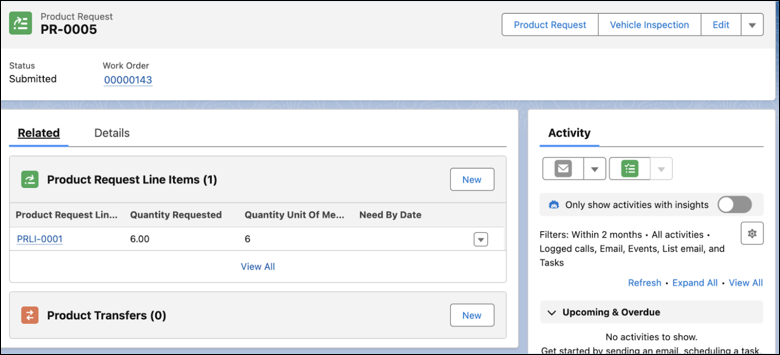
Search for the product request number to verify that everything went smoothly in the
system.
- Test out the errors by entering an invalid date such as 2025-dfgs-24 and see whether the flow generates an error message.
Step 5: Verify on the Field Service Mobile App
- Make sure that you’re defined as a mobile worker in the Salesforce org and have access to the Field Service mobile app. See Give Users Access to the Field Service Mobile App.
- Open the Field Service mobile app.
- Tap Actions.
-
Ask Agentforce to order a product for you. Make sure you provide the number of the
work order, the product order, and the due date.
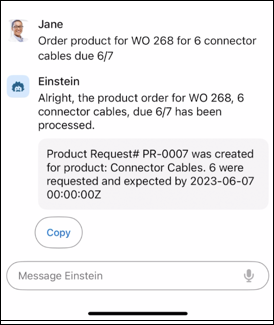
Agentforce creates the product request for you with the required details.
Did this article solve your issue?
Let us know so we can improve!
