
Actions in the Scheduling Console
Learn about the actions available in the Scheduling Console to manage service appointments, service resources, and resource absences.
Required Editions
| Available in: Lightning Experience |
| The Field Service core features, managed package, and mobile app are available in Enterprise, Unlimited, and Developer Editions. |
 This is a Field Service managed package feature.
In the Scheduling Console, all actions are accessible from the Gantt, the service appointment list, and the map.
Actions are available from the action bars and popovers, and can be applied to service appointments, service resources, and resource absences.
The Show on Gantt action is the only exception, as it's accessible only from the service appointment list and the map.
These actions are supported in the Scheduling Console.
- Actions applied to service appointments:
- Schedule / Reschedule (single and multiple appointments)
- Unschedule
- Change Status
- Pin / Unpin
- Show on Gantt
- Show on Map
- Rebook with Agentforce
- Actions applied to service resources:
- View Route
- Resource Schedule Optimization
- Actions applied to service territories:
- In-Day Optimization
- Global Optimization
- Actions applied to resource absences (permission-based):
- Edit
- Delete

Drag and Drop
The Drag and Drop action is available both from the Gantt and the service appointment list, giving dispatchers an intuitive way to schedule or reschedule service appointments with immediate UI feedback for a fast experience.
To streamline scheduling, you can use dual monitors. Keep the Gantt open on one monitor and the service appointment list on the other. Then, drag service appointments from the list onto the Gantt across monitors. To set up dual monitors, duplicate your current console tab. Expand the Gantt to display on one monitor and then expand the service appointment list on the other.
Within the Gantt only, you can also drag and drop resource absences.
The Drag and Drop action is also available from the map. You can drag unscheduled service appointments directly from the map onto the Gantt to schedule them visually. To do this, open the map in the Scheduling Console to view the map side by side with the Gantt, or use dual monitors. Keep the Gantt open on one monitor and then open the map in a separate tab on another monitor.
Find Candidates
The Find Candidates action offers enhanced clarity for evaluating usability and scheduling. Instead of numeric grades, users are shown intuitive labels and AI-generated summaries that clearly explain the reasoning behind the scheduling recommendations. The experience is clean and friendly, the UI provides clear explanations, and dispatchers gain increased confidence in their scheduling decisions.
Travel details are visible to users, who can view the travel time added to a service resource's daily schedule. They also have the option to sort the list of candidates based on travel time.
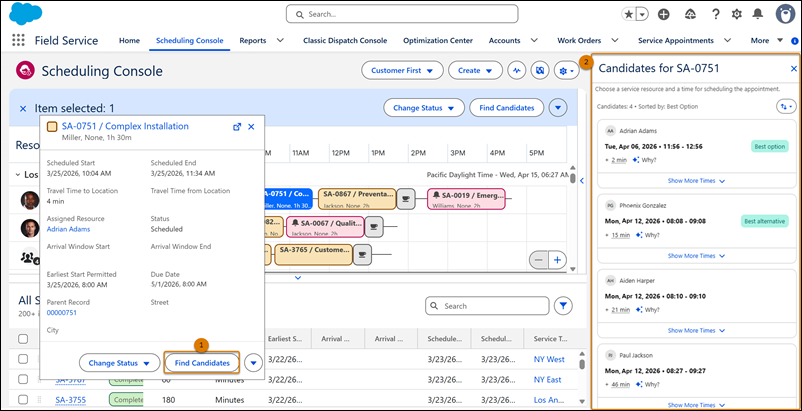
- To view candidates, click the Find Candidates action (1).
- Review the list of candidates and time slots (2).
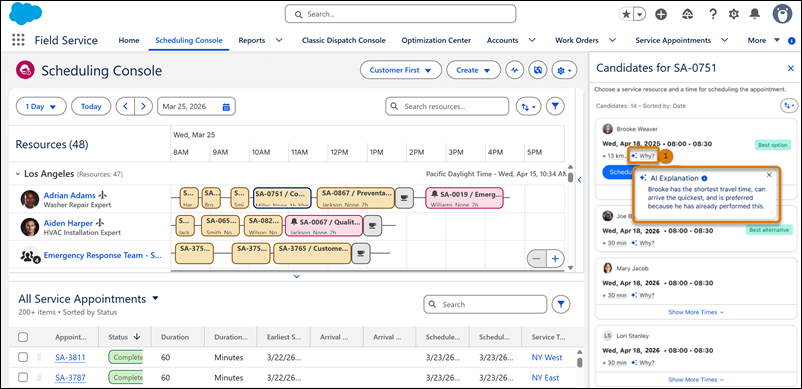
Clicking Why? in the candidates side panel (1) shows an AI-generated rationale behind each recommended slot, giving dispatchers full transparency into why a specific time is suggested. This clarity allows users to understand why one option is superior or inferior to others.

Schedule and Reschedule Multiple Service Appointments
Schedule or reschedule multiple service appointments at once to handle schedule changes and operational disruptions more efficiently.
You can select appointments from the Gantt, the service appointment list, or the map.
Select Service Appointments From the Gantt
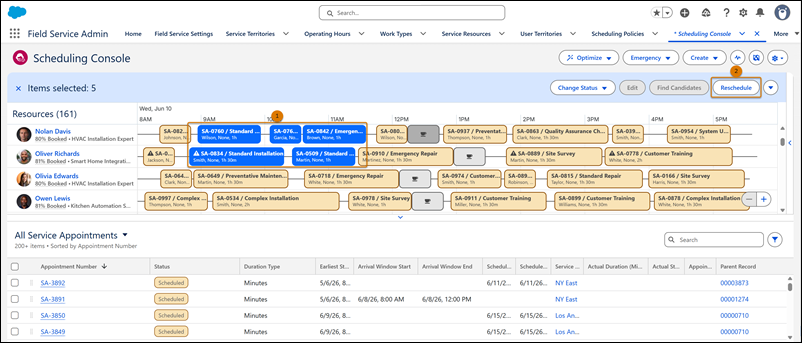
- Use Cmd or Ctrl to select appointments (1).
- Click Reschedule in the action bar (2).
Select Service Appointments From the Service Appointment List
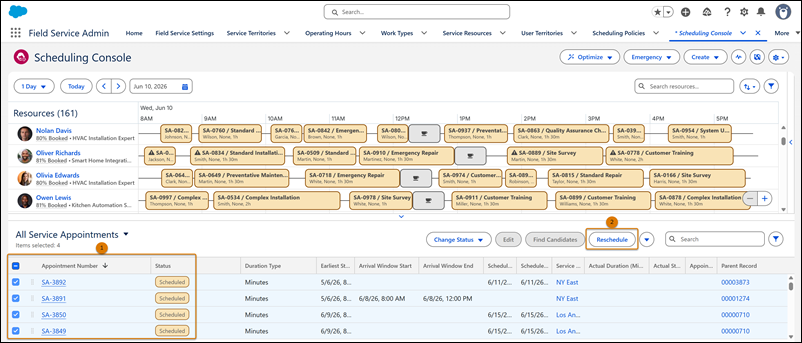
Select service appointments to schedule or reschedule (1). When your selection includes only scheduled appointments, the Reschedule button (2) appears in the action bar. When your selection includes only unscheduled appointments, or both scheduled and unscheduled appointments, the Schedule button appears instead.
Select Service Appointments From the Map
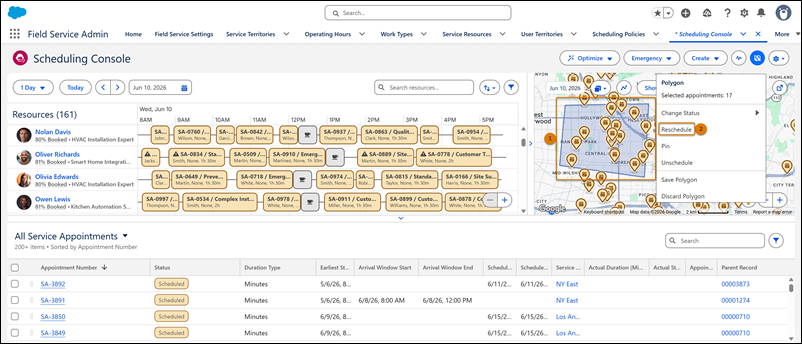
- Draw a polygon to select appointments (1).
- Click Schedule or Reschedule from the action menu that appears (2). When your polygon includes only scheduled appointments, the Reschedule button appears in the menu. When it includes only unscheduled appointments, or both scheduled and unscheduled appointments, the Schedule button appears instead.
Scheduling and rescheduling run in the background, so you can continue working in the Scheduling Console while your request is processed.
Use the Activity Tracker to monitor the status of your request in real time. See Activity Tracker in the Scheduling Console.
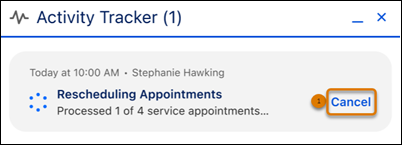
To stop a scheduling or rescheduling process before it finishes, click Cancel (1). When you cancel a process, it stops future appointments from being processed. Appointments already scheduled or rescheduled before cancellation aren't changed.
When the process completes and changes are applied to the schedule, use the Activity Tracker to review the results.
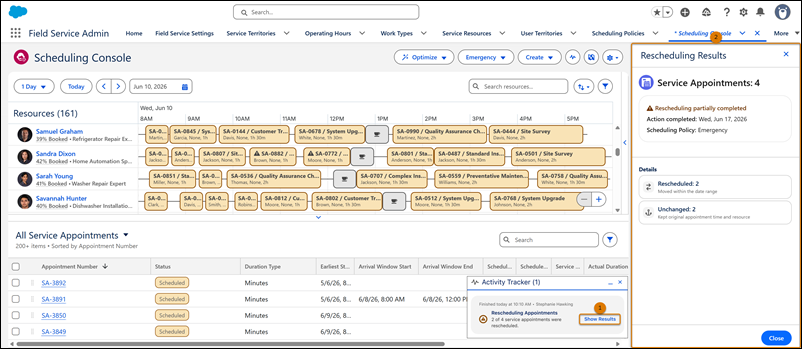
Click Show Results (1) in the Activity Tracker to open the results panel (2). The panel shows the total number of service appointments processed, the scheduling or rescheduling status, the action completion date, and the scheduling policy used.
The Details section in the panel shows a breakdown of service appointment updates.
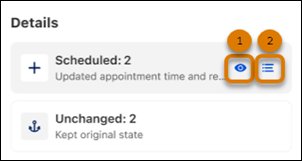
- Scheduled or Rescheduled:
- Scheduled: Appointments assigned a new time and service resource. Click Highlight on Gantt (1) to highlight them on the Gantt, or click Show List (2) to open a temporary list of the scheduled appointments.
- Rescheduled: Appointments assigned a new time, a new service resource, or both. Click Highlight on Gantt or Show List to review them.
- Unchanged: Appointments that kept their original state after scheduling, or kept their original time and service resource after rescheduling. Click Highlight on Gantt or Show List to review them.
All temporary lists show the current state of the appointments.
