
Customize the Scheduling Console
Adjust the layout, features, and policies of the Scheduling Console to give dispatchers the tools they need to work efficiently.
Required Editions
| Available in: Lightning Experience |
| The Field Service core features, managed package, and mobile app are available in Enterprise, Unlimited, and Developer Editions. |
 This is a Field Service managed package feature.

The Scheduling Console Settings page is where you manage and customize how the Scheduling Console works for your team. These settings can be adjusted at any time.
Access the Scheduling Console Settings page from Setup. Enter Scheduling Console Settings in the Quick Find box, then select Scheduling Console Settings.
You can also access the page from the Scheduling Console page in Salesforce Go. Go to the Migrate to the Scheduling Console section and click Set It Up next to Customize the Scheduling Console.
The page includes settings in the following areas: Visibility, Actions, Layout, and Scheduling Behavior.
Visibility
| Setting | Description |
|---|---|
| Show Secondary Territory Members on Gantt | Show service resources assigned to multiple territories on the Gantt under their secondary territory membership. When turned off, only primary territory members are shown. For considerations about showing secondary territory members, see Filter the Field Service Gantt by Service Territory. |
| Mark as Offline | Set the number of minutes that a service resource can be inactive before they're marked as offline. If the Online Offset field on the Service Resource object has a value, it overrides this setting. |
| First Day of Week | Select the first day of the week that shows on the Gantt. |
Actions
Add custom actions that launch a Lightning Web Component or flow, call an Apex class, or open a Visualforce page. Actions can appear on records or specific console sections, like the Gantt.
To create a custom action, click Manage to open the Create Custom Actions dialog.
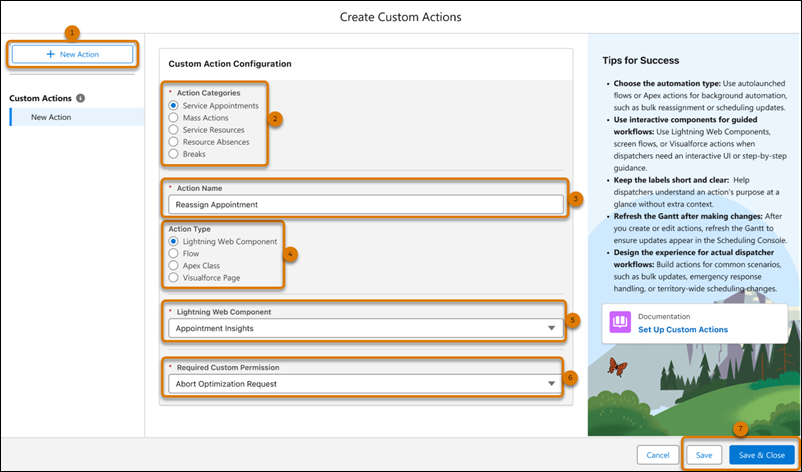
- Click + New Action (1).
- Select an Action Categories option: Service Appointments, Mass Actions, Service Resources, Resource Absences, or Breaks (2).
- Enter a name in the Action Name field (3).
- Under Action Type, select how the action is triggered: Lightning Web Component, Flow, Apex Class, or Visualforce Page (4).
- Select the component, flow, Apex class, or page in the corresponding field (5).
- Select a Required Custom Permission to control which users can see the action (6).
- Save your changes (7).
After saving, you can select a custom action from the side panel to edit or delete it.
Layout
| Setting | Description |
|---|---|
| Service Appointment Lifecycle | Allow tracking of service appointment scheduling history on appointment records and in the service appointment side panel. See Monitor Scheduling History with Service Appointment Lifecycle. |
| Service Appointment Side Panel | Select a Lightning page that includes the appointment details dispatchers see in the service appointment side panel. The panel shows additional information from the service appointment record. Click Open in App Builder to customize the page in Lightning App Builder. See Customize the Service Appointment Side Panel in Set Up the Scheduling Console. |
Scheduling Behavior
| Setting | Description |
|---|---|
| Scheduling Policy | Select the default scheduling policy for the console and auto-scheduling. |
| Gantt Snap Time Interval | Set the snap time interval, in minutes, for service appointments and resource absences that are dragged or adjusted on the Gantt. |
