
Map Views and Routes in the Scheduling Console
The map in the Scheduling Console gives dispatchers a clear geographical view of service resources and service appointments, with routes displayed directly.
Required Editions
| Available in: Lightning Experience |
| The Field Service core features, managed package, and mobile app are available in Enterprise, Unlimited, and Developer Editions. |
 This is a Field Service managed package feature.
The map data is fully synchronized with the Gantt, the service appointment list, or both, through the map layers.
The map shows data for a single day. If the Gantt view spans multiple days, the map shows data corresponding to the first day of the Gantt's date range. The service resource route is also visible on the map. Dispatchers have the flexibility to view the map alongside the Gantt and the service appointment list view, or to open it separately in a new tab.
To maintain visual clarity, the map groups nearby service appointments into clusters when dispatchers zoom out to view larger geographic areas.
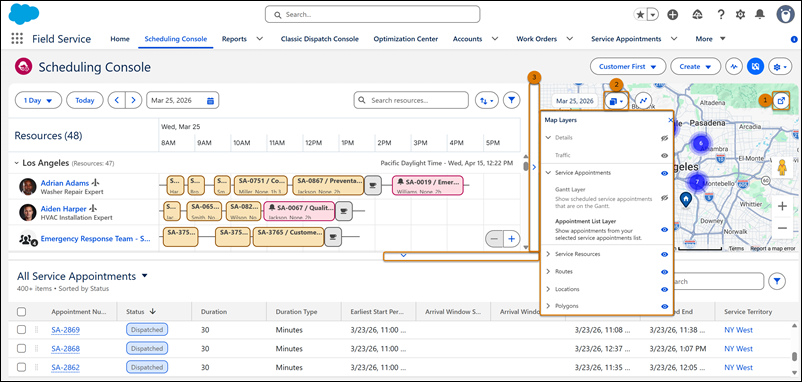
- Open the map in a new tab (1). When opened in a separate tab, the map remains fully synchronized with the data shown on the Gantt and the service appointment list.
- Show map layers (2). These map layers are available:
- Details > Traffic: This layer is turned off by default.
- Service Appointments: Controls which appointments are shown on the map; those from the Gantt (first day of the Gantt’s date range), those in the service appointment list view, or from both.
- Service Resources: Shows service resource markers on the map.
- Routes: Shows both actual and planned routes. For crew service resources, the route display depends on whether a crew leader or a crew member is selected.
- Locations: Shows the home base (Service Territory Member) and service territories.
- Polygons
- Resize the map from the side and bottom (3).
Viewing a Service Resource's Route
When a service resource is selected, you can display its route directly on the map and compare the planned route with the actual route to verify schedule adherence and identify deviations.
- Planned route: Shows the optimized sequence of stops as determined by the scheduling and optimization engine.
- Actual route: Shows the resource's real-world movements, tracked from location history.
The planned route is always visible when a resource is selected. To show or hide the actual route, toggle the Actual Route layer under Routes in the map layers panel.
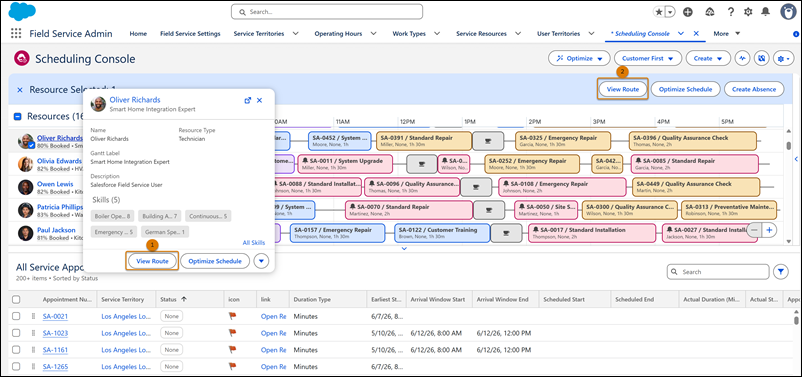
To view a resource's route from the Gantt, in the service resource list, hover over the resource and click View Route in the resource popover (1), or select the resource and click View Route in the action bar (2). The map centers on the resource's route.
Viewing Route Details
You can explore route information directly from the map.
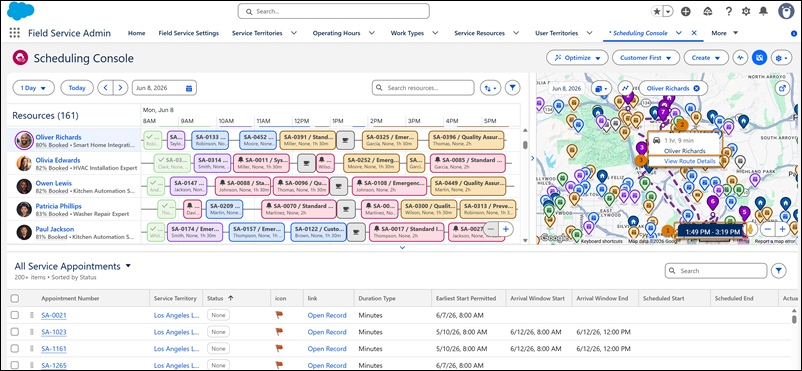
- Hover over individual route stops to see the appointment's scheduled start and end times (1).
- Hover over a route on the map to see a tooltip showing the route's total travel time and a link to view additional route information (2).
- Click View Route Details to open a panel with more information about the route (3).
Routes for Crew Resources
When a service resource of type Crew is shown on the map, the route display reflects the structure of the crew.
- Crew Leader selected: The map shows the combined planned route and the combined actual route for the entire crew. The actual route is displayed based on the active layer selection.
- Crew member selected: The map shows these two routes.
- The crew's combined planned route, derived from the crew leader's movements.
- The crew member's own actual location tracking, shown for comparison when the member's actual movements deviate from the crew's actual route. The actual route is displayed based on the active layer selection.
The planned route for a crew member is always taken from the crew. The actual route is taken from the individual crew member.
Home base markers also reflect crew membership. The crew's home base has a dedicated marker based on its Service Territory Membership. For crew members, the home base marker includes an additional indicator showing that the service resource belongs to a crew.
Viewing Multiple Routes
You can view and compare the routes of up to 50 service resources simultaneously on the map. Viewing routes side by side helps you fix route conflicts before they happen, ensure resources follow their daily plan, and identify opportunities to improve efficiency, such as reassigning service appointments between nearby resources.
When routes are displayed, each resource's route is shown in a distinct color. The map automatically adjusts the view to fit all selected routes.
View Routes from the Map
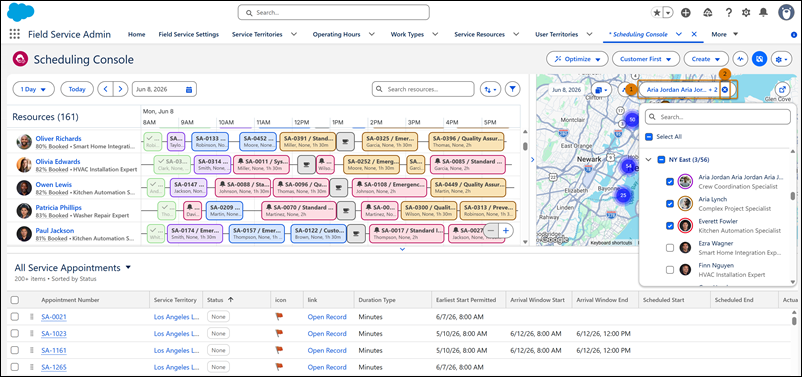
From the map, click Show Routes (1) to open a dropdown with a list of service resources and service territories (2). Search for or select specific resources or territories, or select Select all to show routes for all resources. When a service territory is selected, the routes of all resources in that territory are shown.
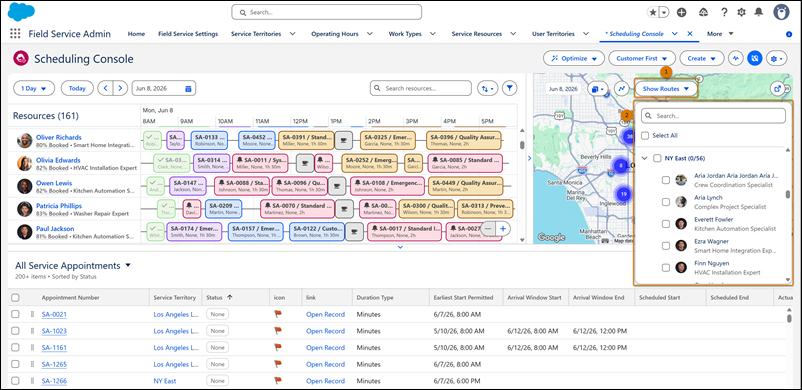
When you select resources from the dropdown, the Show Routes button changes to display the first resource's name along with the number of selected resources (1). To remove all routes from the map, click the clear routes icon (2).
View Routes from the Gantt
In the service resource list, select the relevant service resources (1), and then click View Route in the action bar (2). The selected resources' routes appear on the map (3). The Show Routes button also changes and the clear routes icon appears, the same as when selecting from the map (4).
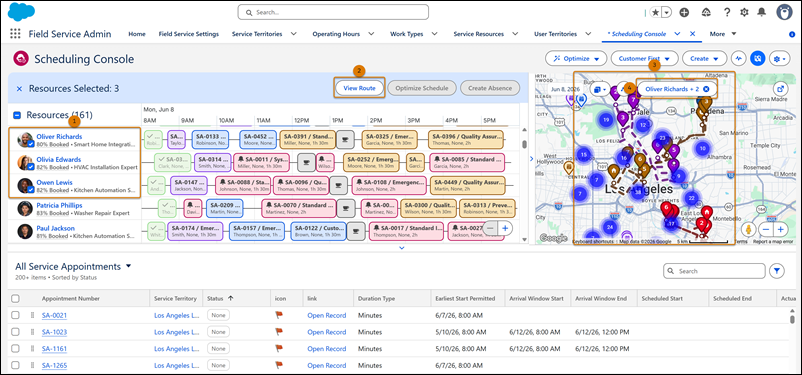
To view details for a route, hover over it to see the route’s total travel time, then click View Route Details to open a panel with more information.
Map Polygons
To improve dispatching efficiency, you can draw custom polygons directly on the map to select all service appointments within a specific geographic area and perform actions on them. Polygons can be saved and reused across sessions.

Draw a Polygon
Draw a polygon on the map to define the area you want to work with.
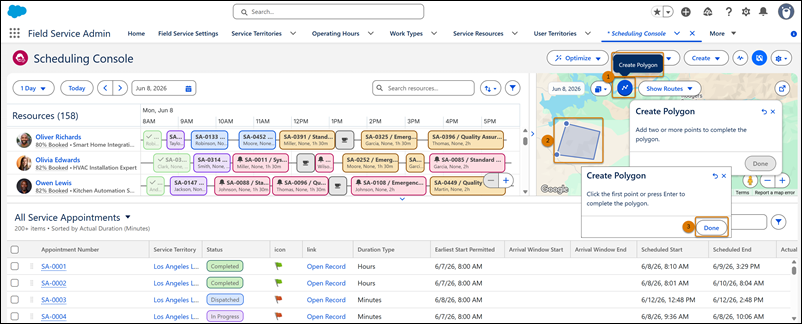
- From the map, click Create Polygon (1). The map switches to drawing mode and a popover appears to guide you.
- Draw the polygon by clicking on the map (2).
- Click anywhere on the map to place the first point of the polygon.
- Continue clicking to add points. After placing the first point, add two or more additional points to complete the polygon.
- When you have at least three points, click the first point or press Enter to close the shape.
- Click Done (3). An action menu appears showing the number of selected service appointments, the available actions, and the save and discard options. You can perform actions on the selected appointments without saving, or continue to the next step to save or discard the polygon.
- Click Save Polygon to save the polygon for future use. Enter a name and, optionally, associate it with a service territory. Or click Discard Polygon to remove the polygon without saving.
Perform Actions
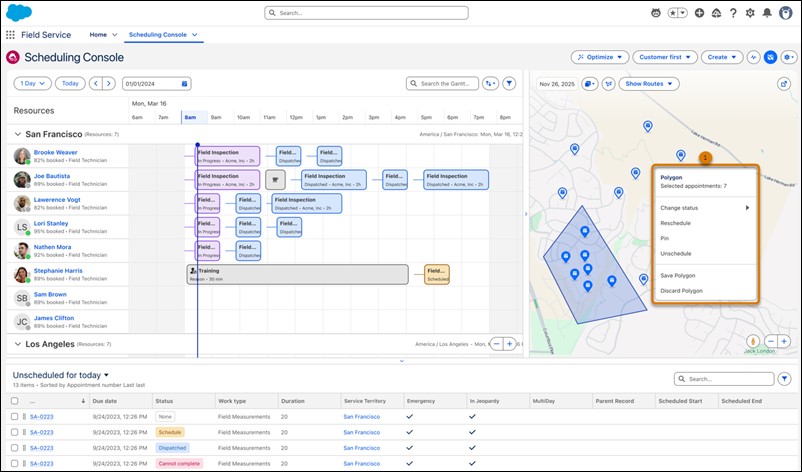
From the polygon action menu (1), you can perform actions on the selected appointments, such as Schedule / Reschedule, Change Status, and Unschedule.
Manage Saved Polygons
Saved polygons appear on the map and can be shown or hidden from the map layers panel. To manage a polygon, click it on the map to open the action menu.
- Edit Polygon: Modify the polygon shape, name, or associated service territory. If you navigate away with unsaved changes, you're prompted to save or discard them.
- Delete Polygon: Remove the polygon from the map permanently.
