You are here:
Create Custom Assignment Rules for IT Services
Create the assignment rules for incidents, problems, change requests, releases, and service requests. Configure the criteria for assigning the record and make the assignment rule the default rule for the object type for efficient IT service delivery.
Required Editions
| Available in: Lightning Experience |
| Available in: Enterprise, Performance, and Unlimited Editions with Agentforce IT Service. |
Create the queues to assign the record before creating assignment rules. You can either create queues manually or set up omnichannel routing to create associated queues to further route records to support reps.
- Create the Assignment Rule.
- From the Salesforce Go page, go to the Features tab, search for and select Assignment Rules for IT Service.
- In the Configure Assignment Rules Using Expression Sets section, click Go to Business Rule Engine.
- On the IT Services Assignment page, select New.
- Enter a name for the assignment rule and review the autopopulated API name.
-
From the Applies to list, select the correct context definition.
For IT Services, select from:
- IncidentCtxtDef
- ProblemCtxtDef
- ReleaseCtxtDef
- ChangeRequestCtxtDef
- ServiceRequestCtxtDef
To use custom fields from incident, problem, release, change request, or service request records in assignment rules, clone the corresponding context definition and add the custom fields as nodes. Then select the cloned context definition when you create the assignment rule so that the custom fields are available as variables in the Expression Set Builder. See Clone a Context Definition.
- Save the rule.
- Configure the logic for the assignment rule.
- Open the assignment rule from the IT services console app.
- Select the version of the assignment rule you want to modify.
- Define the criteria for the assignment rule.
- Use elements such as Assignment Criteria, Assign to Queue, and Assign to User to create your rule logic.
- Save the assignment rule.
- Select Simulate to test the output of the assignment rule.
- Go to Assignment Rule Properties from the sidebar.
- Enter the rank for the assignment rule.
- Activate the assignment rule.
- Save the changes.
- Set a default assignment rule.


-
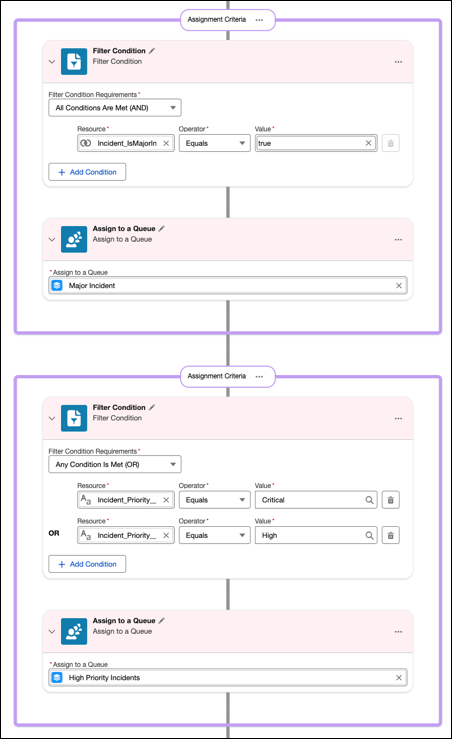
In the Expression Set builder, add an Assignment Criteria element.
-
Use the List Filter to define these assignment conditions:
- From the Filter Condition Requirements dropdown, select All Conditions are Met (AND).
- Select the resource type as Incident_IsMajorIncident__std.
- Select the operator as Equals.
- Select the value as True.
-
Click Add Element and then click Assign to a Queue.
-
Select the Major Incident queue.
-
Similarly, add these assignment criteria elements below the first one in the specified order:
Assignment Criteria 1 Filter Condition Requirements: Any Condition Is Met (OR)
Condition 1:
- Resource: Incident_Priority__std
- Operator: Equals
- Value: High
Condition 2:
- Resource: Incident_Priority__std
- Operator: Equals
- Value: Critical
Assign to a Queue: High Priority Incident Assignment Criteria 2 Filter Condition Requirements: All Conditions Are Met (AND)
Condition:
- Resource: Incident_IncidentNumber__std
- Operator: Is Not Null
Assign to a Queue: Incident
The assignment rule runs when a new incident is created and evaluates the conditions from top to bottom. In case multiple conditions are true, the first condition is executed.