
You are here:
Migrate Multiple Article Types
You planned your migration. You went over the pre-migration checklist, and you made all the prerequisite revisions to your Classic knowledge base. You’re aware of the limitations. You’re ready to go. Here’s your step-by-step guide to using the Lightning Knowledge Migration Tool with multiple article type orgs.
Required Editions
| Available in Lightning Experience. View supported editions. |
| User Permissions Needed | |
|---|---|
| To use the Lightning Knowledge Migration Tool: | Customize Application AND Knowledge User |


- Switch to Lightning Experience.
- From Setup, in the Quick Find box, enter migration, and then select Lightning Knowledge Migration Tool.
- To start the migration, follow the on-screen prompts.
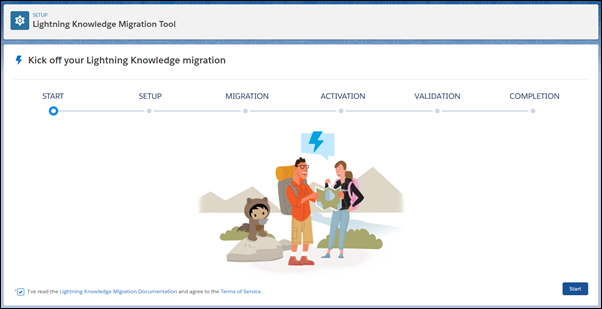 Note If you receive an error message after beginning the migration, follow the instructions in the message. Then restart the migration.
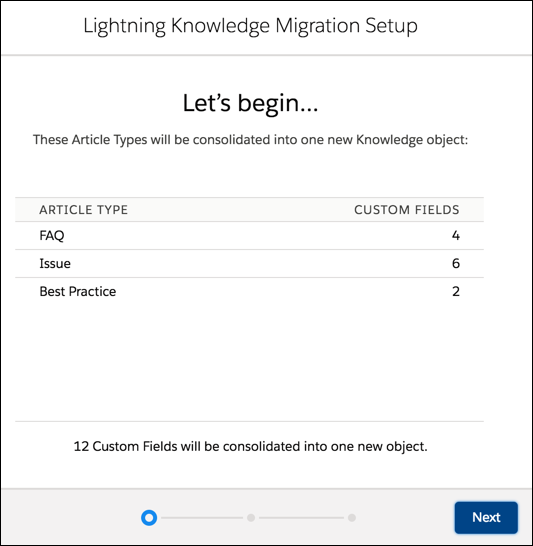
 - Start migration setup. Review the article types and custom fields that are part of the
migration.
- Map the article fields. Mapping is one of the most important steps in the migration. Tab
through each article type, and make your new field selections.
 Important The migration tool creates a placeholder field called “Article Type_Field Name”, where _Field Name matches the custom field name.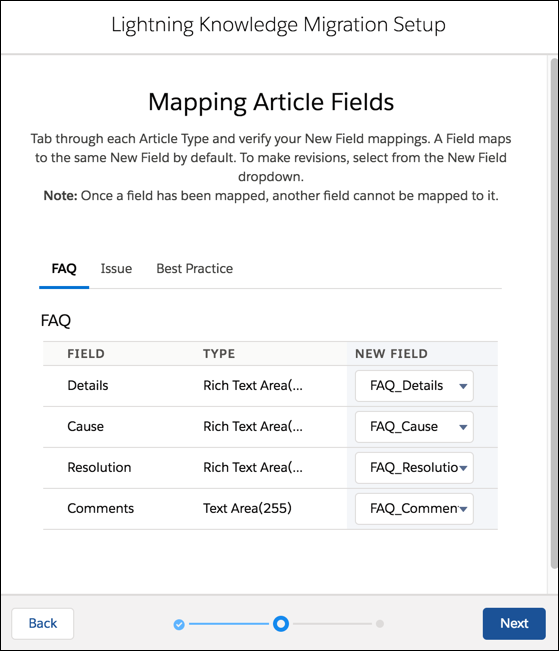
- To choose alternative field mappings, click a dropdown under New Field.
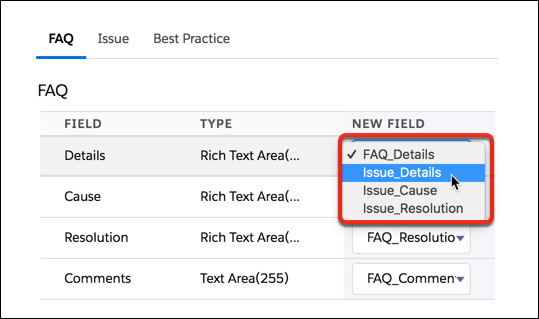
 Tip If you have fields of the same type that are common across article types, you can consolidate them in the new object. For example, if multiple article types have a field called Question, you can map all the article types to use the Question field from one article type to reduce duplication.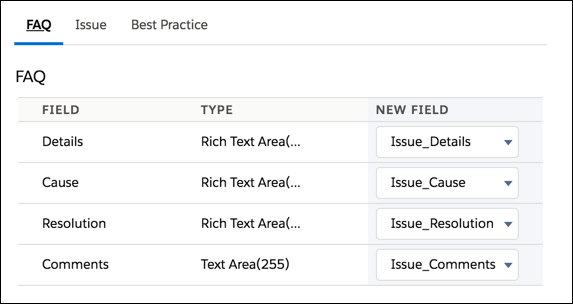
- After you map the article fields, tab through each Article Type again. Review your field mappings on each tab, and then go to the next screen.
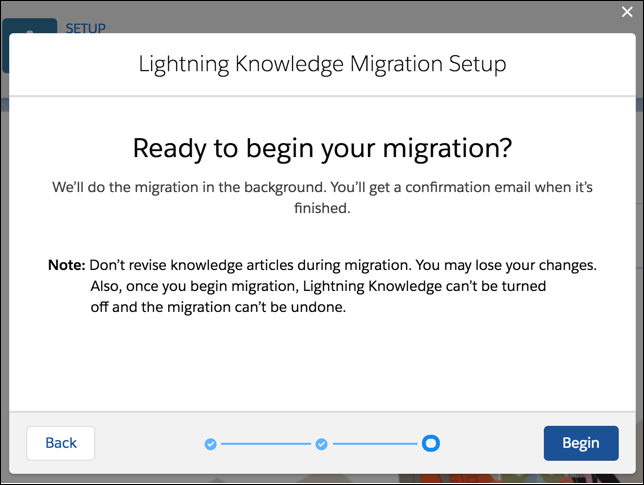
- Begin data migration. Follow the on-screen instructions. A confirmation email is sent to
you when it’s complete. Tip All users with administrative permissions and the Modify All Data permission receive the confirmation and notification emails.Warning If you create an article, update an existing article, or change any related data during data migration, these changes aren’t migrated.
- If your migration includes files, you see a screen during migration to set the default visibility. To provide your Experience Cloud users, such as customers, partners, and guest users, access to files, select All users. File visibility is always restricted to users who can access the record where it is attached. You can change the visibility for individual files after migration.
- To view the migration progress, refresh this page as needed. It can take a few minutes
to load the data.
When the migration is finished, the Data Migration Summary page appears under Activation.
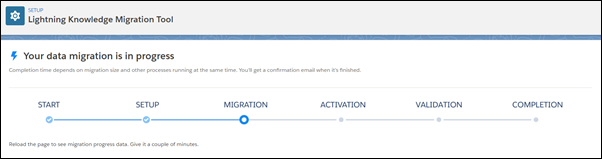 Note Completion time depends on the size of the knowledge base you’re migrating and how many other processes are running at the same time. Feeds and smart links migrate during the Activation step. If at least one existing article type has Feed Tracking enabled, Feed Tracking is turned on automatically for the new Knowledge object.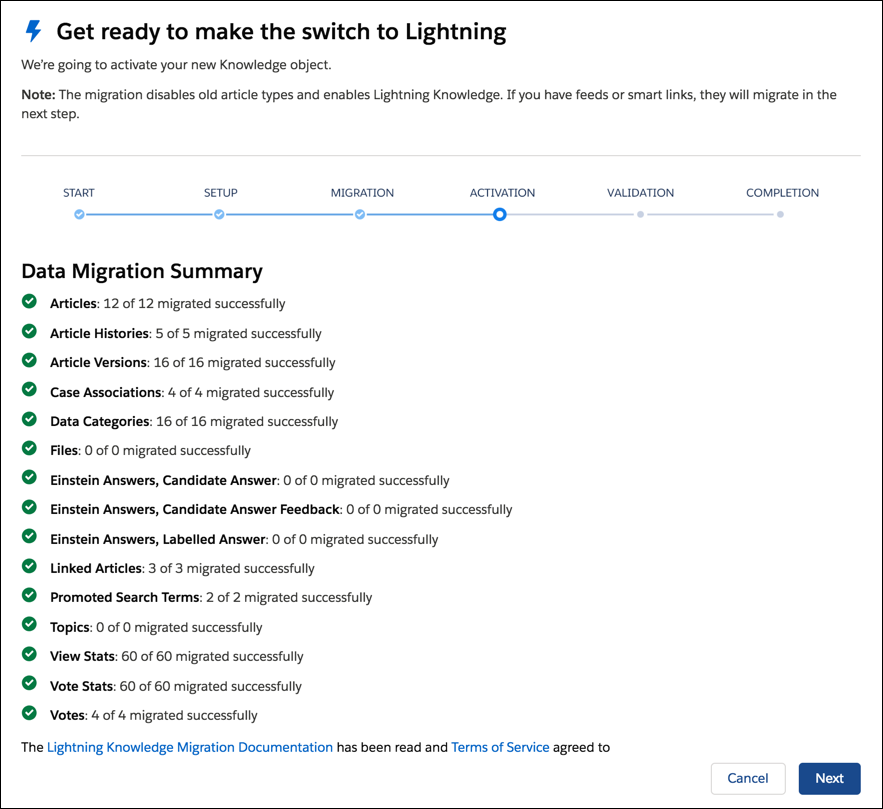
- You can cancel or continue the migration at this point. At this stage, no manual changes are required, but you want to verify the migration by validating the old and new Knowledge article IDs before you continue.
- To finish the activation phase, click Next. In this step, feeds
and smart links migrate, the new Knowledge object is activated, and existing article types
are deactivated. Important At this point in the migration, make sure that your internal and external users have only read access to articles so that they can't edit articles. In this step, your org switches to using Lightning Knowledge articles. To grant read access to Lightning articles, set up permissions for the new Knowledge object.Note The feed component and feed posts don't appear immediately after migration. After you activate the new Knowledge object, the article’s feed component disappears temporarily while the feed posts migrate. Then the feed component reappears.
- Under Validation, review the Data Migration Summary. In the example, green check marks
next to each item indicate 100% migration. Yellow warning flags (not present in this
migration example) appear beside data that didn’t migrate. Note During migration, a results file called LightningKnowledgeMigrationResultTimestamp.txt is generated in the standard Files object. The admin who started the migration owns this file. If all articles and article versions migrate successfully, the file shows a success message. If files or articles fail to migrate, they are reported in the results file. Related data, such as data categories or feeds, isn’t reported in this file. Assess whether unmigrated data is blocking your migration.
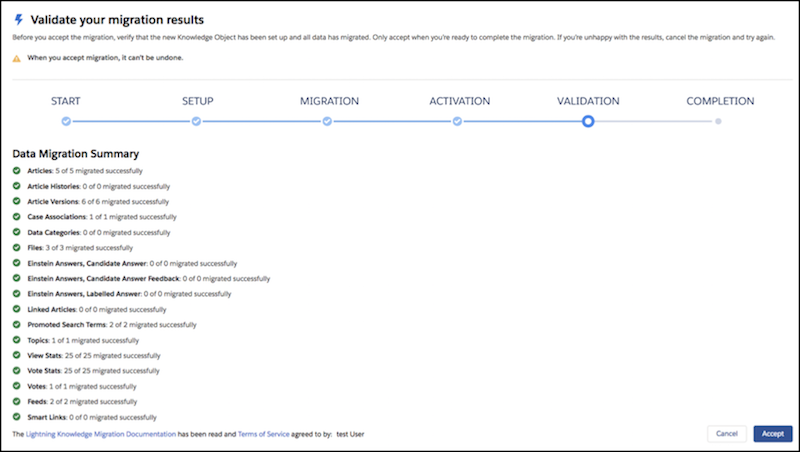
- Validate the results of the Data Migration Summary before you press Cancel or Accept. We
strongly recommend that you validate the article migration before accepting the results.
Warning
- Do not update the Knowledge object or the existing article types in the Object Manager before accepting or canceling the migration. If you do, the cancel or accept process stops working.
- Continue working through the validation steps so that you can cancel or accept the migration as soon as possible. An incomplete migration can mean extra downtime for your users.
To validate the migrated components, review the following.
- Metadata setup—In Setup, go to the Object Manager tab, and scroll down the
list to locate Knowledge, which indicates that the migration was successful.
- In the Object Manager navigation bar, select Fields & Relationships. To verify that fields migrated successfully, review the field labels.
- Verify the migration of the other Knowledge object details by reviewing Page Layouts, Record Types, and other Setup pages.
- Data—A tab named Knowledge is created for the new Knowledge object. On this
tab, view and validate the migrated articles.Tip We recommend using a selection of pre-existing articles to validate the before-and-after contents.
- Customizations—Verify that the following entities are updated.
- No Apex code is referencing the old article types to be deleted. If they are referenced, manually remove the Apex code.
- Experience Cloud or Salesforce Sites don’t reference the old article types to be deleted.
- Data flows are not referencing old article types to be deleted.
- Processes, flows, workflows, or approval processes don’t reference the old data model.
- In Case Settings, verify that the default article type selected under Allow user to create an article from a case is None.
- In Answer Settings, verify that the default article type selected under Allow users to create an article from a reply is None.
- In the Developer Console, search for references to Article Type objects with the
__kav suffix.
- Click the gear icon in the upper-right, and select Developer Console.
- Click Edit, and then click Search in Files.
- In the Search field, enter __kav , and click the magnifying glass icon. This returns all instances of Apex code in your org that contain a reference to an Article Type object (*__kav).
- Update code during the validation period after the Migration Tool is run, but before the changes are accepted. If not, your existing code doesn’t function properly.
- Verify that all old article types have a deployment status of In Development.
- Verify that the Knowledge_kav object has a deployment status of Deployed.
- If the migration tool created the Knowledge__kav object to migrate multiple article types, your new code must reference that object. Also, the code must filter SOQL queries by the appropriate record type ID where necessary. Remember that SOQL queries must filter by record type IDs instead of record type. Record type IDs can be different between sandbox and production, so include code that looks up the ID of the record type by object. Ideally, put this code in a reusable utility class.
- Verify the migrated articles by comparing the old and new articles in the browser. Use Workbench to query for the new and old IDs.
- After you validate the results in the Data Migration Summary and find them satisfactory,
you can either cancel the migration or accept it and continue.
- Cancel the migration. To undo the migration, you can cancel it while you investigate
any data that did not migrate. Canceling the migration restores the Classic knowledge
base with article types and file fields and removes the new Knowledge object created
during the migration.
To cancel the migration, return to the Lightning Knowledge Migration Tool and click Cancel.
When restoration is complete, try the migration again. The time it takes to cancel the migration depends on the size of your knowledge base and how many other processes are running. It can take several days or longer.
When you cancel, make sure no components reference the new Knowledge object Knowledge__kav. Review the validation checklist in step 14 for which components could be referencing the object. If canceling doesn’t delete the Knowledge__kav object, you receive an email with instructions on how to manually delete the object. When the new object is successfully deleted, the cancellation process automatically resumes.
- Accept the migration. You performed the validation steps and are satisfied with the
migration results. Accepting the migration enables your new Lightning Knowledge org.
It deletes the old article types and Classic versions of the articles, including
versions that weren’t migrated. After you accept the migration, you can’t undo
it.
If migration validation is successful, return to the Lightning Knowledge Migration Tool, and click Accept.
Tip After you accept the migration, the Lightning Knowledge Migration Tool no longer appears in Setup. - Cancel the migration. To undo the migration, you can cancel it while you investigate
any data that did not migrate. Canceling the migration restores the Classic knowledge
base with article types and file fields and removes the new Knowledge object created
during the migration.
- Proceed to the Lightning Knowledge Post-Migration Checklist.
- Verify Migrated Articles in Multiple Article Type Orgs
During Lightning Migration for Multiple Article Type orgs, each knowledge article is given a new ID when it becomes part of the standard Knowledge object. Use the old and new IDs to look at articles and verify that their contents and metadata have migrated properly. We recommend that Multiple Article Type orgs verify articles during the Lightning Knowledge Migration Tool’s Activation and Validation stages.
