
You are here:
Personalize the URL of an Auto-Response Component
To personalize the URL being sent by an auto-response messaging component, use a placeholder. Personalizing the URL creates a dynamic experience for the end user. For example, use a placeholder to reference a language code in the URL, which presents the URL to the end user in their preferred language.
Required Editions
| View supported editions. | |
 This article applies to:
|
Enhanced Web Chat v1, Enhanced Web Chat v2, and Bring Your Own Channel |
 This article doesn’t apply to:
|
Enhanced In-App Chat, Enhanced WhatsApp, Standard and Enhanced Facebook Messenger, Standard and Enhanced SMS, Enhanced Apple Messages for Business, and Enhanced LINE channels |
| User Permissions Needed | |
|---|---|
| To create messaging components: | Customize Application AND View Setup and Configuration OR System Administrator |
| To set up and edit Messaging channels: | Configure Messaging |
| To view channels: | View Setup and Configuration |
Understand Placeholders
There are two types of placeholders that you can use to personalize an auto-response URL.
- Core Parameters, also known as Web Page Parameters - These parameters typically represent messaging session-related values. They’re configured in Salesforce in the Messaging Component builder under Web Page Parameters.
- Client Page Parameters, frequently known as API parameters - These parameters typically represent page-specific or end user context, such as language or location. They’re configured on the customer’s website using JavaScript and the Auto-Response API.
Use Placeholders to Personalize a URL in an Auto-Response
- Choose a name for your parameters. In this example, we call them Language and MessagingSessionName.
-
Add each parameter name as a placeholder in your URL.
-
A placeholder is a set of double curly braces that surround a parameter. If the
parameter is called language, its placeholder would be formatted as
{{Language}}. If the parameter is referencing a Messaging Session Name field, its placeholder would be{{MessagingSessionName}}. -
In this example, our URL looks like
https://www.example.com/{{Language}}?MessagingSessionName={{MessagingSessionName}}.
-
A placeholder is a set of double curly braces that surround a parameter. If the
parameter is called language, its placeholder would be formatted as
-
Add the URL to an auto-response component in the Messaging Component Builder.
- From the Messaging Components page in Setup, click the name of the auto-response messaging component to open the Builder.
- Select + Add Format.
- Select Web Page and click Done.
- Select Web Page under Component Formats.
- In the Message Configuration section, add the text portion of your message. In this example, we select Literal as the Type, and enter Please take our survey! in the Text field.
-
In the URL Configuration section, add the version of the URL that you configured in step
2. In this example, we select Literal as the Type and enter
https://www.example.com/{{Language}}?MessagingSessionName={{MessagingSessionName}}in the Text field.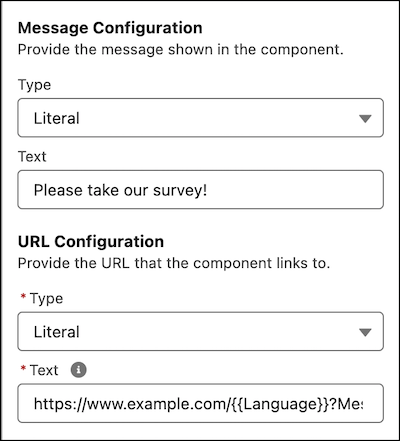
- In the Display Method field, select Pop-Up Message.
- If you intend to use Auto-Responses API to populate the URL placeholders, set that up and skip the remaining steps.
-
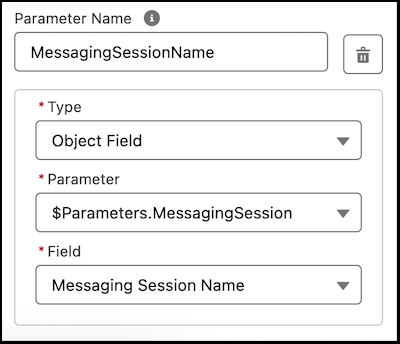
Under Web Page Parameters, click Add Parameter. Fill in the details
of your parameters.
-
We’ll format the {{MessagingSessionName}} placeholder in the URL configuration as a core
parameter. We’ll name it MessagingSessionName and then configure a corresponding Web Page
Parameter by setting the Type to Object Field and then setting the Parameter to
$Parameters.MessagingSession (which tells the component what object to reference), and
select Messaging Session Name (which tells the component what field
on the object to reference).
Did this article solve your issue?
Let us know so we can improve!