
You are here:
Create and Send Auto-Response Components in Messaging Sessions
Create a text or link response that’s sent automatically when a customer initiates a messaging session, a service rep joins, a customer stops responding, or a session ends. Auto-response messaging components are supported only in Enhanced Chat and Bring Your Own Channel.
Required Editions
| View supported editions. | |
 This article applies to:
|
Enhanced In-App Chat, Enhanced Web Chat v1, Enhanced Web Chat v2, Enhanced WhatsApp, Enhanced Facebook Messenger, Enhanced SMS, Enhanced Apple Messages for Business, Enhanced LINE, and Bring Your Own Channel |
 This article doesn’t apply to:
|
Standard Facebook Messenger and Standard SMS channels |
| User Permissions Needed | |
|---|---|
| To create messaging components: | Customize Application AND View Setup and Configuration OR System Administrator |
| To set up and edit Messaging channels: | Configure Messaging |
| To view channels: | View Setup and Configuration |
With auto-response messaging components, you can automate common actions. For example:
- At the start of each messaging session, send a welcome message with a link to your Terms and Conditions web page.
- At the end of each messaging session, send a link to a page showing your current promotions.
- At the end of each messaging session, send a link to a customer satisfaction survey.
- When a customer remains inactive for a certain number of minutes, send them a reminder to engage or a warning that their session may time out due to inactivity. Follow that up with a second message, in your preferred time frame, letting them know that the service rep is moving on to another customer. Automatic inactivation doesn’t work if Status-Based Capacity is enabled.
To use auto-response components, create the component in Setup. Then, add the component to an Enhanced Chat channel or Bring Your Own Channel and specify when it’s sent.
- From Setup, enter Messaging Components in the Quick Find box, and then select Messaging Components.
- Click New Component, and then click Next.
- Select Auto-Response, and then click Next.
-
Enter the auto-response. For example: Thanks for letting us help you
today!
If you plan to include a link, enter the introductory text only. You can add the link in a minute. For example: Sign up for our newsletter.
-
Enter a name and description for your component, and click
Done.
The Messaging Component Builder opens.
-
On the Component Details page, further customize your auto-response.
- If your auto-response is text-only, you’re all set. Skip to step 8.
-
To add a link to your auto-response, click Add Format and select
Web Page.
 Note Each messaging component is available in one or more formats, such as Web Page, and some formats work only in certain channels. For a list of formats that each channel supports, see Messaging Component Types and Formats. It’s a good idea to add at least one supported format for each channel where the component will be sent. If no formats are added, the component uses the default text format.
 - Click Web Page in the left-hand menu and customize its properties in the Component Properties pane.
- Under Message Configuration, select Constant for Type and $Constants.Title for Constant. This adds the auto-response text that you provided earlier.
-
Under URL Configuration, select Literal and enter the link
URL.
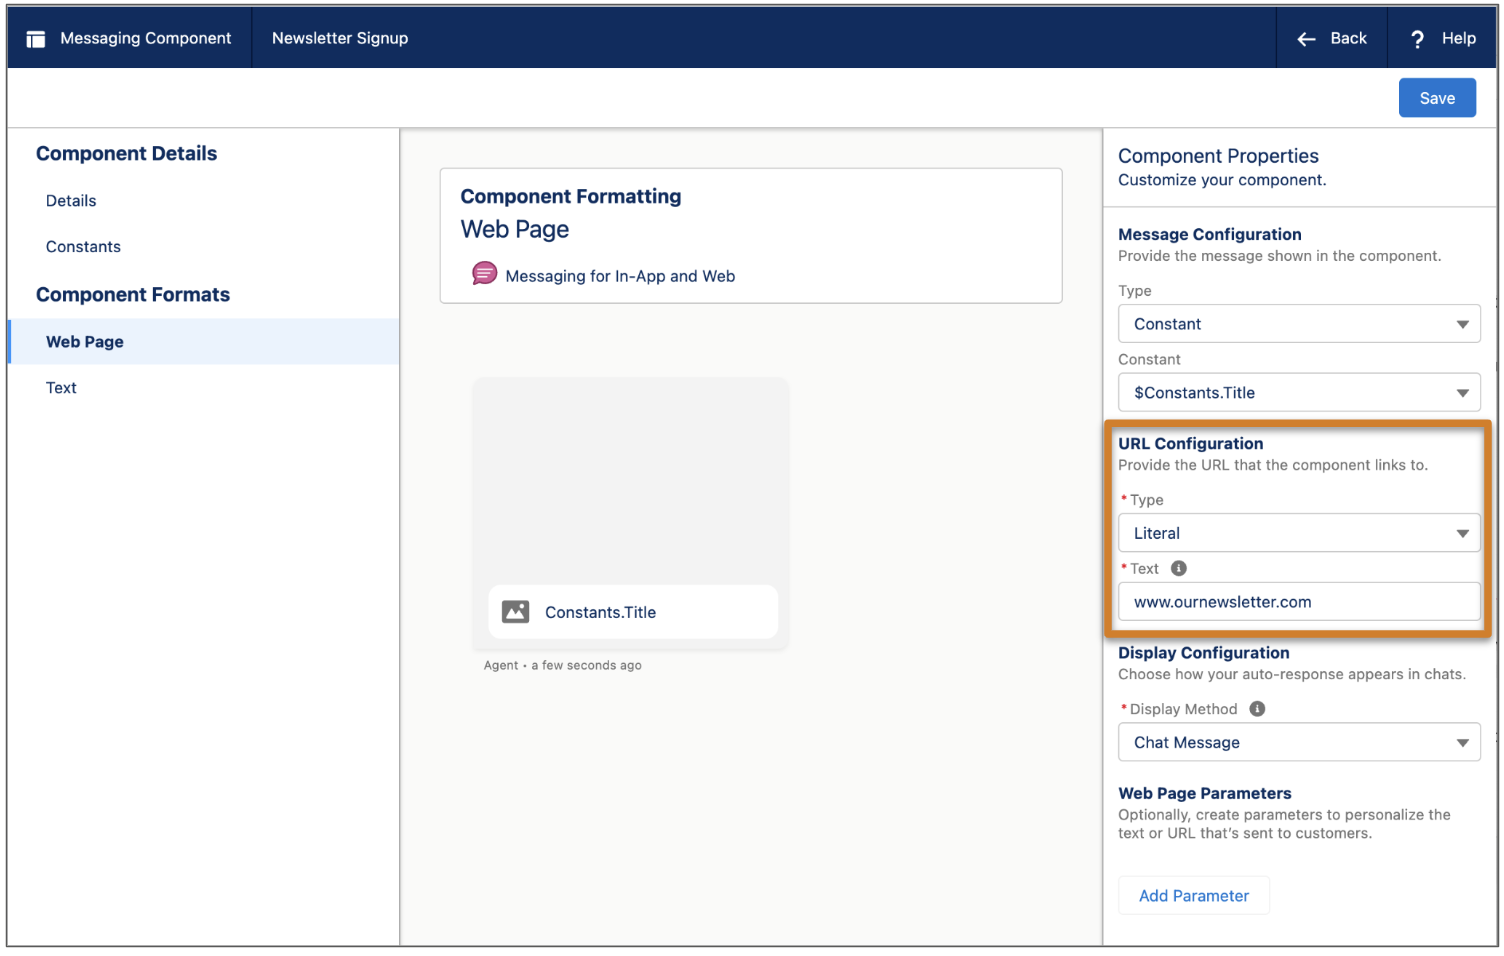
- Under Display Configuration, select Chat Message or Popup. In Enhanced Chat for In-App and Bring Your Own Channel, all auto-responses appear as chat messages regardless of this setting.
- (Optional) Under Web Page Parameters, reference parameters specific to the messaging session, web page, or app.
- Click Save.
-
Configure the plain text version of your auto-response to include the URL.
- Click Text in the left-hand menu.
-
Edit the Formula Template field to include the URL.
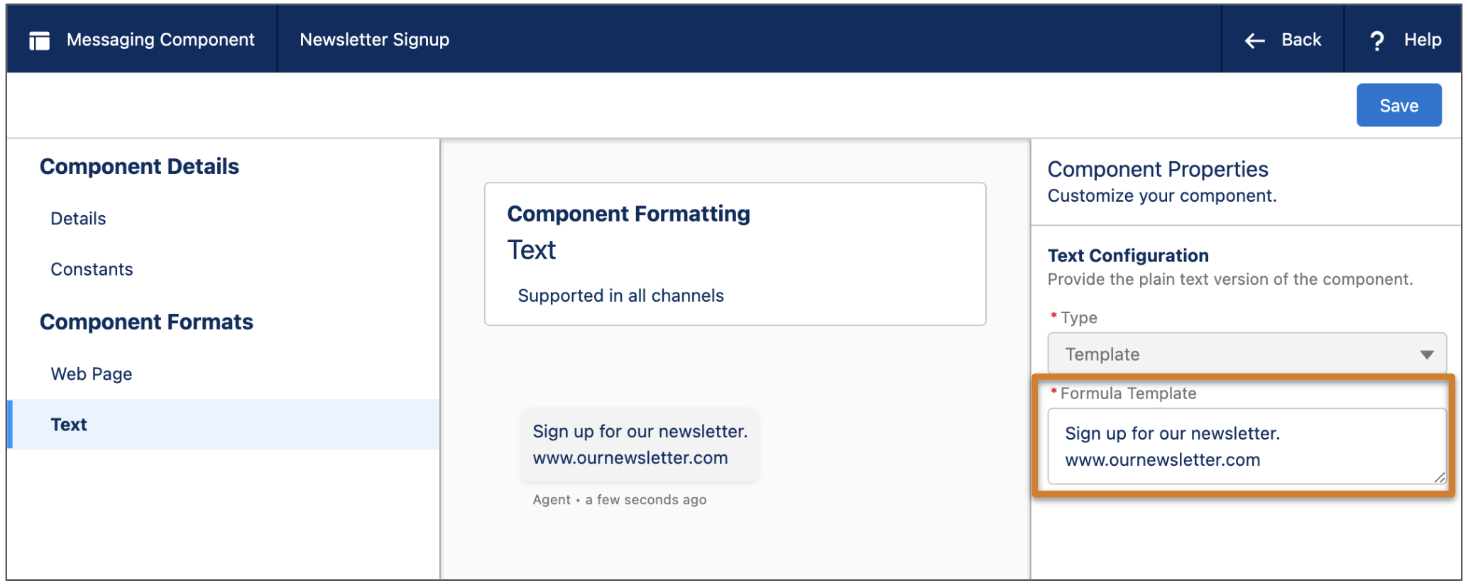
- Click Save.
- Your component is saved in a draft state. When you're ready to make it available to your support team, click Activate at the top of the page.
-
Add the component to your messaging channel.
- From Setup, enter Messaging Settings in the Quick Find box, and then select Messaging Settings.
- If you’re adding the component to an Enhanced Chat channel, find your channel in the list, and click Edit in its action menu. If you’re adding the component to a Bring Your Own Channel messaging channel, find your channel in the list, and click its name.
-
Your next step depends on the type of auto-response component you’re adding:
- If you're adding a Conversation Acknowledgment, Start Conversation, End Conversation, or Inactive Conversation component: Scroll down to the Automated Responses section of the page. In the Conversation Acknowledgment, Start Conversation, End Conversation, and Inactive Conversation fields, select an auto-response component. You can use the same component for multiple fields.
- If you're adding a Warning Message: Scroll down to the Customer Inactivity section of the page. Select the Warn customers before inactivation box. In the Warning Time box, use the + and - buttons to set the number of minutes between the warning message being sent to the end user and the session being auto-inactivated. In the Inactivation Warning box, select your auto-response component.
- Save your changes.
- Optionally, use the Enhanced In-App Chat or Enhanced Web Chat APIs (Web, iOS, Android) to send additional parameter values to the component.
- Test the component in a messaging session.
Keep these considerations in mind.
- The messaging component action in the messaging window doesn’t show auto-response components. These components are sent only if they’re selected in settings for an Enhanced Chat channel or Bring Your Own Channel.
- When an auto-response component is sent in an Enhanced Chat channel or Bring Your Own Channel, service reps see a generic placeholder in the transcript. Service reps can’t see the content of the auto-response.
- Troubleshooting Auto-Response Messaging Components
You can encounter error messages when sending an auto-response messaging component. - Personalize the URL of an Auto-Response Component
To personalize the URL being sent by an auto-response messaging component, use a placeholder. Personalizing the URL creates a dynamic experience for the end user. For example, use a placeholder to reference a language code in the URL, which presents the URL to the end user in their preferred language. - Set Up Post-Conversation Surveys for Enhanced Chat
At the end of an Enhanced Chat session, automatically send the customer a link to a Salesforce Feedback Management survey.
Did this article solve your issue?
Let us know so we can improve!