
You are here:
Add Dynamic Images to Messaging Components
If you want a messaging component to show different images depending on the situation, define the images in the Messaging Component Builder by using parameters or sObject formulas. Adding dynamic images to messaging components is more advanced than adding static images, but it’s an effective way to personalize messages sent to customers.
Required Editions
| View supported editions. | |
 This article applies to:
|
Enhanced In-App Chat, Enhanced Web Chat v1, Enhanced Web Chat v2, Enhanced WhatsApp, Enhanced Facebook Messenger, Enhanced Apple Messages for Business, Enhanced LINE, and Bring Your Own Channel |
 This article doesn’t apply to:
|
Standard Facebook Messenger, and Standard and Enhanced SMS channels |
| User Permissions Needed | |
|---|---|
| To create messaging components: | Customize Application AND View Setup and Configuration OR System Administrator |
| To send and receive messages in Messaging: | Messaging Agent |
When a service rep or bot sends a messaging component with dynamic images, Salesforce provides the right images based on parameters that you set. For example, in a list of the customer’s three most recently purchased products, show an image of each product next to the product name. Or in an enhanced link messaging component, show a URL and image that vary depending on the season or the end user’s location.
Images can be provided as Image ID parameters or URL parameters, depending on how your image is stored in Salesforce. Alternatively, define images using an sObject formula.
Provide Images via an Image ID Parameter
Here are the high-level steps to add dynamic images to messaging components with image ID parameters.
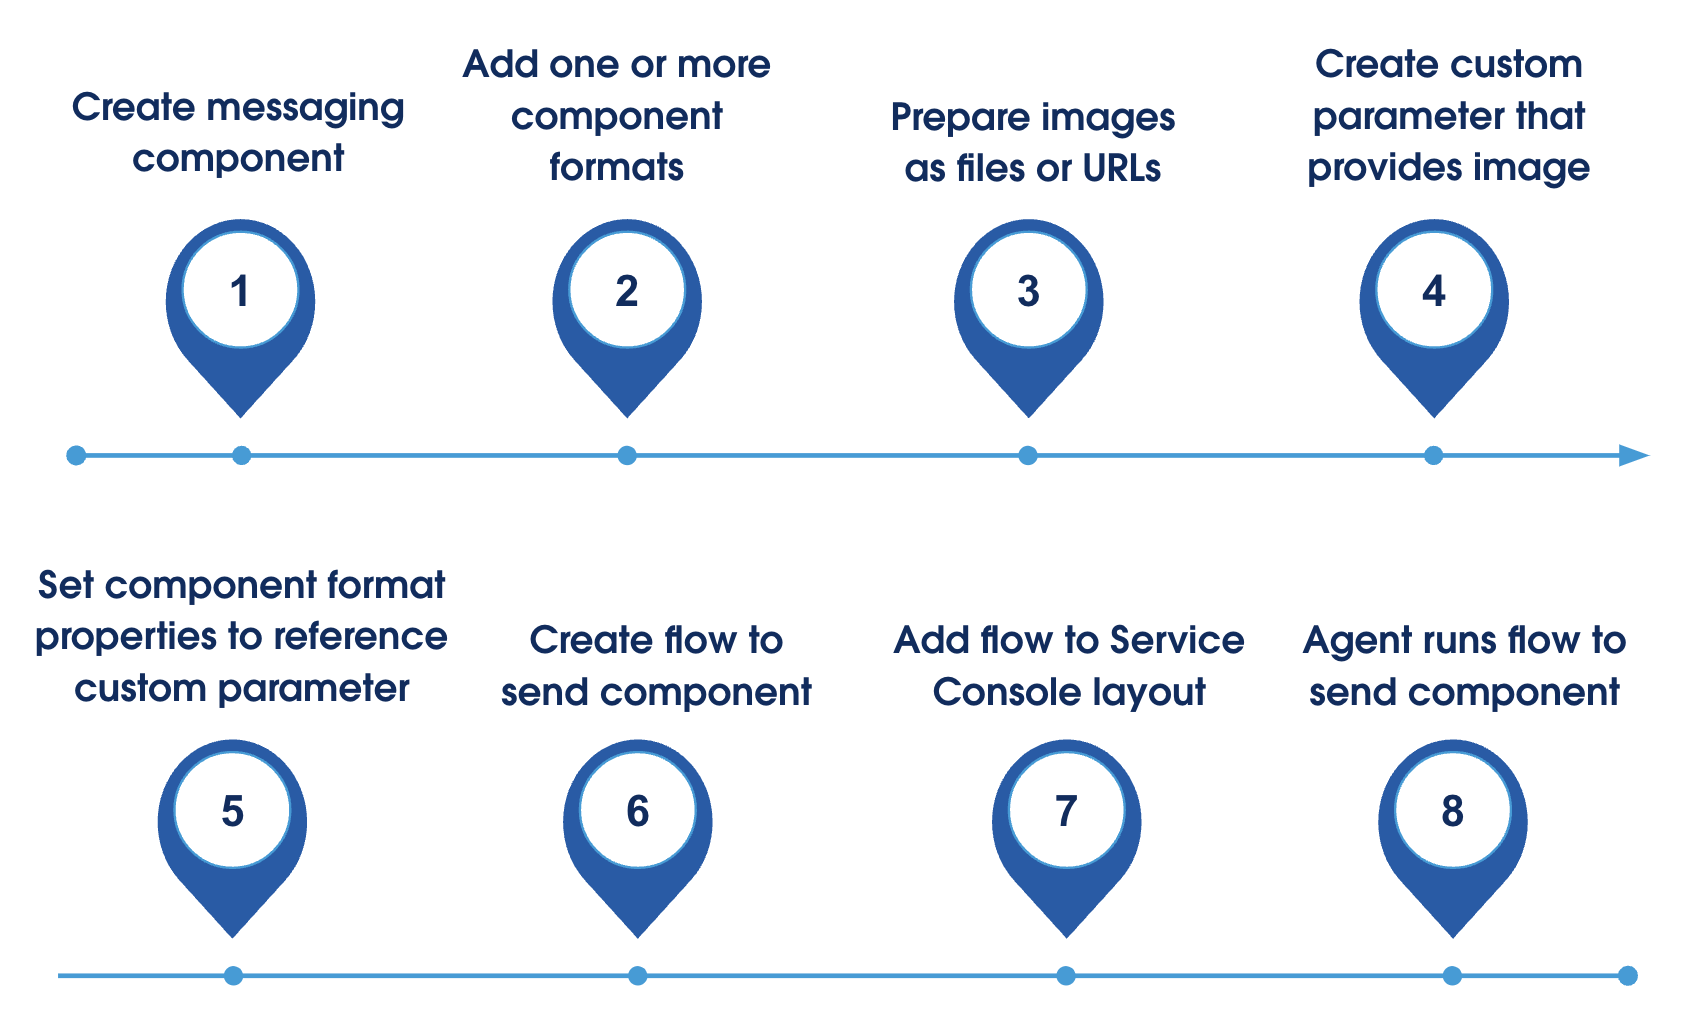
Let’s walk through these steps to create an enhanced link messaging component with a dynamic image.
-
Create the messaging component in Setup.
- From Setup, enter Messaging Components in the Quick Find box, and then select Messaging Components.
- Click New Component.
-
Complete the flow to create your enhanced link. Because an image is required, upload a
generic image.
When the component is created, the Messaging Component Builder opens.
-
Add one or more supported
formats to the component.
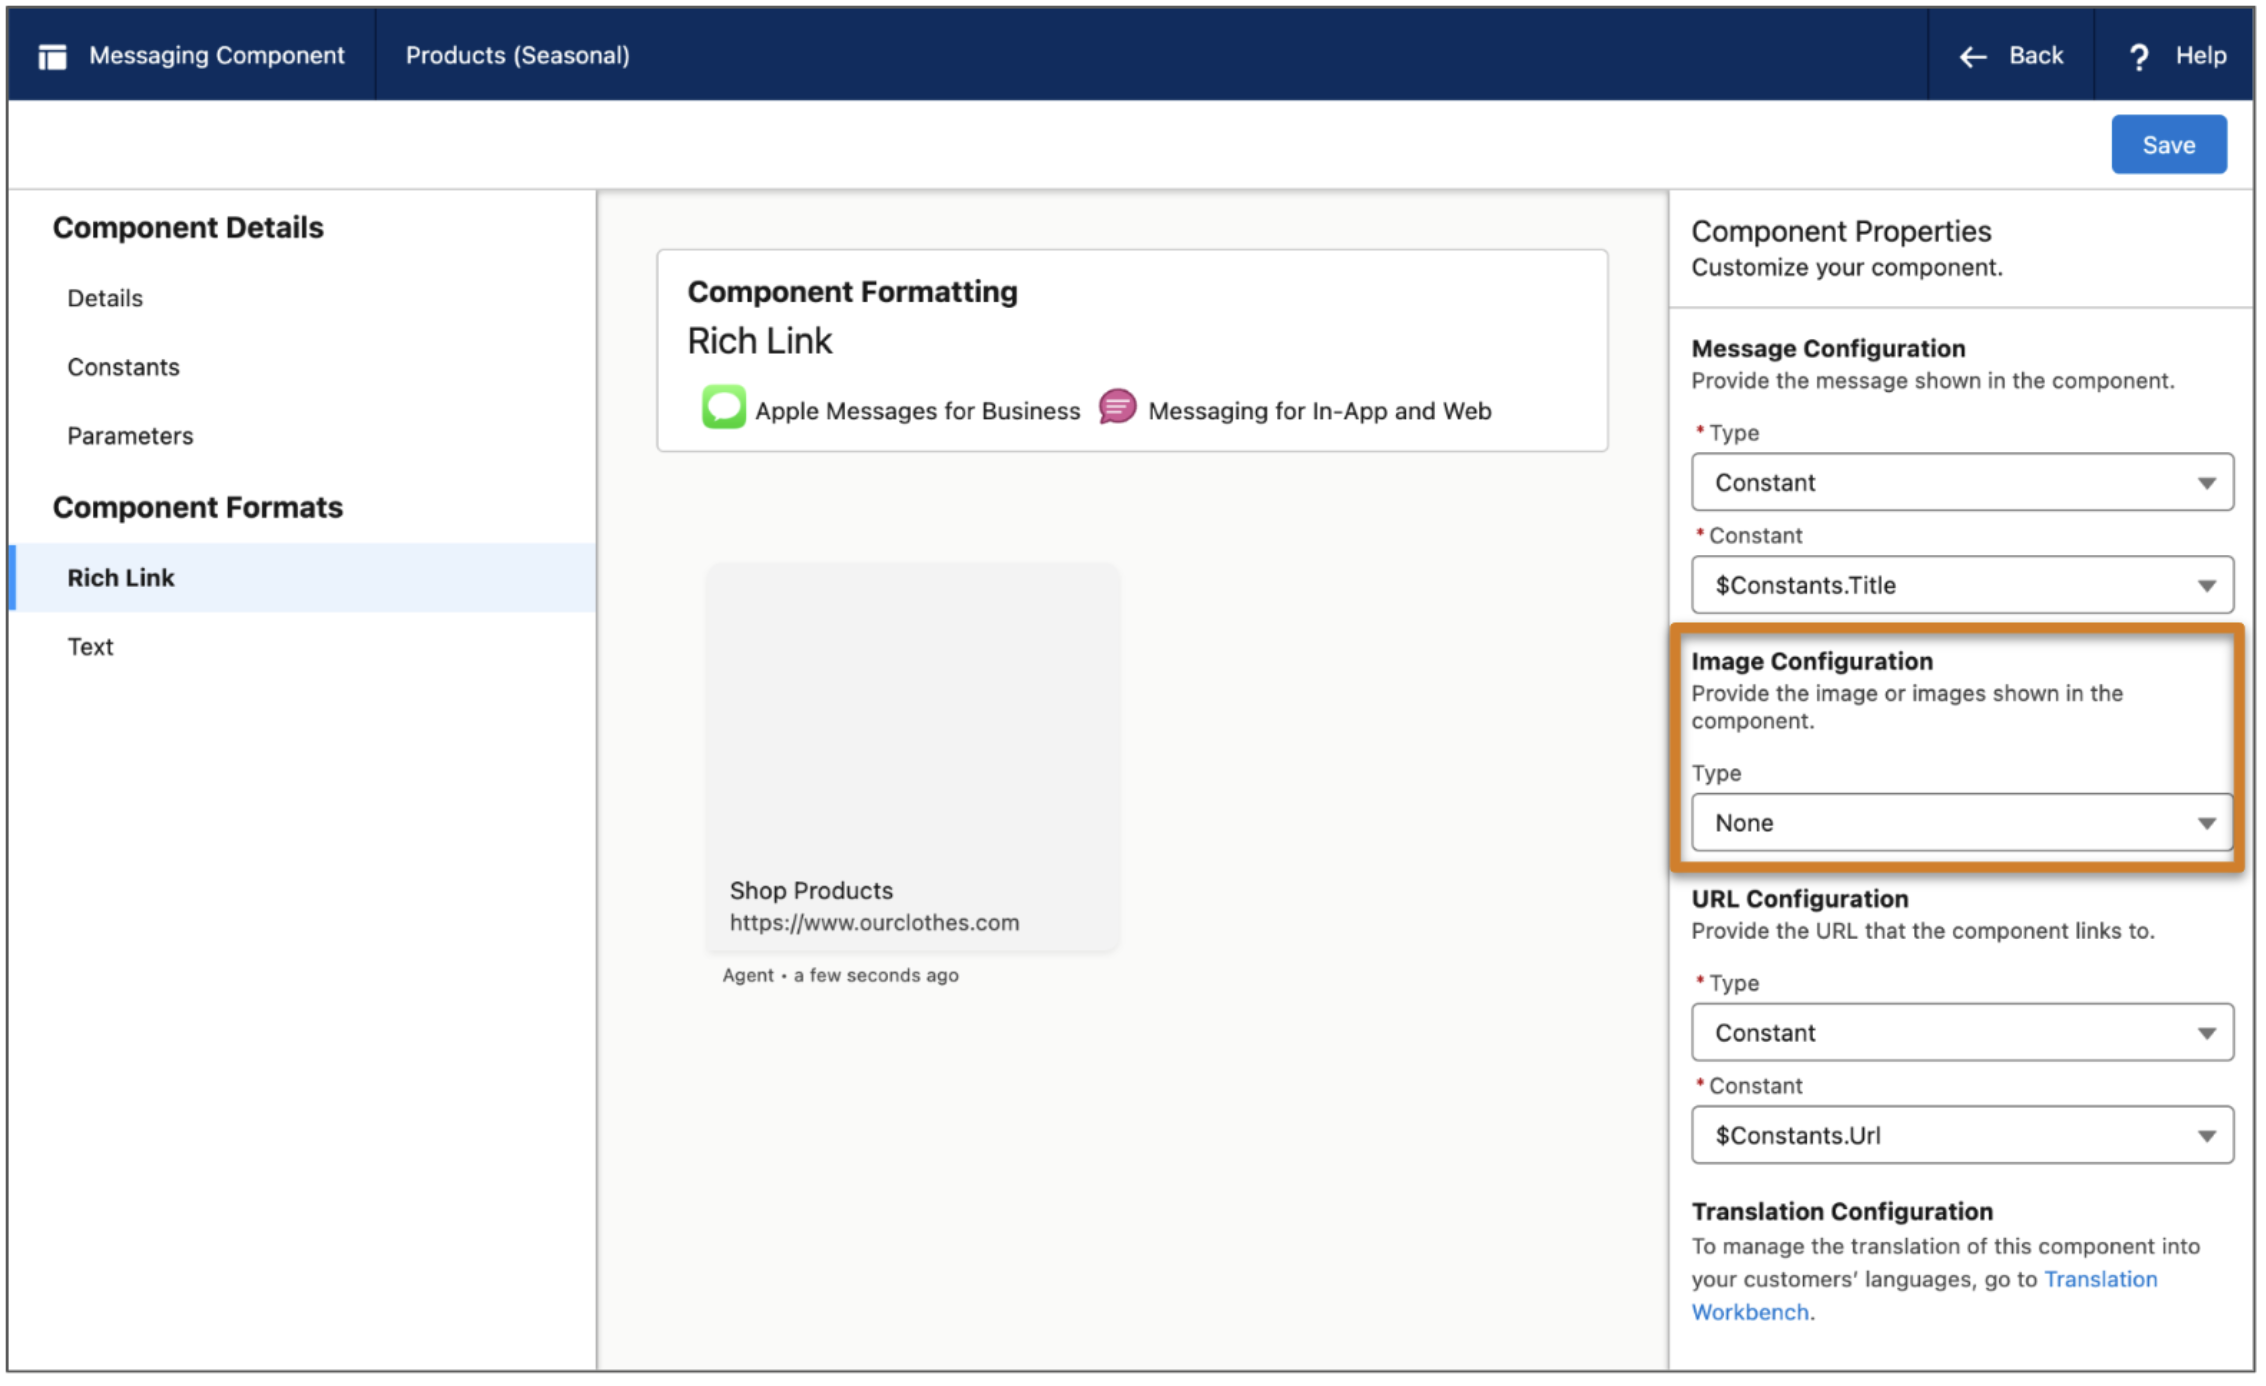
- From the Details tab in the Messaging Component Builder, click Add Format and select a format, such as Rich Link.
-
For each format that you add, click its name in the navigation menu and check the
properties pane to see how many images you can include. Look for properties with “Image” in
the title. The Rich Link format has one image property.
-
In a separate browser tab, prepare the images that you plan to use in your messaging
component. Upload them as files or assets, or store them in a custom field that contains a URL
leading to the image.
 Tip If you save the images as files or assets, perform a query from the Salesforce Developer Console to gather the image ID of the associated ContentVersion or ContentAsset record. You can then reference this ID in your flow. ContentVersion IDs start with
069, while ContentAsset IDs start with03S. In this example ContentVersion URL, the ID is 0691Q00000YOjliQAD:https://yourwebsite.com/lightning/r/0691Q00000YOjliQAD/view. -
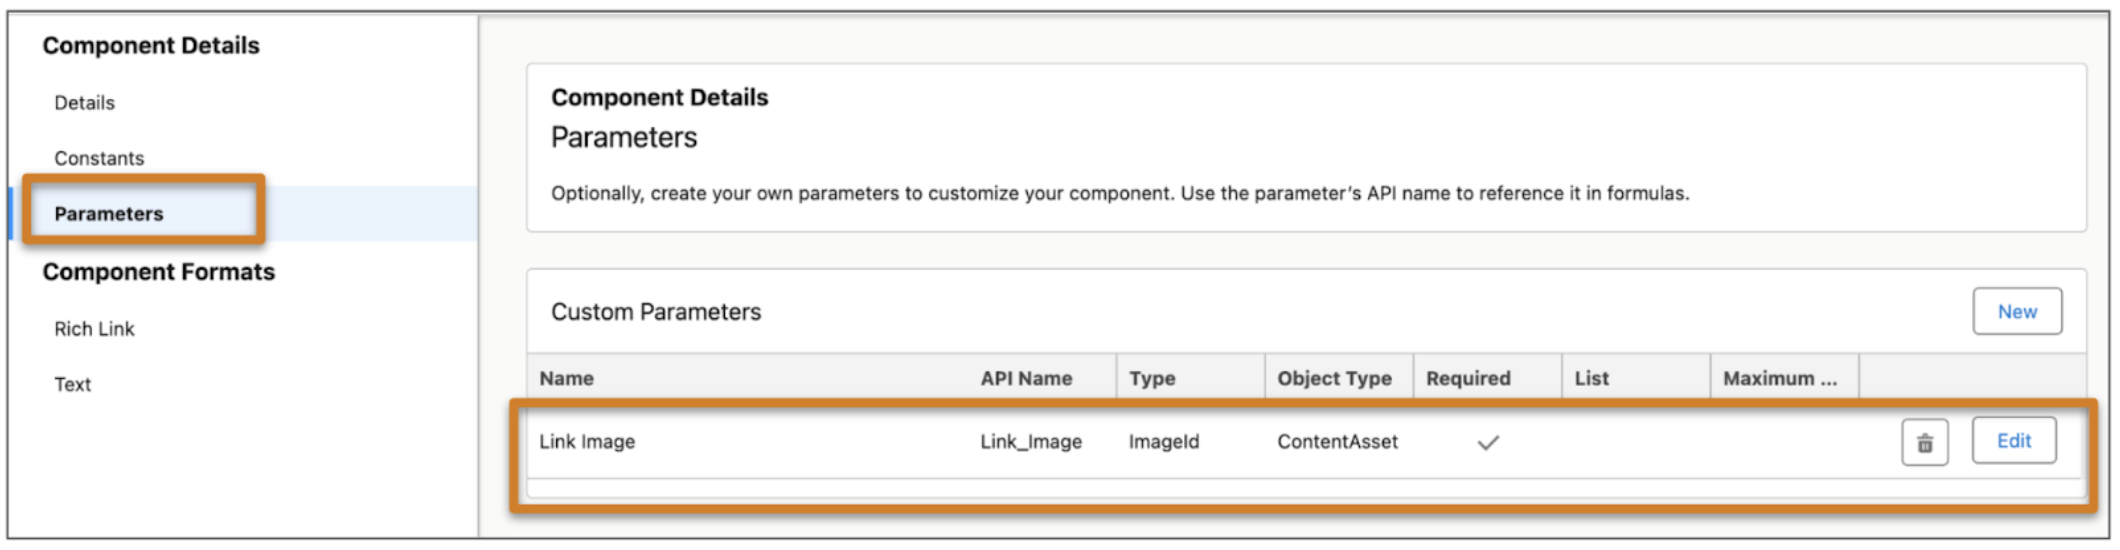
Back in the Messaging Component Builder, create a custom parameter to provide the link
image.
-
From the Parameters tab, click New in the Custom Parameters
section.
You can add up to 5 custom parameters.
- Enter a name and API name, and select ImageId as the type.
-
Select Required if the parameter must be provided for the
component to be sent.
The flow to insert the component fails if it doesn’t provide this parameter.
-
Leave List deselected. Image parameters can’t be lists.
-
From the Parameters tab, click New in the Custom Parameters
section.
-
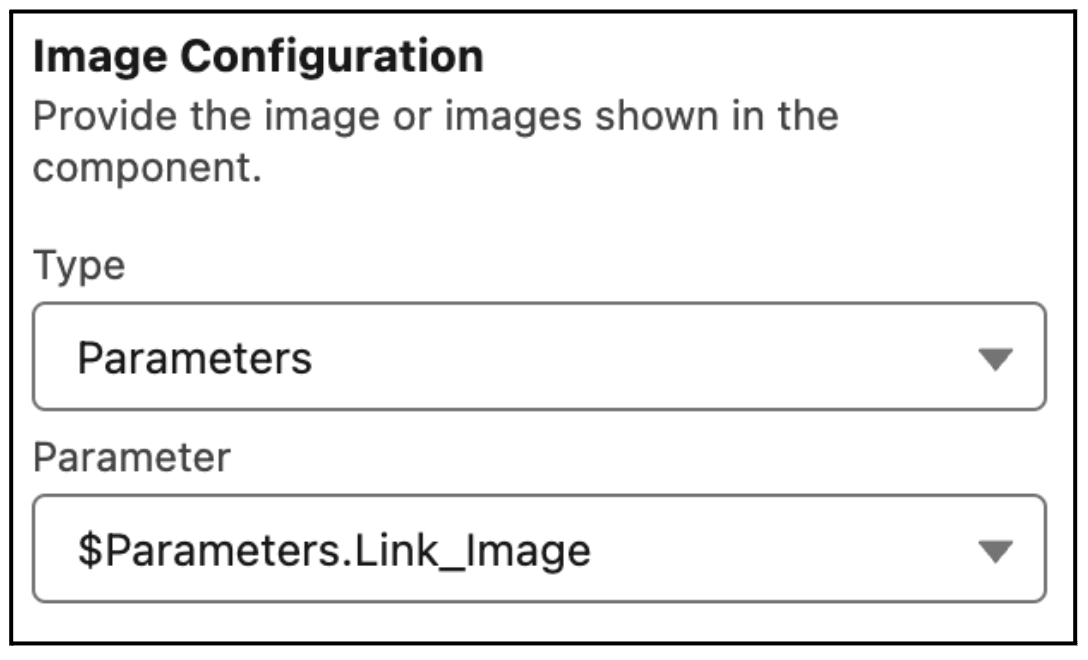
Update each format’s image properties to use image parameters.
- Click a format name in the navigation menu, such as Rich Link.
-
For each image property, select the Parameters type and select an
image parameter. If you don’t want to include an image, leave the type as None.
-
On the Flows page in Setup, create a screen flow that service reps can run to send
the messaging component to a customer. While flows are highly customizable, refer to
these steps for guidance.
- Create a text variable named recordId and make it available for input. This resource stores the ID of the messaging session.
- Create a second text variable named imageId and make it available for input. This resource stores the ID of the image asset.
- Add a screen containing an Enhanced Message component.
- In the inputs section of the Enhanced Message component, enter your recordId variable as the Messaging Session ID and select the messaging component.
-
In the custom parameters section of the Enhanced Message component, select the
custom imageId parameter and imageId variable.

- Add other flow logic to define when a particular image is used. For example, use a decision element paired with assignment elements to populate the imageId variable with a specific ContentVersion ID based on the user’s location. Or, add a Get Records screen that retrieves a ContentVersion or ContentAsset record matching your criteria.
- Save, debug, and activate your flow.
- Add the flow to your Messaging Session page layout. See Add Messaging to the Service Console.
- To send the messaging component in a messaging session with its images populated, the service rep runs the flow in the Service Console.
Provide Images via a MESSAGINGIMAGE Formula
On some image properties on messaging component formats, the Type field on the image
property doesn’t show Parameter as an option. In these properties, you can instead provide the
image dynamically with a MESSAGINGIMAGE
formula.
A MESSAGINGIMAGE formula transforms an image URL into an
image in a messaging component. It contains two parameters.
- The
imageUrlparameter defines the custom object field containing the image URL. - The
mimeTypeparameter defines the content type, such as jpeg, jpg, or png.
The formula takes this format: MESSAGINGIMAGE(imageUrl,
mimeType). Here’s a simple example formula from an image property on the List
Selector format: MESSAGINGIMAGE(Image__c,
“image/jpeg”)
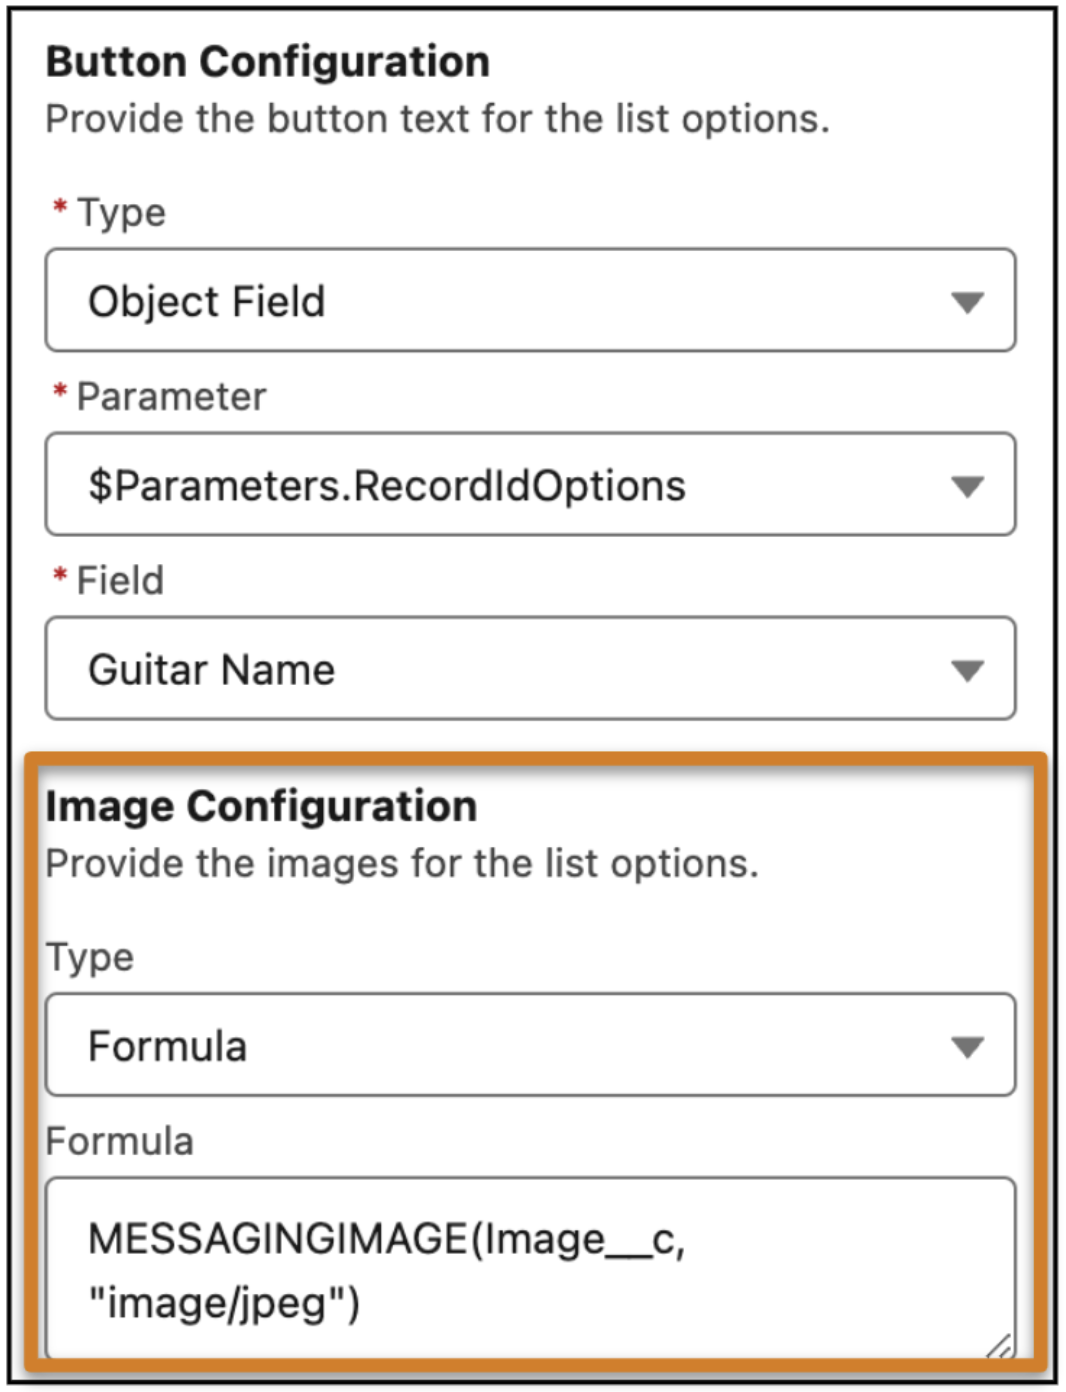
The button text is provided via a standard parameter, shown in the Button Configuration
section. The accompanying flow can then define which records are shown as list options, while
the MessagingImage formula transforms each record’s image
URL into the image shown with the list option.