
You are here:
Create WhatsApp Pay Screen Flow for Brazil
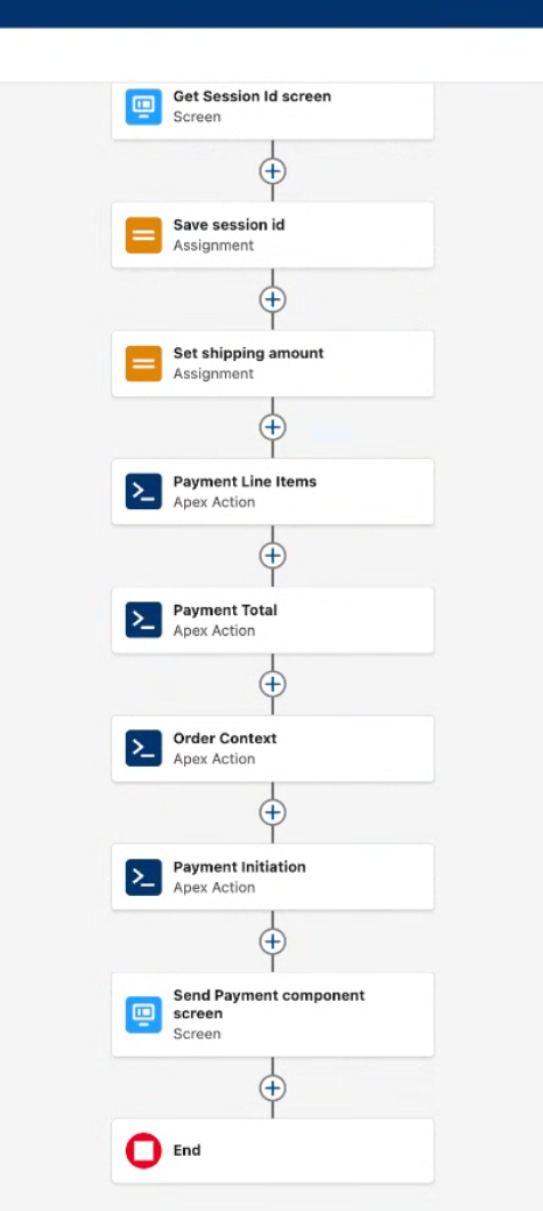
This tutorial guides you through building a sample screen flow that uses a payment messaging component to send a payment request to a customer. You can use the component to request payments from customers directly within a WhatsApp messaging channel. To send this component and populate it with dynamic order details, you can build a screen flow. You can use this flow to gather necessary payment data by calling Apex actions. The data includes line items, totals, order context, and custom parameters like shipping amounts. After data gathering, the flow uses the Enhanced Message action to send the component to the user.
- See Use Screen Flows to Interact with Users and Get Started with Screen Flows.
- Create a WhatsApp payment messaging component. For your component properties, make sure you are selecting the country name as Brazil, and currency code as Brazilian Real.
- Make sure that the Apex classes for retrieving payment data
(
PaymentMessageLineltems,PaymentPaymentTotal,PaymentOrderContext,PaymentMessage, andPaymentInitiations) are available in your org. You can have your own class names for better understanding. For more information on how to create an Apex class and sample code, see Create an Apex Class and Sample Code Snippets for Apex Classes. - If you’re using PIX as your payment method, make sure that you’ve specified the merchant name property.
- If you’re sending order status back to the end user, create two custom parameters in your payment messaging component. One for capturing the reference ID and one capturing the order status label. Also, make sure that you’ve configured your WABA template for order status. If you haven't configured still, login to your WABA account and go to your message template. Under the Utility tab, select Order Status and then submit for review.
- Create a custom parameter to capture the shipping amount. It’s an optional parameter that isn't available to you by default.
- The messaging session expiry times can differ from payment component expiry times.
- Make sure that you send the order status back to customer in the chat.
Create a Custom Parameter
- From Setup, in the Quick Find box, enter Messaging Components, and then select Messaging Components.
- Find and click your WhatsApp Pay messaging component.
- Click Parameters.
-
Click New.
The New Pameter window appears.
- Enter the name as shipping_amount and select type as double.
- Click Save.
Step 1: Create a Screen Flow
- From Setup, in the Quick Find box, enter Flows, and then select Flows.
-
Click New Flow, select Screen Flow.
The Screen Flow appears on the auto-layout page. If you don't see Screen Flow, use the search box to search Screen Flow.
-
Click + to add the required screen flow elements.
For more information on how to work with Flow Builder elements, such as Screen, Assignment, and Action see, Flow Elements.
Step 2: Get the Messaging Session ID
-
Click + to add a Screen element to your flow to capture the session
ID.
The New Screen Window appears.
- Under Components, in the search box, enter Text, and then select Text to add a Text component to the Screen element.
- Under Properties, for Label, enter GetSessionld, and enter details in other fields if necessary.
-
Click Done.
The flow is updated with the GetSessionld screen element.
-
Click + below the screen element to add an Assignment element to
the flow.
This step creates a variable to store the session ID. Name it as StoreSessionld.
-
Create a variable named Messaging Sessionld with the Data Type set
to Text, and select Available for input and
Available for output.
Assign the Messaging Sessionld variable to the value of the screen component (GetSessionld.Sessionld). For more information on how to create variables, see Learn About Flow Variables.
Step 3: Assign the Shipping Amount
- Add an Assignment element and name it SaveShippingAmount.
-
Create a variable named ShippingAmount with the Data Type set to
Number.
Assign the Shipping Amount variable a value, such as 10.
Step 4: Get Payment Line Items
- Add an Action element to call the Apex class that provides payment line items.
- Under Search Actions, search for and select the PaymentMessageLineltems action.
- Label the action as GetPaymentLineltems.
- Under View Output Resources, select Manually assign variables (advanced).
-
Under Store Output Values, click the search box to create a variable named
PaymentLineltems.
-
Set the Data Type to Apex-Defined, select the
RichMessaging_PaymentLineltemApex class, and select Allow multiple values (collection). - Select Available for input and Available for output. Assign the output to your PaymentLineltems variable.
-
Set the Data Type to Apex-Defined, select the
- Click Done.
Step 5: Get the Payment Total
- Add an Action element to call the Apex class that provides the total payment.
- Under Search Actions, search for and select the PaymentPaymentTotal action.
- Label the action as GetPayment Total.
- Under View Output Resources, select Manually assign variables (advanced).
-
Under Store Output Values, click the search box to create a variable named Payment
Total.
- Set the Data Type to Apex-Defined and select the RichMessaging_PaymentTotal Apex class. Don't allow multiple values. Assign the output to your Payment Total variable.
- Select Available for input and Available for output.
- Click Done.
Step 6: Get the Order Context
- Add an Action element to call the Apex class that provides the order context or details.
- Under Search Actions, search for and select the PaymentOrderContext action.
- Label the action as GetPaymentOrderContext.
- Under View Output Resources, select Manually assign variables (advanced).
-
Under Store Output Values, click the search box to create a variable named
OrderContext.
- Set the Data Type to Apex-Defined and select the RichMessaging_OrderContext Apex class. Don't allow multiple values. Assign the output to your OrderContext variable.
- Select Available for input and Available for output.
- Click Done.
Step 7: Get Payment Initiations
- Add an Action element to call the Apex class for payment initiation.
- Under Search Actions, search for and select the PaymentInitiations action.
- Label the action as GetPaymentInitiations.
- Under View Output Resources, select Manually assign variables (advanced).
-
Under Store Output Values, click the search box to create a variable named
PaymentInitiations.
- Set the Data Type to Apex-Defined, select the RichMessaging_PaymentInitiation Apex class, and select Allow multiple values (collection). Assign the output to your PaymentInitiations variable.
- Select Available for input and Available for output.
- Click Done.
Step 8: Send the Payment Component
-
Add a Screen element to create interactive interfaces that collect input from users or
display information to them.
Label it as SendPaymentComponent.
- Under Components, in the search box, enter Enhanced Message, then select Enhanced Message.
-
Under Properties, select the required details.
- For Messaging Session ID, select the Messaging Sessionld variable.
- For Messaging Component Name, select your payment messaging component name. For example, Sample WhatsApp Payment Component.
- Map the standard parameters to the Apex-defined variables that you created.
- Payment Line Items Parameter: PaymentLineltems
- Payment Total Parameter: Payment Total
- Order Context: OrderContext
- PaymentInitiations: PaymentInitiations
-
Click Configure Custom Parameters.
- From Parameter Name, select shipping_amount.
- From Parameter Value Type, select Variable.
- From Variable, select the ShippingAmount variable.
- Click Add.
- Click Done.
Did this article solve your issue?
Let us know so we can improve!