
You are here:
Use a Screen Flow to Pass Input Data to a Dynamic WhatsApp Flow
The screen flow can collect customer data and securely pass it into variables. These variables can then serve as input for the dynamic WhatsApp Flow that is created with an Apex-based form messaging component. To add personalized content to the message, in the Apex-based form messaging component, add dynamic references to this input data. For example, to schedule a veterinary appointment, the screen flow collects specific details, such as the type of animal and the issue, and dynamically passes this information to the Apex-based form messaging component.
Required Editions
| View supported editions. | |
 This article applies to:
|
Enhanced WhatsApp channels, Unified WhatsApp |
 This article doesn’t apply to:
|
Enhanced In-App Chat, Enhanced Web Chat, Standard and Enhanced Facebook Messenger, Standard and Enhanced SMS, Enhanced Apple Messages for Business, Enhanced LINE, and Bring Your Own Channel |
| User Permissions Needed | |
|---|---|
| To create messaging components: | Customize Application AND View Setup and Configuration OR System Administrator |
| To send and receive messages in Messaging: | Messaging Agent |
When you create an Apex-based form messaging component, these standard input parameters are available, by default.
| Parameter | Description |
|---|---|
FormData |
Stores input data passed to the flow. The data is stored as a JSON string of key-value pairs. To reference this data, you must define the structure of the data in a data model. The structure of the data model must match the structure of the JSON. You can access this data using Apex or a screen flow. |
FormEntryScreenId |
Stores the ID of the entry screen, which is the first screen that the messaging end user sees. |
You can find these default parameters on the Parameters tab of the Component Details
section.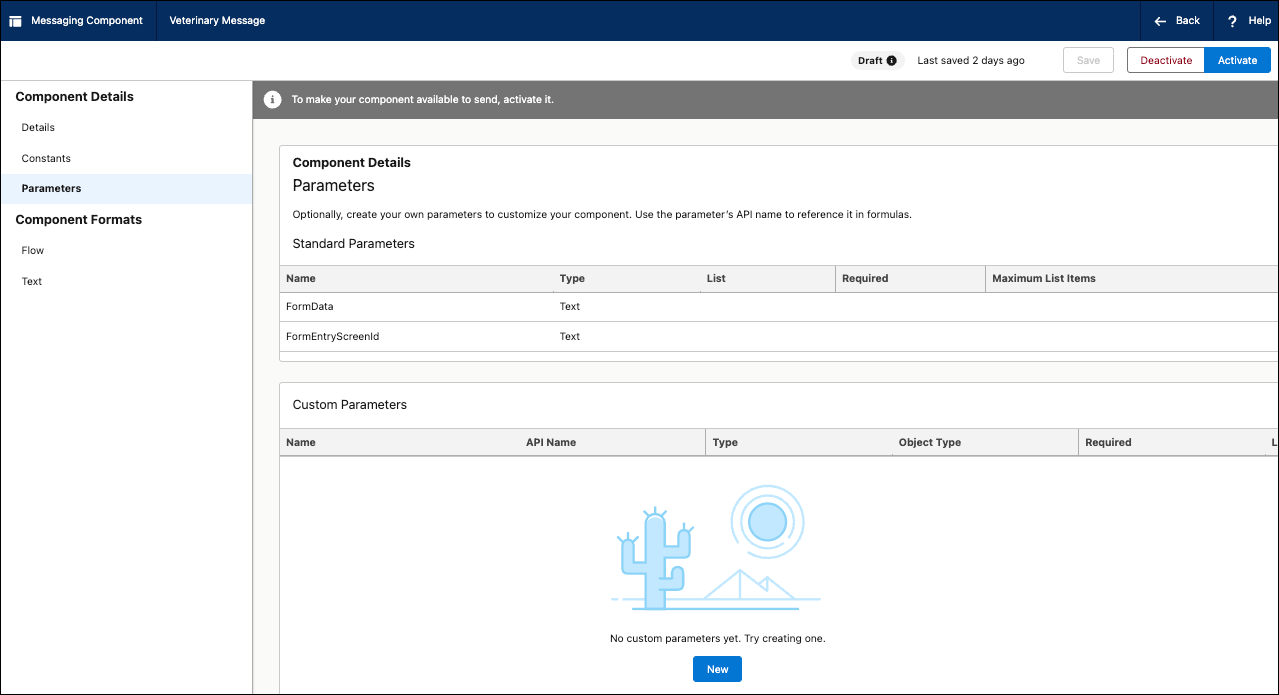
To help you understand how to use these parameters and a screen flow to pass in input data, let’s look at an example.
-
Open the Flow format of the Apex-based form messaging component.
-
In the Flow format, click Manage Data to define a data model
for all input data being passed in from the FormData parameter.
For example, the FormData parameter stores this input data.
{“FirstName”:“Albert”,“LastName”:“Costa”,“isStudent”:“true”} -
To add a field to the data model, click Add Field and
configure its properties.
Perform this step for every field in the FormData parameter. To create a structure, select the Object data type for a field, and add nested fields.
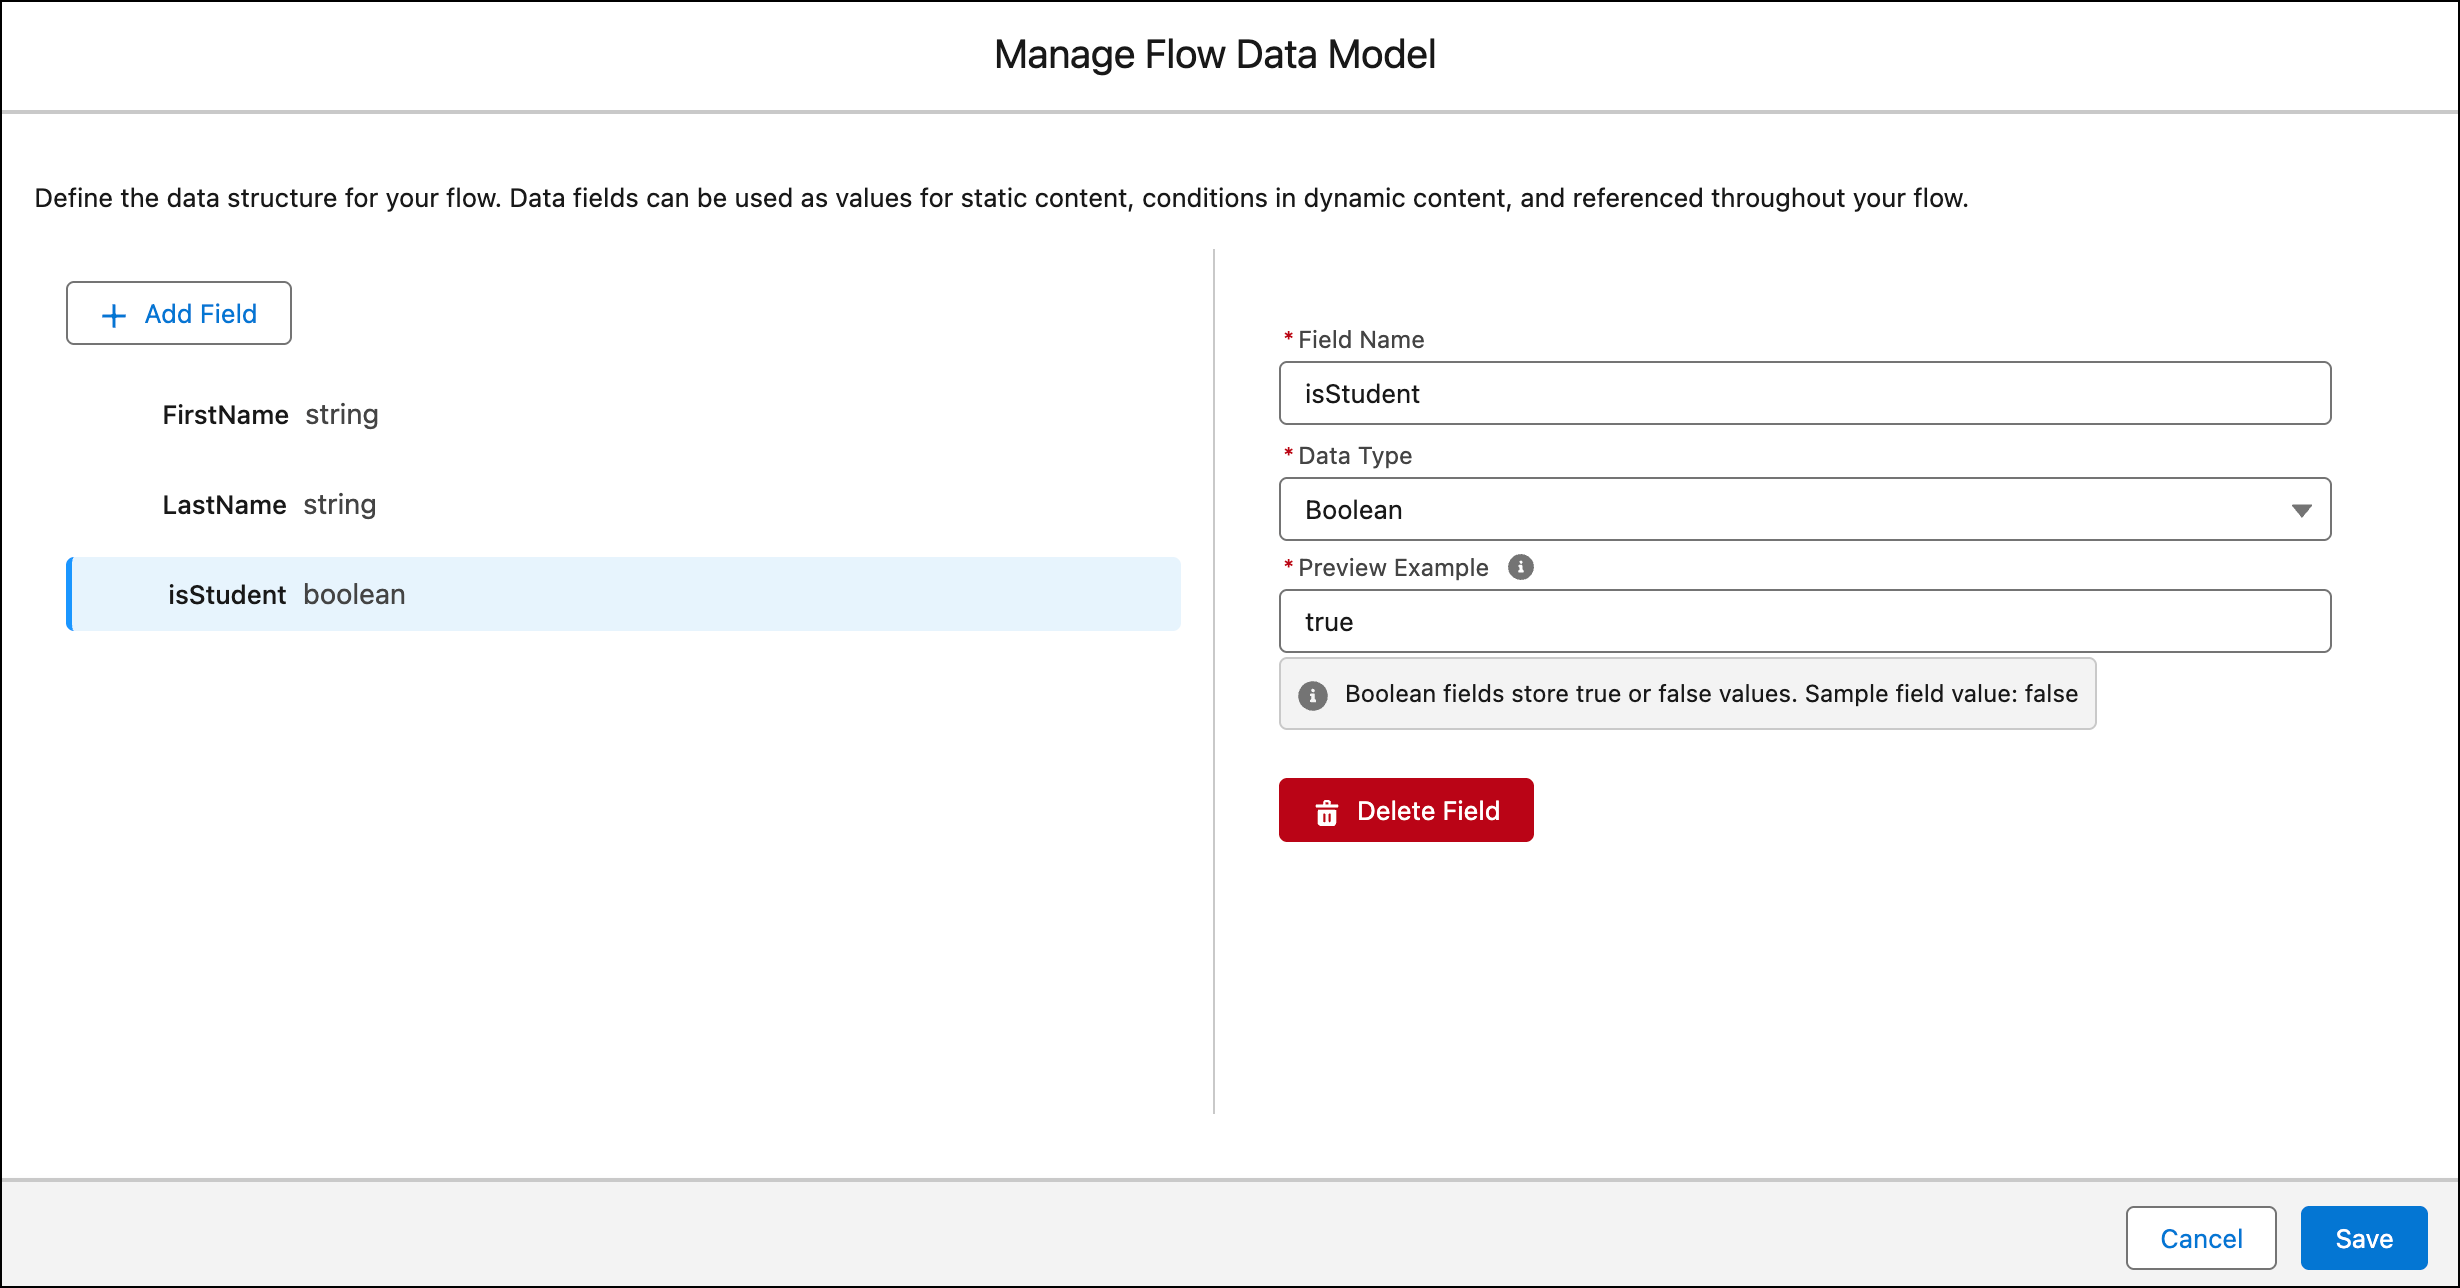
- After you’re done defining the data model, save it.
-
In the Flow format, click Manage Data to define a data model
for all input data being passed in from the FormData parameter.
-
To use the value from a data model field in a Flow property, add a dynamic
reference.
-
Open the Flow format and locate the property for which you want to use a dynamic
reference.
For example, you can add a dynamic reference for the Text Content field for a Body screen element.
- In the Type field, select Dynamic Reference.
-
In the Select the Reference Field, select the data model field.
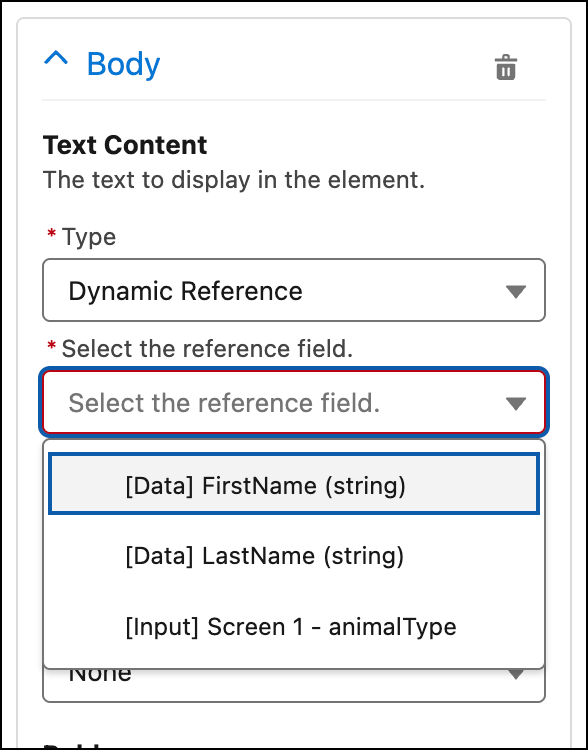
Dynamic references can pull data from data model fields or input fields defined in a screen.
-
In the canvas, preview the dynamic reference.

-
Open the Flow format and locate the property for which you want to use a dynamic
reference.
-
To pass data into the messaging component, create a screen flow.
The screen flow can collect data from the messaging session and use it in the Apex-based Form messaging component. To illustrate how this works, let’s create a sample screen flow.
-
Define the screen flow variables.
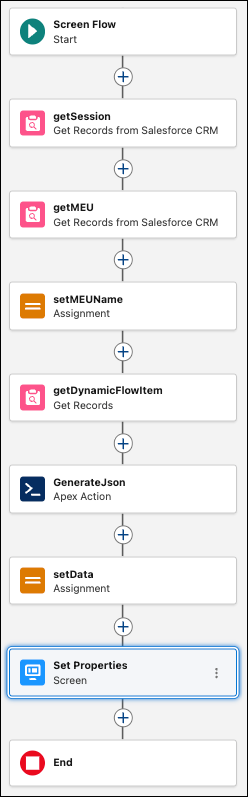
Variable Value sessionIdStores the messaging session record ID. initialDataStores the input data for the Apex-based form. The fields in this JSON string must match the field names that you added to the data model. initialScreenIdStores the initial screen ID for the Apex-based form. This is the first screen that a messaging end user sees. meuNameStores the name of the messaging end user. itemsThis collection variable stores a list of items. -
In the screen flow, add these actions in this order. To retrieve data from a
Salesforce object, add a Get Records action. To assign values to the screen variables,
add an Assignment action.
Action Description getSession Get Records action Get the messaging session based on the session ID. You can get relevant data from that messaging session. In this case, it retrieves and stores the Id and MessagingEndUserId field values. getMEU Get Records action Get the Messaging User record based on the MessagingEndUserId. setMEUName Assignment action Set the meuNamevariable to the value of the Messaging User Name field from the Messaging User record.getDynamicFlowItem Get Records action Get all DynamicFlowItem records from the DynamicFlowItem object, storing the ID, ItemId__c, and itemTitle__c fields in the itemscollection variable.GenerateJson Apex action Converts the input data from the itemsandmeuNamevariables to the JSON format. The fields of the JSON object are mapped to the fields in the flow’s data model. This action is based on an Apex class. See sample Apex class after this table.setData Assignment action Set the InitialDatavariable to the value of the generated JSON action.This Apex class transforms structured input data—a user's name and a list of Salesforce records—into a single JSON string. This JSON string is then used to pass input data to the Apex-based form messaging component.
public class FlowJSONBuilder { // 1. Input parameters public class FlowInput { @InvocableVariable(label='User Name' required=true) public String meuName; // CHANGE: Use List<SObject> instead of List<DynamicFlowItems__c> to avoid compile error @InvocableVariable(label='Flow Items' required=true) public List<SObject> items; } // 2. Output parameters public class FlowOutput { @InvocableVariable(label='Generated JSON') public String jsonString; } // 3. Internal Wrapper classes public class JSONStructure { public String greeting; public List<ItemWrapper> items; } public class ItemWrapper { public String id; public String title; } // 4. Main Method @InvocableMethod(label='Generate Custom JSON' description='Builds the JSON string from Flow items') public static List<FlowOutput> generateJson(List<FlowInput> requests) { List<FlowOutput> outputs = new List<FlowOutput>(); for (FlowInput request : requests) { FlowOutput output = new FlowOutput(); JSONStructure jsonRoot = new JSONStructure(); jsonRoot.greeting = 'Hello ' + request.meuName + '!'; jsonRoot.items = new List<ItemWrapper>(); if (request.items != null) { // Loop through generic SObjects for (SObject genericRec : request.items) { // CAST the generic SObject to your specific Custom Object DynamicFlowItem__c rec = (DynamicFlowItem__c)genericRec; ItemWrapper item = new ItemWrapper(); item.id = rec.itemId__c; item.title = rec.itemTitle__c; jsonRoot.items.add(item); } } output.jsonString = JSON.serialize(jsonRoot); outputs.add(output); } return outputs; } } -
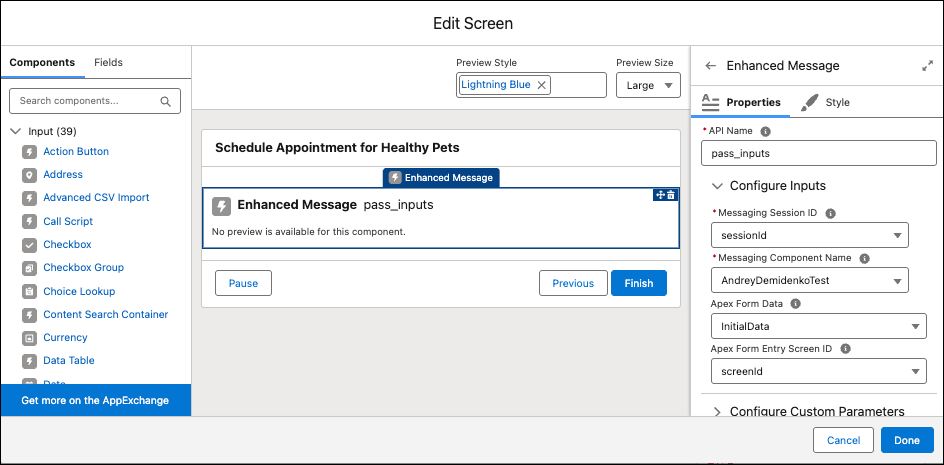
Add a Screen action to the screen flow, and then drag the Enhanced Message
component onto the screen.
-
To specify the input data, set these Enhanced Message component properties as
shown.
Property Value Messaging Session ID Select sessionId, the screen flow variable that contains the session ID.Messaging Component Name Select the name of the Apex-based form messaging component that you created. Apex Form Data Select initialData, the screen flow variable that contains the input data.Apex Form Entry Screen ID Select initialScreenId, the screen flow variable that contains the initial screen ID.At run time, the screen action invokes the Apex-based form messaging component and passes this input data to it.
-
Save and activate the screen flow.
-
Define the screen flow variables.
-
To enable a service rep to run the screen flow, embed the active screen flow in the service console
page.
For example, add the Flow component to the Messaging Session record page.
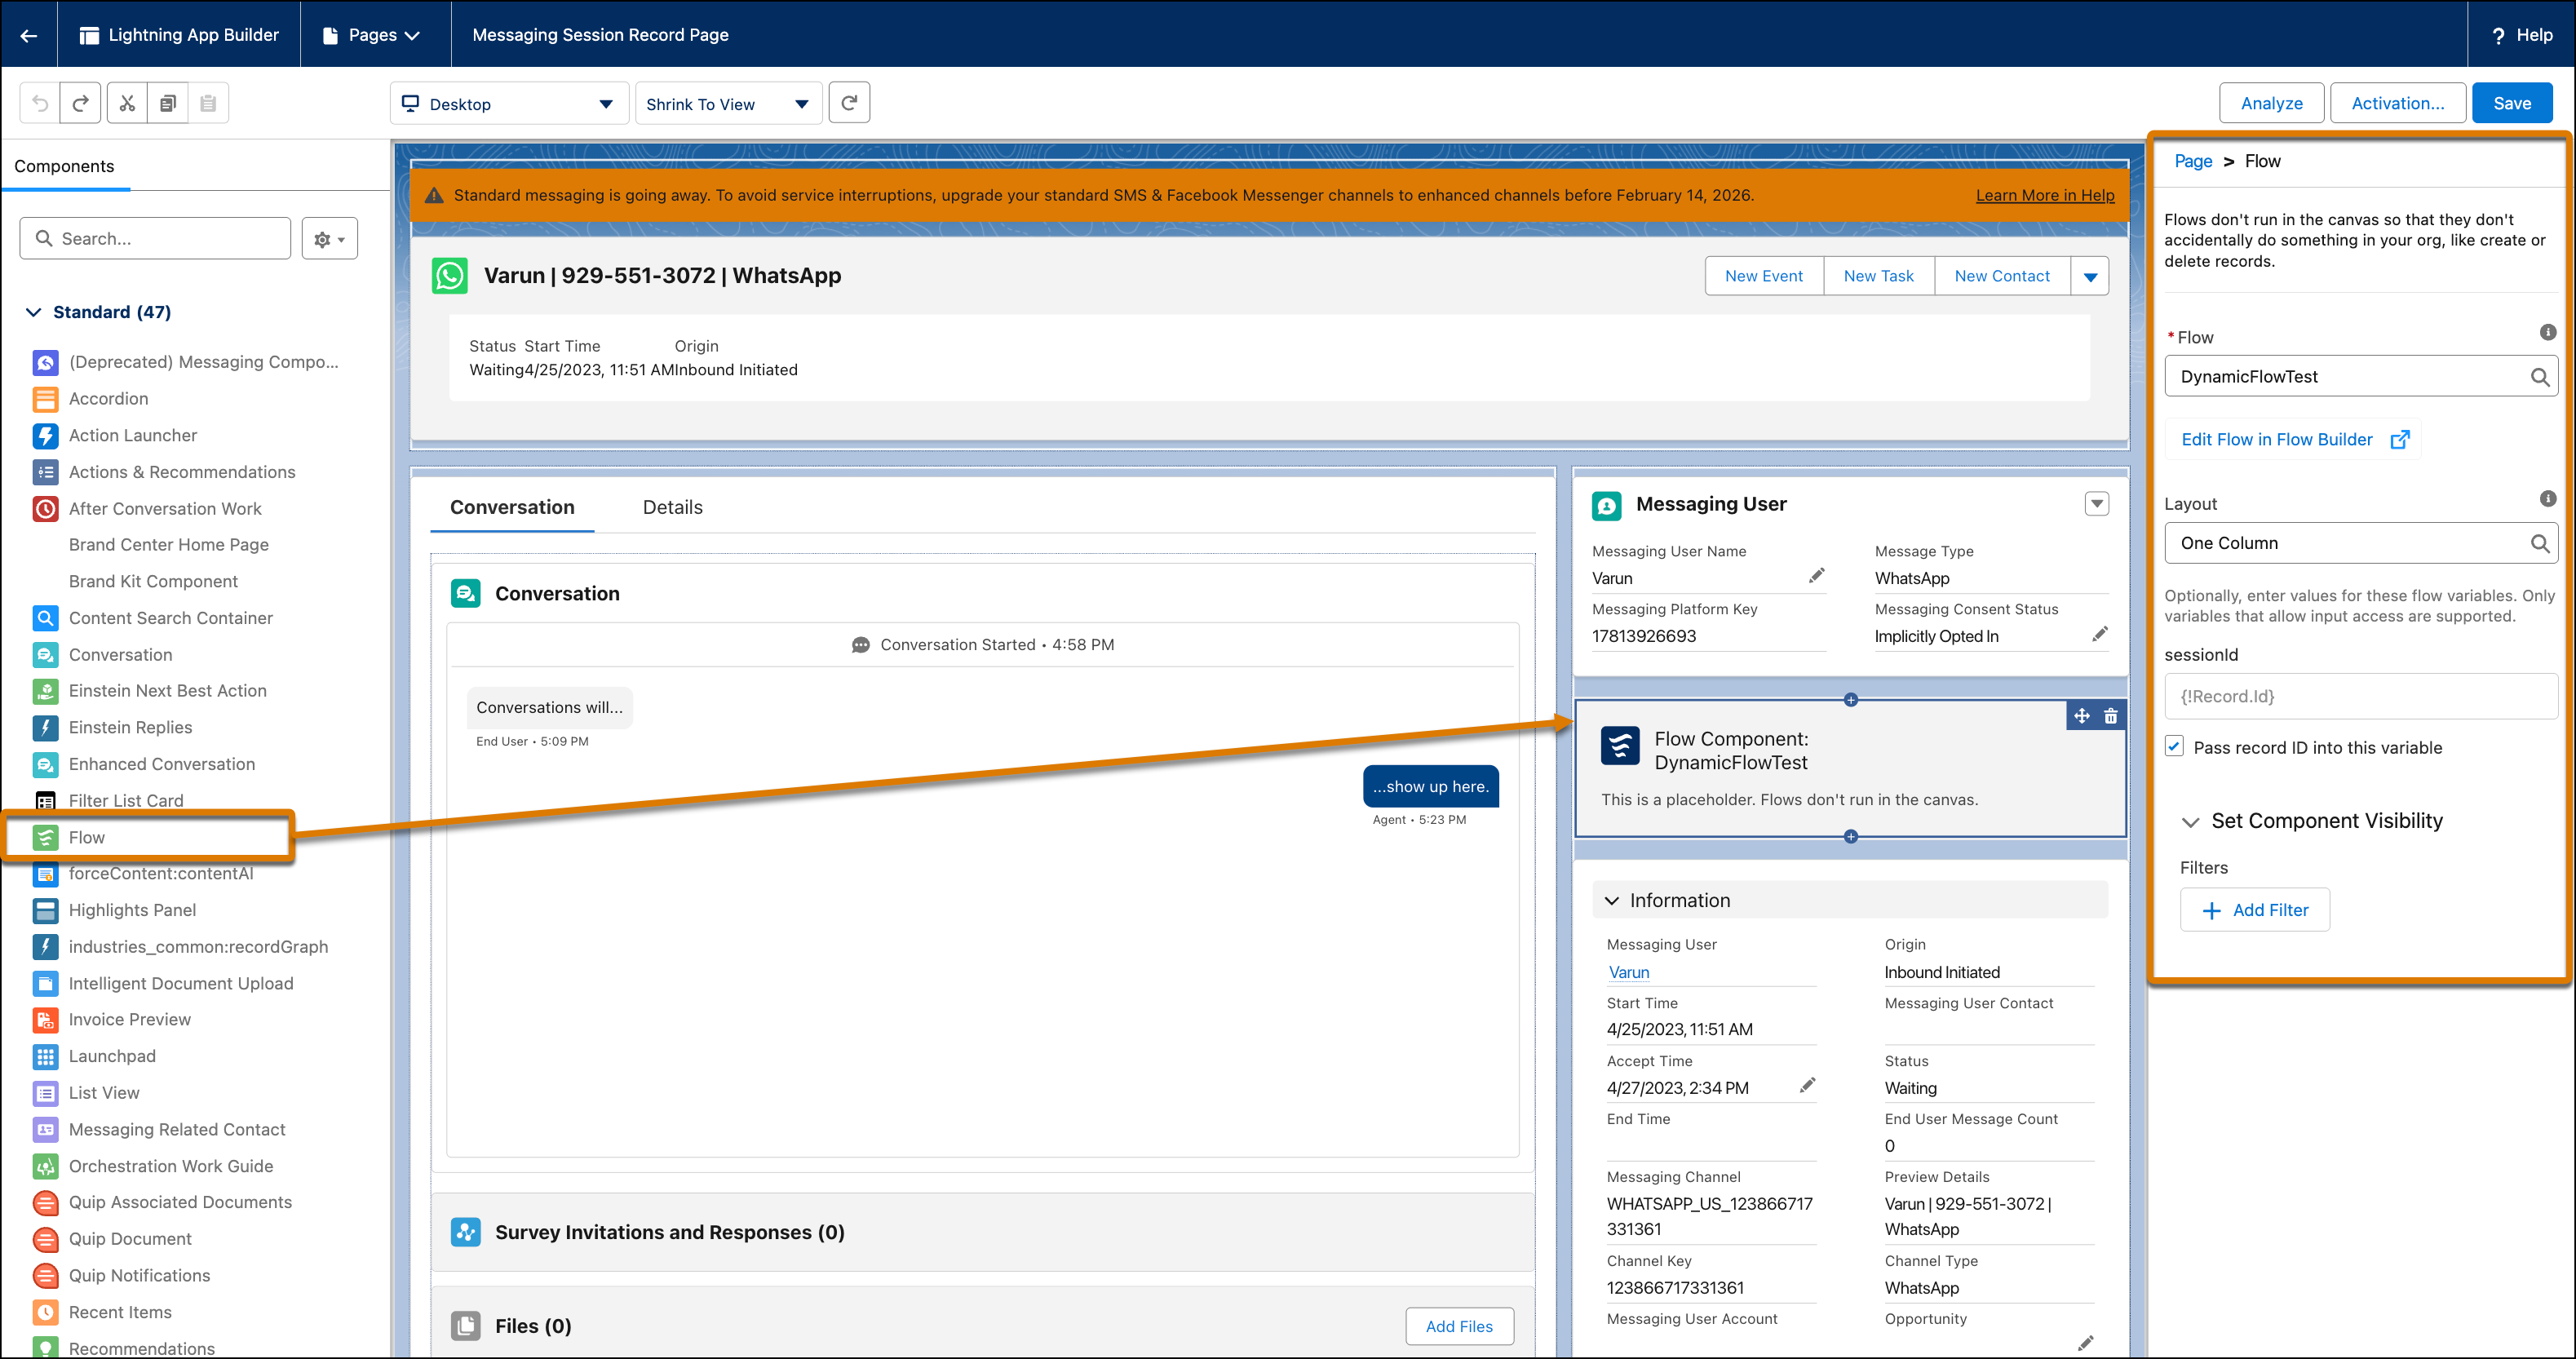
During a messaging session, to launch the screen flow from the page, the service rep can click Next.
To insert the flow’s messaging component into the conversation with the customer, the service rep can click Insert Message.

The service rep can then send the message to the customer.