
Set Up Contactless Signature Flows
Create your own version of the flows based on the templates in the Appointment Assistant package.
Required Editions
| Available in: both Salesforce Classic (not available in all orgs) and Lightning Experience |
| The Field Service core features, managed package, and mobile app are available in Enterprise, Unlimited, and Developer Editions. |
| Available only if Digital Engagement is enabled. |
| User Permissions Needed | |
|---|---|
| To open, edit, or create a flow in Flow Builder: | Manage Flow |
- From Setup, in the Quick Find box, enter Process Automation, and then select Flows.
- To create your own copy of the Create Service Report and Document Recipient flow, open the flow, click Save As, and activate the flow.
-
Add your site’s URL to your Generate and send URL to Contact
flow.
-
In Experience Builder, click Settings

-
From Published Status, copy your site’s URL.
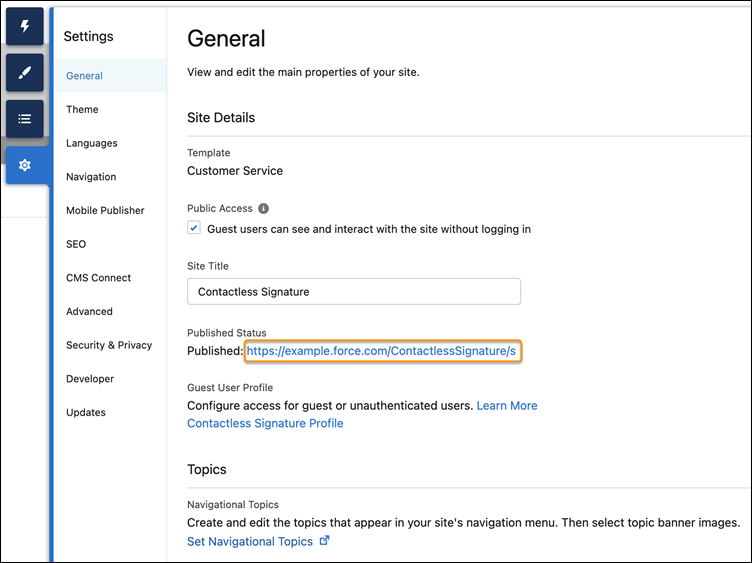
- Open the Generate and send URL to Contact flow.
- In the flow, open the Get URL apex action.
-
In SiteURL, this URL appears:
?drId={!$Record.Id}&expiration=60&type=Default
Add your site’s URL at the beginning. For example: https://example.force.com/ContactlessSignature/s?drId={!$Record.Id}&expiration=60&type=DefaultYou can leave the rest of the URL as is, or you can change these details.
- Expiration—60 is the number of minutes the URL is valid for from the time it’s generated. You can change this number according to your needs.
- Type—Default is the signature type defined in your service report template. If you’re not using the default type of digital signature, change the type to the one that’s used in your service report.
-
In Experience Builder, click Settings
- To use email, click Save As, and activate the Generate and send URL to Contact flow.
-
To use SMS, delete the Send URL action, and create a new action.
- Add a collection variable for the Messaging User object. This collection variable is populated with a list of messaging user record IDs based on your criteria. For example, you can configure your flow to send an automated message to a subset of messaging users based on channel and consent status.
- Add an action to the canvas. The New Action window opens.
-
Select the Send Conversation Messages action and complete
the fields.
- In Messaging Users, select the collection variable that you created.
- In Messaging Component, select your new messaging component. Make sure that the component status is Active on the Messaging Components page in Setup.
- Select Any Time for when to send the message.
- Select Yes, apply Messaging End User settings for end user’s consent preferences.
- In Session Longevity, select Yes, End Session Immediately if the end user doesn’t need to respond in this messaging session.
You can use values from earlier in a flow to set inputs for the message. If the action fields don’t contain valid inputs, the flow fails. - Click Done.
- Click Save As, and activate the Generate and send URL to Contact flow.
See Also
Did this article solve your issue?
Let us know so we can improve!
