
Set Up Appointment Assistant Self-Service Scheduling For Existing Appointments
Let your customers confirm, reschedule, or cancel their upcoming appointments.
Required Editions
| Available in: both Salesforce Classic (not available in all orgs) and Lightning Experience |
| The Field Service core features, managed package, and mobile app are available in Enterprise, Unlimited, and Developer Editions. |
| The Field Service Appointment Assistant managed package and permission set license are required. |
| User Permissions Needed | |
|---|---|
| To configure layouts: | Customize Application |
| To configure statuses: | Customize Application |
| To configure the Appointment Assistant settings: | Field Service Appointment Assistant |
| To add components to sites: | Create and Set Up Experience Sites AND View Setup and Configuration |
| To create messaging components: | Configure Messaging |
| To open, edit, or create a flow in Flow Builder: | Manage Flow |
| To create a sharing rule: | Customize Application |
See Also
(Optional) Add Notes to the Service Appointment Layout
To let your mobile workers see notes from customers, add the Service Notes field to the layout for mobile workers.
- From Setup, go to the Object Manager tab.
- In the Quick Find box, enter Service Appointment, and then select Service Appointment.
- In Page Layouts, edit the layout used for the Field Service mobile workers.
- Add the Service Note field to the layout.
- Save the layout.
(Optional) Add a Service Appointment Status for Confirmed Appointments
Add a Confirmed status to the Service Appointment Status options. If you enter this status in the Appointment Assistant Self-Service Scheduling settings, when the customers confirm their appointments, the service appointment’s status changes accordingly.
-
Add the new status.
- From Setup, go to the Object Manager tab.
- In the Quick Find box, enter Service Appointment, and then select Service Appointment.
- Click Fields & Relationships.
- In the Quick Find box, enter Status, and then select Status.
- In Status Picklist Values, click New.
- Enter the details of the Confirmed status.
- Save the new status.
-
If your Salesforce org uses status transitions:
- From Field Service Admin, go to the Field Service Settings tab.
- From Service Appointment Workflow, go to Status Transitions.
- Add the flows for the Confirmed status.
Step 1: Configure Appointment Assistant Settings for Self-Service Scheduling
Make sure that the Appointment Assistant settings are configured.
-
Check if Appointment Assistant is configured in your org.
- From Setup, in the Quick Find box, enter Field Service, and then select Field Service Settings.
- If the Appointment Assistant section is filled in, you’re all set.
- If it isn’t configured, see Configure Field Service Settings for Real-Time Location.
Step 2: Add Self-Service Scheduling to Your Experience Builder Site
To enable Appointment Assistant Self-Service Scheduling, add it to your Experience Builder site.
- From Setup, in the Quick Find box, enter Digital Experiences, and then select All Sites.
- In the row for your site, click Builder.
-
From Experience Builder, click Components
 .
.
- From Custom Components, locate the Self-Service Scheduling component.
-
Drag the component onto the site.
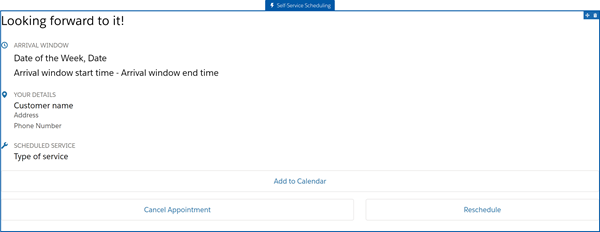
- To open the settings panel, click anywhere in the Appointment Assistant Self-Service Scheduling component.
-
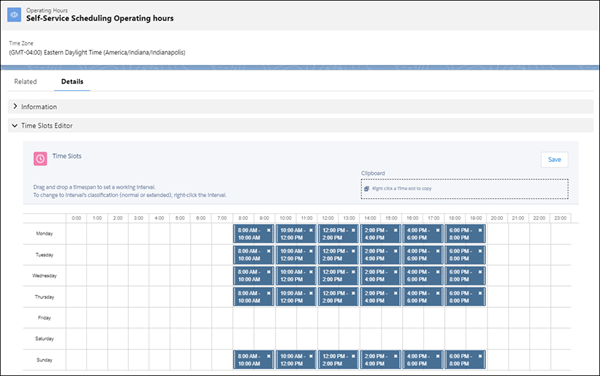
In Operating Hours, select the record that defines the appointment slots. For example, in
this Operating Hours record, the company has 3-hour slots on Mondays and Wednesdays, and
2-hour slots on Tuesdays, Thursdays, and Sundays.
- In Statuses That Allow Rescheduling, enter statuses that aren’t pinned.
-
Fill in the remaining settings. Your selections are reflected in the preview of the
component.
 Note The service appointment’s territory time determines the time zone. If the service appointment’s territory time is empty, the end user’s time zone is used.
 - Publish the site.
Step 3: Enable Customers to Cancel Appointments
To enable customers to cancel their appointments in the Appointment Assistant Self-Service Scheduling screen, you must disable the option for mentioning an assigned user when the service appointment is dispatched.
- In Field Service Admin, open the Field Service Settings tab.
- Under Dispatch, select Scheduled Jobs.
-
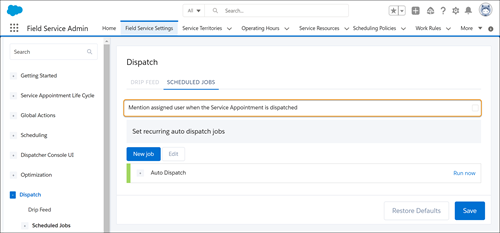
Disable the Mention assigned user when the Service Appointment is
dispatched option.
- Save your changes.
Step 4: Create a Messaging Component for Existing Appointments
Create a messaging component for messages that let customers open the Appointment Assistant Self-Service Scheduling page.
- From Setup, in the Quick Find box, enter Messaging, and then select Messaging Components.
- Click New Component.
- Click Notification, and then click Next.
- Enter the plain text version of your automated message. Include the URL placeholder that lets customers navigate to the Experience Builder site that you configured. For example: {!ServiceAppointment.ApptBookingInfoUrl}
- Click Next.
- Enter a name and description for your component. For example, Appointment Booking.
- Click Done. The Messaging Component Builder opens.
- In the left sidebar, click Parameters.
- In the Custom Parameters section, click New.
-
Configure the URL parameter.
- Name—A label for the parameter. For example, Change Appointment Booking.
- API Name—ApptBookingInfoUrl
- Type—Text
- Object Type—Service Appointment
- Click Save.
- (Optional) In the left sidebar, click Text to further customize the plain text version of your automated message.
- Save your changes.
Step 5: Create Flows to Send Messages
Streamline your messaging process by setting up flows that use the messaging components that you created.
- From Setup, in the Quick Find box, enter Process Automation, and then select Flows.
- Click New Flow.
- Select Record-Triggered Flow, and then click Create.
-
Set up the service appointment conditions that send the URL. For example, to send the URL
when a service appointment moves to the Scheduled status, in the Configure Start window:
- In Object, enter Service Appointment.
- In Trigger the Flow When, select A record is updated.
- In Condition Requirements, select All Conditions Are Met (AND).
-
Set the Condition Requirements.
- In Field, enter Status.
- In Operator, select Equals.
- In Value, enter Scheduled.
- In When to Run the Flow for Updated Records, select Only when a record is updated to meet the condition requirements.
- To run the flow after the record is saved, select to optimize the flow for Actions and Related Records.
- Click Done.
-
Add new resources that connect between the community URL, Service Appointment ID, and URL
expiration time.
-
From the Toolbox, click New Resource, and then create a variable
for the URL input.
- In Resource Type, select Variable.
- Enter an API name.
- In Data Type, select Text.
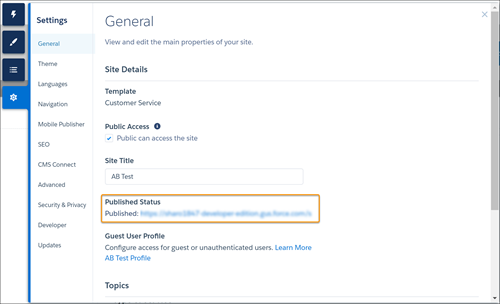
- In Default Value, enter the link to the Experience Builder site, followed by these
characters: /?guestToken=#{!$Record.Id}#[Time in Hours]Note The [Time in Hours] indicates how long the URL is valid for from the time it’s generated.Note To make sure that the link to the Experience Builder site is accurate, copy it from the Experience Builder settings.
- In Availability Outside the Flow, select Available for
input.
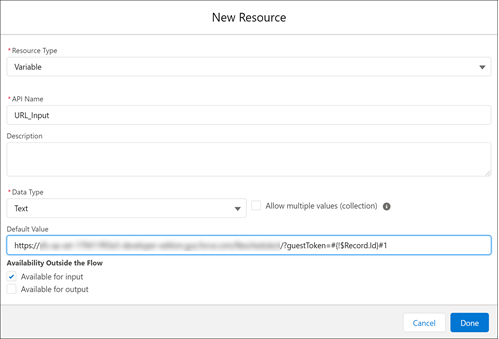
- Click Done.
-
Click New Resource again, and then create a variable for the URL
output.
- In Resource Type, select Variable.
- Enter an API name.
- In Data Type, select Text.
- In Availability Outside the Flow, select Available for input and Available
for output.
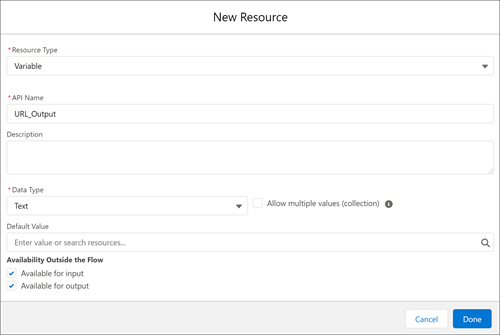
- Click Done.
-
From the Toolbox, click New Resource, and then create a variable
for the URL input.
-
Add the Apex action.
-
To add an element to the flow, click
 .
.
- Under Interaction, select Action.
- In the Action field, enter FSAA.AARebookingGetURLcontroller.
- Enter a name for the Label. The API Name is automatically populated accordingly.
-
In Set Input Values:
- Include the valueFromFlow option.
- Select the URL input variable that you created in step 5.
-
Under Advanced:
- Select Manually assign variables.
- In the output field, select the URL output variable that you created in step 5.
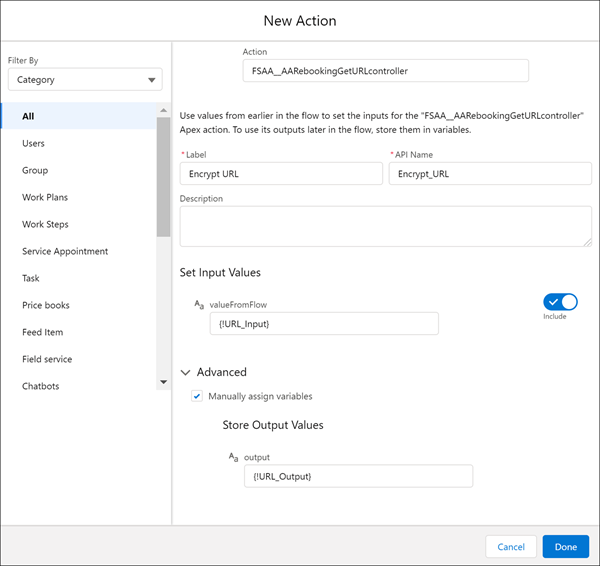
- Click Done.
-
To add an element to the flow, click
-
Add the Update Records component.
-
To add an element to the flow, click .
- Under Data, select Update Records.
- Enter a name for the Label. The API Name is automatically populated accordingly.
-
Under Set Field Values for the Service Appointment Record:
- In Field, select ApptBookingInfoUrl.
- In Value, select the URL output variable that you created in step 5.
- Click Done.
-
To add an element to the flow, click
-
Add the Send Conversation Messages action.
- Add a collection variable for the Messaging User object. This collection variable is populated with a list of messaging user record IDs based on your criteria. For example, you can configure your flow to send an automated message to a subset of messaging users based on channel and consent status.
- Add an action to the canvas. The New Action window opens.
-
Select the Send Conversation Messages action and complete the
fields.
- In Messaging Users, select the collection variable that you created.
- In Messaging Component, select your new messaging component. Make sure that the component status is Active on the Messaging Components page in Setup.
- Select Any Time for when to send the message.
- Select Yes, apply Messaging End User settings for end user’s consent preferences.
- In Session Longevity, select Yes, End Session Immediately if the end user doesn’t need to respond in this messaging session.
You can use values from earlier in a flow to set inputs for the message. If the action fields don’t contain valid inputs, the flow fails.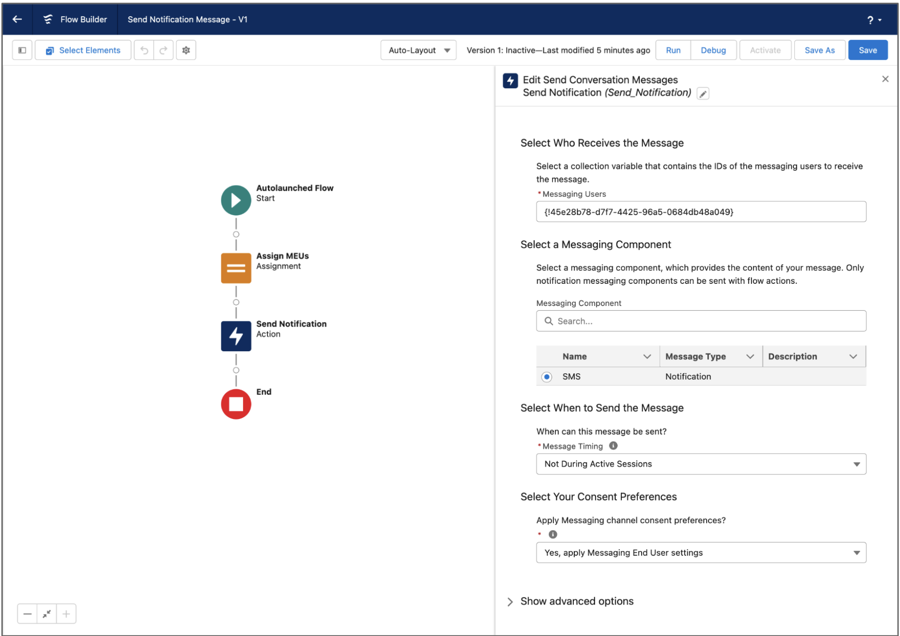
- Click Done.
- Save and activate the flow.
- To help troubleshoot flows, turn on flow debug logs.
- For an optimal customer experience, use complete addresses.
- The limit for active flows per flow type is 2,000.
Step 6: Enable Complex Work for Existing Appointments
If you’re using Enhanced Scheduling and Optimization, you can let users reschedule appointments with scheduling dependencies with Appointment Assistant Self-Service Scheduling. Appointment Assistant Self-Service Scheduling supports complex work only if you’re using Enhanced Scheduling and Optimization.
Give guest users access to the required service appointments. To minimize what guest users can access, only share service appointments used for Appointment Assistant.
- From Setup, in the Quick Find box, enter Security, and then select Sharing Settings.
- For manage sharing settings, select Service Appointments.
- Under Sharing Rules, click New.
- For Rule Type, select Guest user access, based on criteria.
-
Enter the sharing criteria. For example, enter this criteria.
- For Field, select Status.
- For Operator, select not equal to.
- For Value, enter Completed.
- Select to include records owned by high-volume users.
- Share the rule with <Your Site Name> Site Guest User.
- Save the rule.
