
You are here:
Configure an Enhanced Web Chat Deployment
Connect your messaging channel to a website with a new embedded deployment. Create and customize your deployment, add it to your site, and set up security.
Required Editions
| View supported editions. | |
 This article applies to:
|
Enhanced Web Chat channels |
 This article doesn’t apply to:
|
Enhanced In-App Chat, Enhanced WhatsApp, Standard and Enhanced Facebook Messenger, Standard and Enhanced SMS, Enhanced Apple Messages for Business, Enhanced LINE, and Bring Your Own Channel |
| User Permissions | |
|---|---|
| To set up this feature: | Customize Application AND Modify Metadata Through Metadata API Functions |
| To modify permission sets and profiles: | Manage Profiles and Permission Sets |
In this stage of Enhanced Web Chat setup, you’ll:
- Publish a deployment (if adding an additional Enhanced Chat deployment to a pre-existing Enhanced Chat channel).
- Customize a deployment.
- Add the deployment to your website.
- Set security protocols for your deployment.
Publish a Deployment
If you just created your first Enhanced Chat channel and deployment in the quick start flow, and you’re ready to customize that deployment, skip the Publish a Deployment section. If you’re adding an additional deployment to a pre-existing Enhanced Chat channel, take these steps to establish it.
For mobile, see Configure a Mobile Deployment.
- Enable digital experiences in your org.
- From Setup, in the Quick Find box, enter Embedded Service Deployments, and select Embedded Service Deployments.
- Click the New Deployment button. Choose your conversation type, Enhanced Chat.
- Select Web as the deployment destination for your channel.
-
Name your Embedded Service deployment, which creates the
API Name.
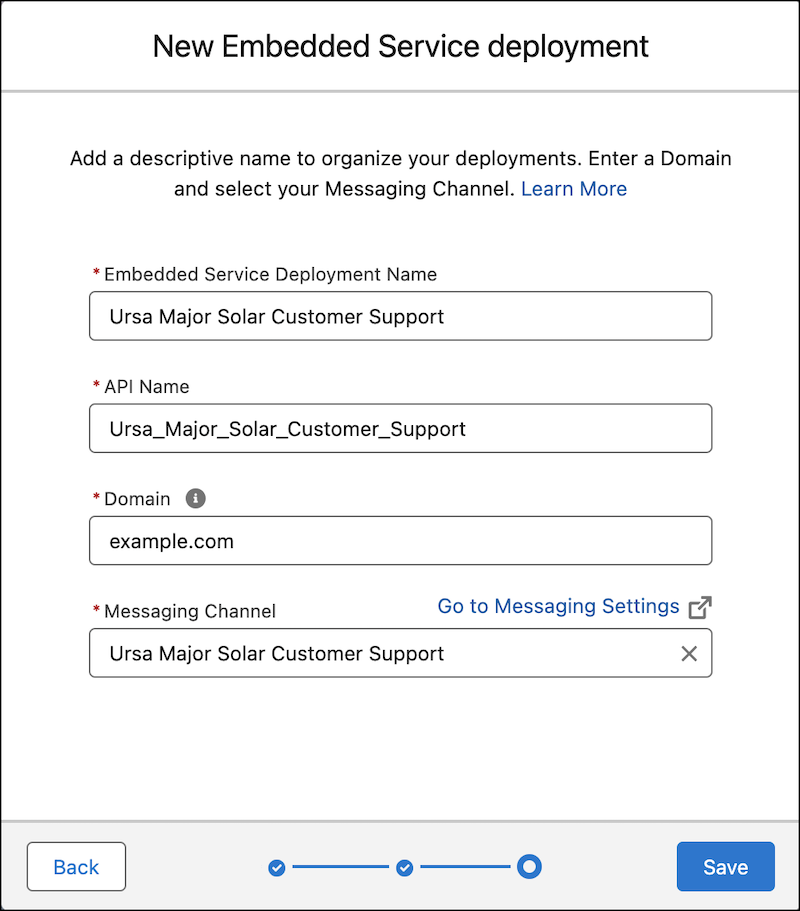
-
Enter the top level Domain name of the website, such as
example.com. This name covers any subdomains of the URL, such as help.example.com. For an
Experience Builder or Commerce Cloud
site deployment, go to Domains in Setup, and copy the
Experience Cloud Site Domain.
- To change the domain that’s associated with your embedded service deployment, go to Setup | User Interface | Sites and Domains | Sites, and select your site from the Site Label column. Your site is formatted as ESW_[deploymentname]_[numbers]. Under Trusted Domains for Inline Frames, find the domain or subdomain that you want to change, and click Edit. Save your changes.
- Select the Messaging Channel you created in Messaging Settings and add to the deployment. If you haven’t created a channel, go to Messaging Settings.
- Save your work.
- Create and publish your new deployment, which takes a few minutes. Don’t navigate away from the page until it’s complete.
- To ensure that Enhanced Chat continues to work optimally, always republish your deployment after testing newly added features.
Customize Your Deployment
Mission control for your customer experience is the Embedded Service Deployment Settings page. Edit your messaging settings, select branding, add pre-chat values, and copy your code snippet to deliver conversations to your website.
After you create or edit a deployment, you must publish it again by clicking the Publish button on the settings page.
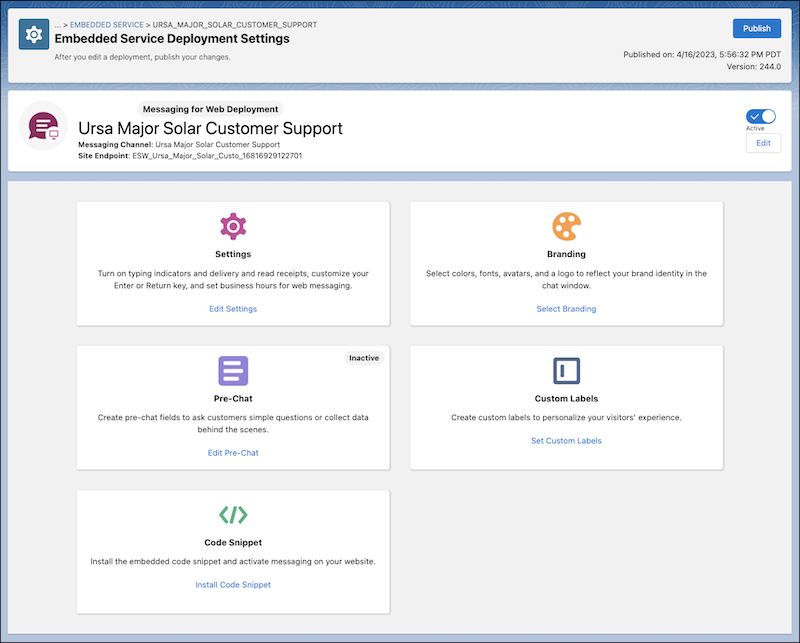
Optionally customize the following aspects of your deployment in Embedded Service Deployment Settings:
| Customization Section | What’s Possible | Additional Work Required |
|---|---|---|
| Settings | Check boxes to show delivery and read receipts to customers in their messaging window. Check a box to show typing indicators. Check a box to show the emoji keyboard to customers. Check a box to change the default behavior of the Enter or Return key from sending a messaging to starting a new line of text. To only display the messaging window during business hours, select a business hours record. | Before you add business hours to your deployment, create a business hours record. To override business hours and hide or show the chat button at specified times, use our API. |
| Branding | Set colors and fonts (including custom fonts), and upload avatars, and chat button image to match your branding in the customer-facing chat window. We recommend using an avatar image that’s 40 x 40 pixels. You can also set the width and height of your chat window. We don’t support adding custom CSS to your deployment. | Avatar images are sourced from a web page. Generate the URL for each image. To use a custom font, upload a .ttf, .otf, or .woff2 font file to Static Resources. Give the font file a unique name and set the cache control to public. In branding, select the custom font option and specify the name of the font file that you uploaded as a static resource. For your chat button we recommend using a circular or square image. If you're customizing the chat button on an Experience Builder site, make sure to add the image’s domain to the CSP Trusted URLs to ensure it renders correctly. See Select a Security Level in Experience Builder Sites |
| Pre-Chat | Select the standard and custom fields that customers must fill out before messaging with a service rep. Add hidden pre-chat fields to collect information automatically, behind the scenes. | To add visible or hidden fields to your pre-chat form, create a custom parameter on the messaging channel for the deployment. See Customize Pre-Chat for Enhanced Chat. |
| Custom Labels | Write your own labels for fields and alt text in your messaging experience. Select the language you want each label to appear in. | Before you create custom labels, enable translation workbench, add your supported language or languages, and assign your translators. See Enable Translation Workbench and Add Translated Languages and Translators. |
| Code Snippet | Copy the code snippet to add the messaging deployment to your website. Skip this action if embedding messaging in an Experience Builder or Commerce Cloud site. See next section to add messaging to your website. | Embed Enhanced Chat in an Experience Builder or Commerce Cloud site with the Embedded Messaging component, not a code snippet. See next section to Add Enhanced Chat to your external website. |
Add Enhanced Chat to Your Website
If embedding Enhanced Chat on an external website, follow these steps to add your code snippet. If using an Experience Builder or Commerce Cloud site instead of a website, add Enhanced Chat via the Embedded Messaging component. You don’t need a code snippet to complete the task.
For more details, see Configure an Enhanced Chat Deployment in an Experience Builder or Commerce Cloud Site.
- From Deployment Settings, select Install Code Snippet.
- To select your code, click Copy the Clipboard.
-
Paste the code before the closing body tag
(</body>)on each web page where you want the messaging button to appear. Don’t place the code in your header. Make sure you’ve added a valid language code for your language setting in the snippet. -
Enhanced Web Chat is compatible with most referrer policies, such as
origin. When selecting your referrer policy, consider these caveats.-
Ensure that the header of the chat button page doesn’t contain a referrer policy of
no-referrer. Specifically, the page must not include this line:<meta name="referrer" content="no-referrer" />. -
To ensure that Enhanced Web Chat works seamlessly in the Firefox browser, don't use
a referrer policy of
same-origin.
-
Ensure that the header of the chat button page doesn’t contain a referrer policy of
- Optionally, include the Meta Tag Code Snippet in the head element to make your page responsive to all devices. If your page already has the meta tag, adding this snippet isn’t necessary. The code is the only one that goes in the header section of each web page where embedded messaging appears.
Set Security Protocols for Your Deployment
After completing setup, add your domain to the CORS allowlist.
- If using an external website, add your CORS allowlist entries of URLs for the pages where you deploy messaging. The page you add is where customers access the messaging window. The origin URL pattern must include the HTTP or HTTPS protocol and a domain name. The wildcard character (*) is supported and must be in front of a second-level domain name. For example, https://*.example.com (https://%2A.example.com/) adds all subdomains of example.com (http://example.com/) to the allowlist.
- If using an Experience Builder or Commerce Cloud site, visit the instructions for adding security to that type of site here.
- From Setup, enter CORS in the Quick Find box, and then select CORS.
- Select New.
- Enter an origin URL pattern.
- Save your work.