Loading
Salesforce now sends email only from verified domains. Read More
Agentforce Contact Center
Table of Contents
Select Filters

          No results
          No results
          Here are some search tips

          Check the spelling of your keywords.
          Use more general search terms.
          Select fewer filters to broaden your search.

          Search all of Salesforce Help
          Persist Pre-Chat Inputs Across Messaging Sessions

          Persist Pre-Chat Inputs Across Messaging Sessions

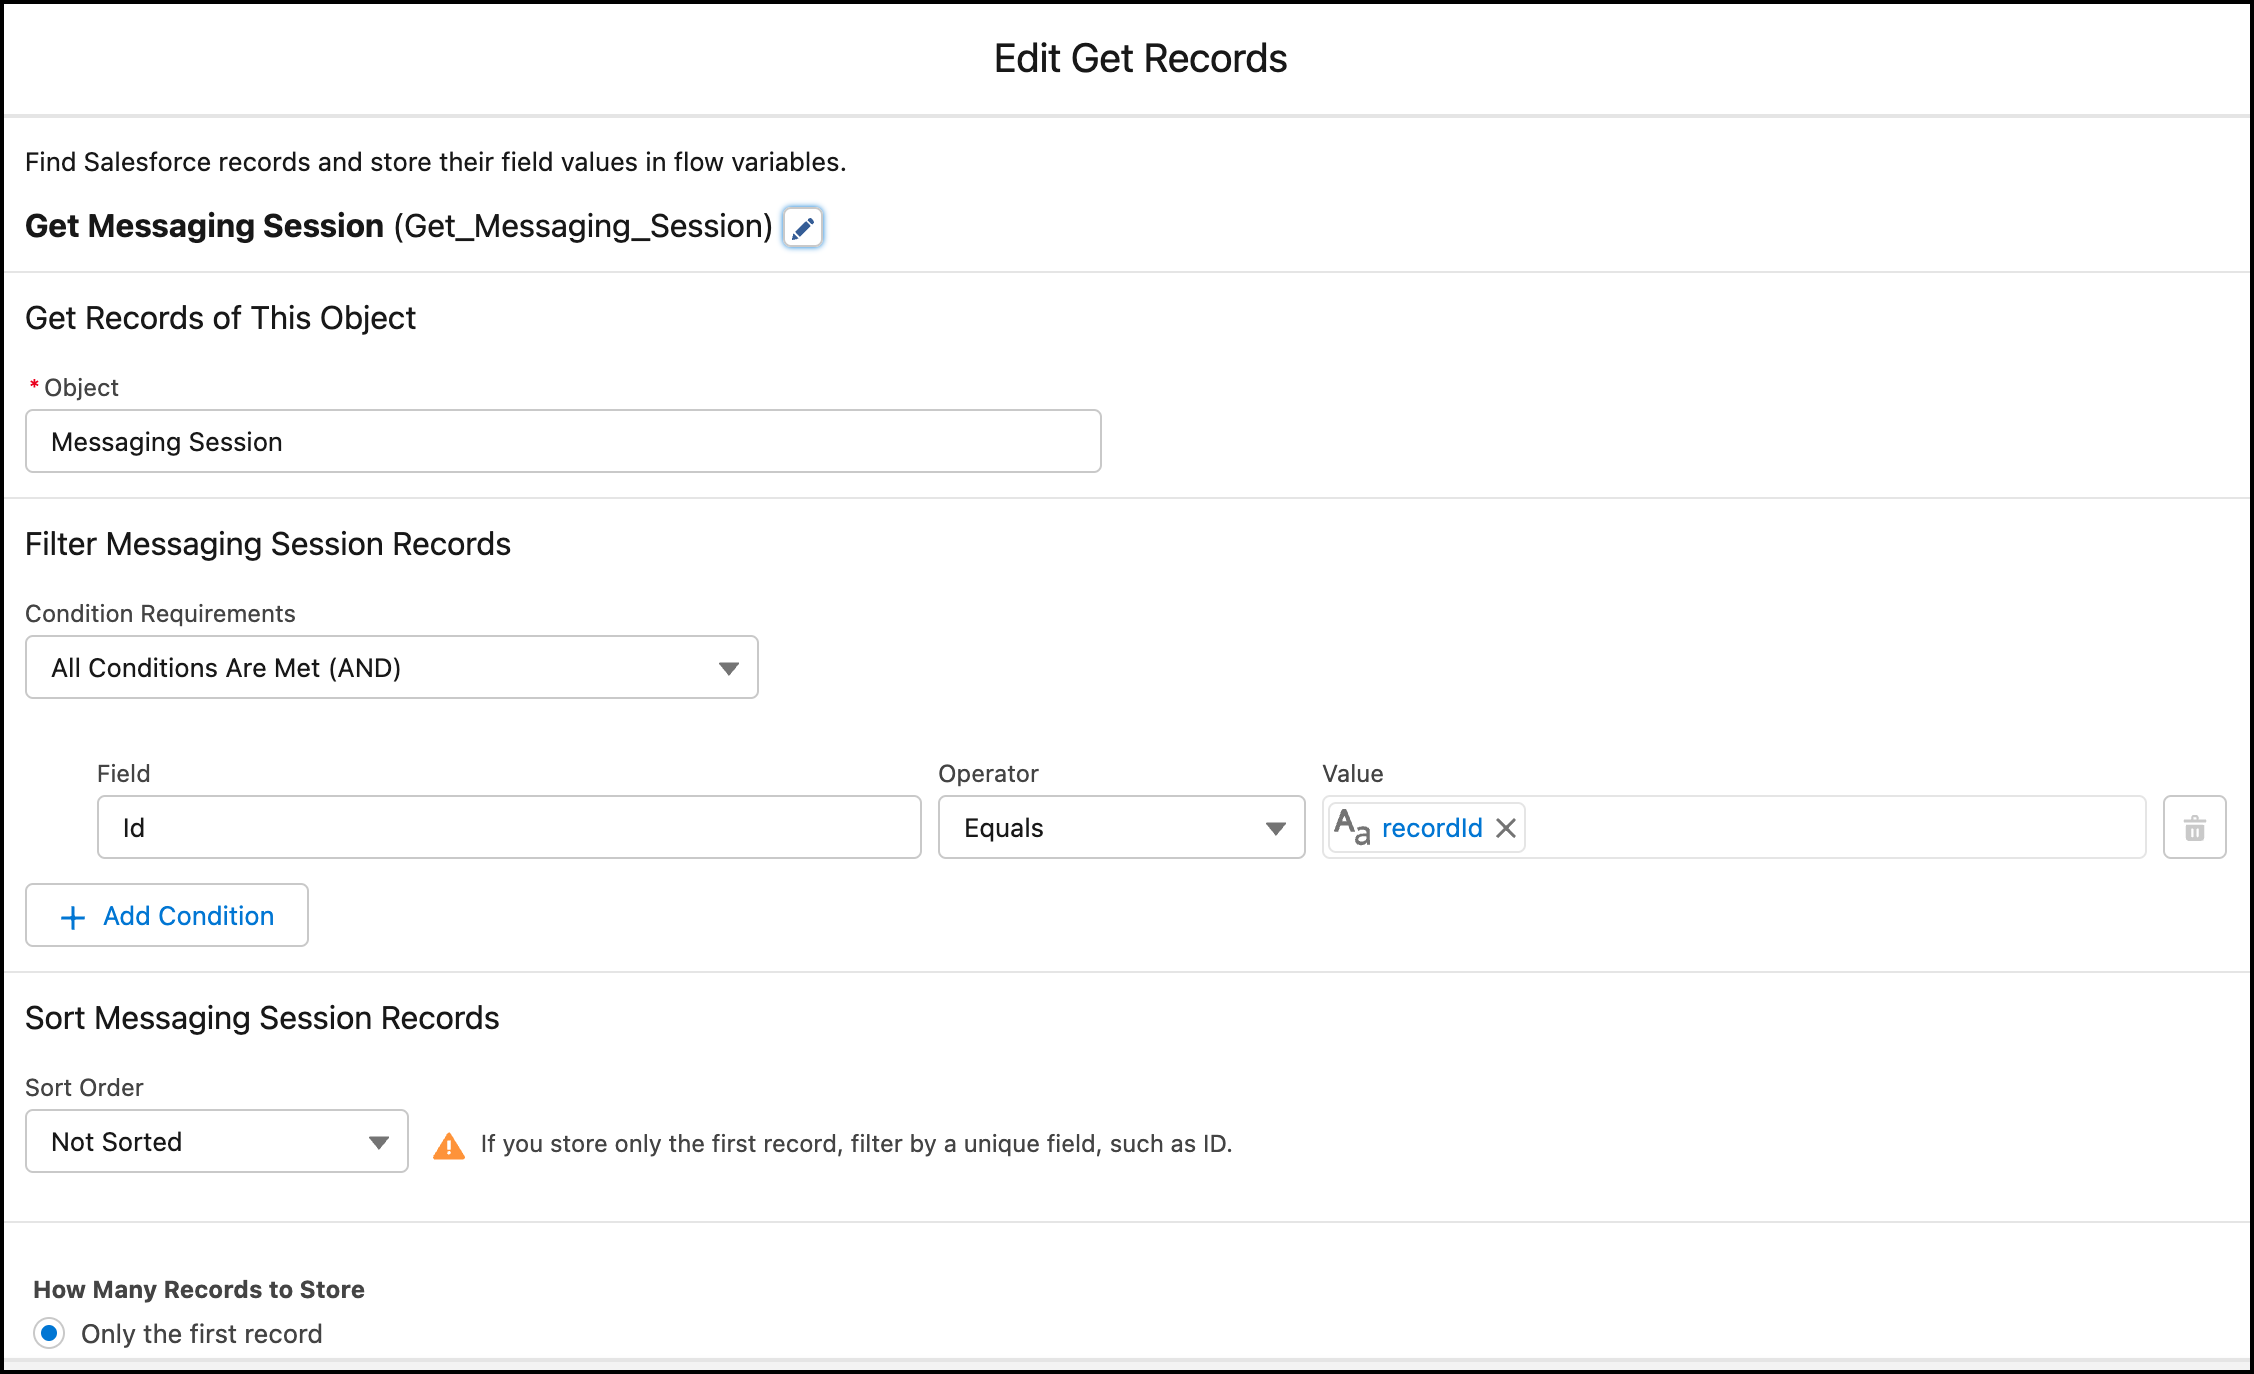
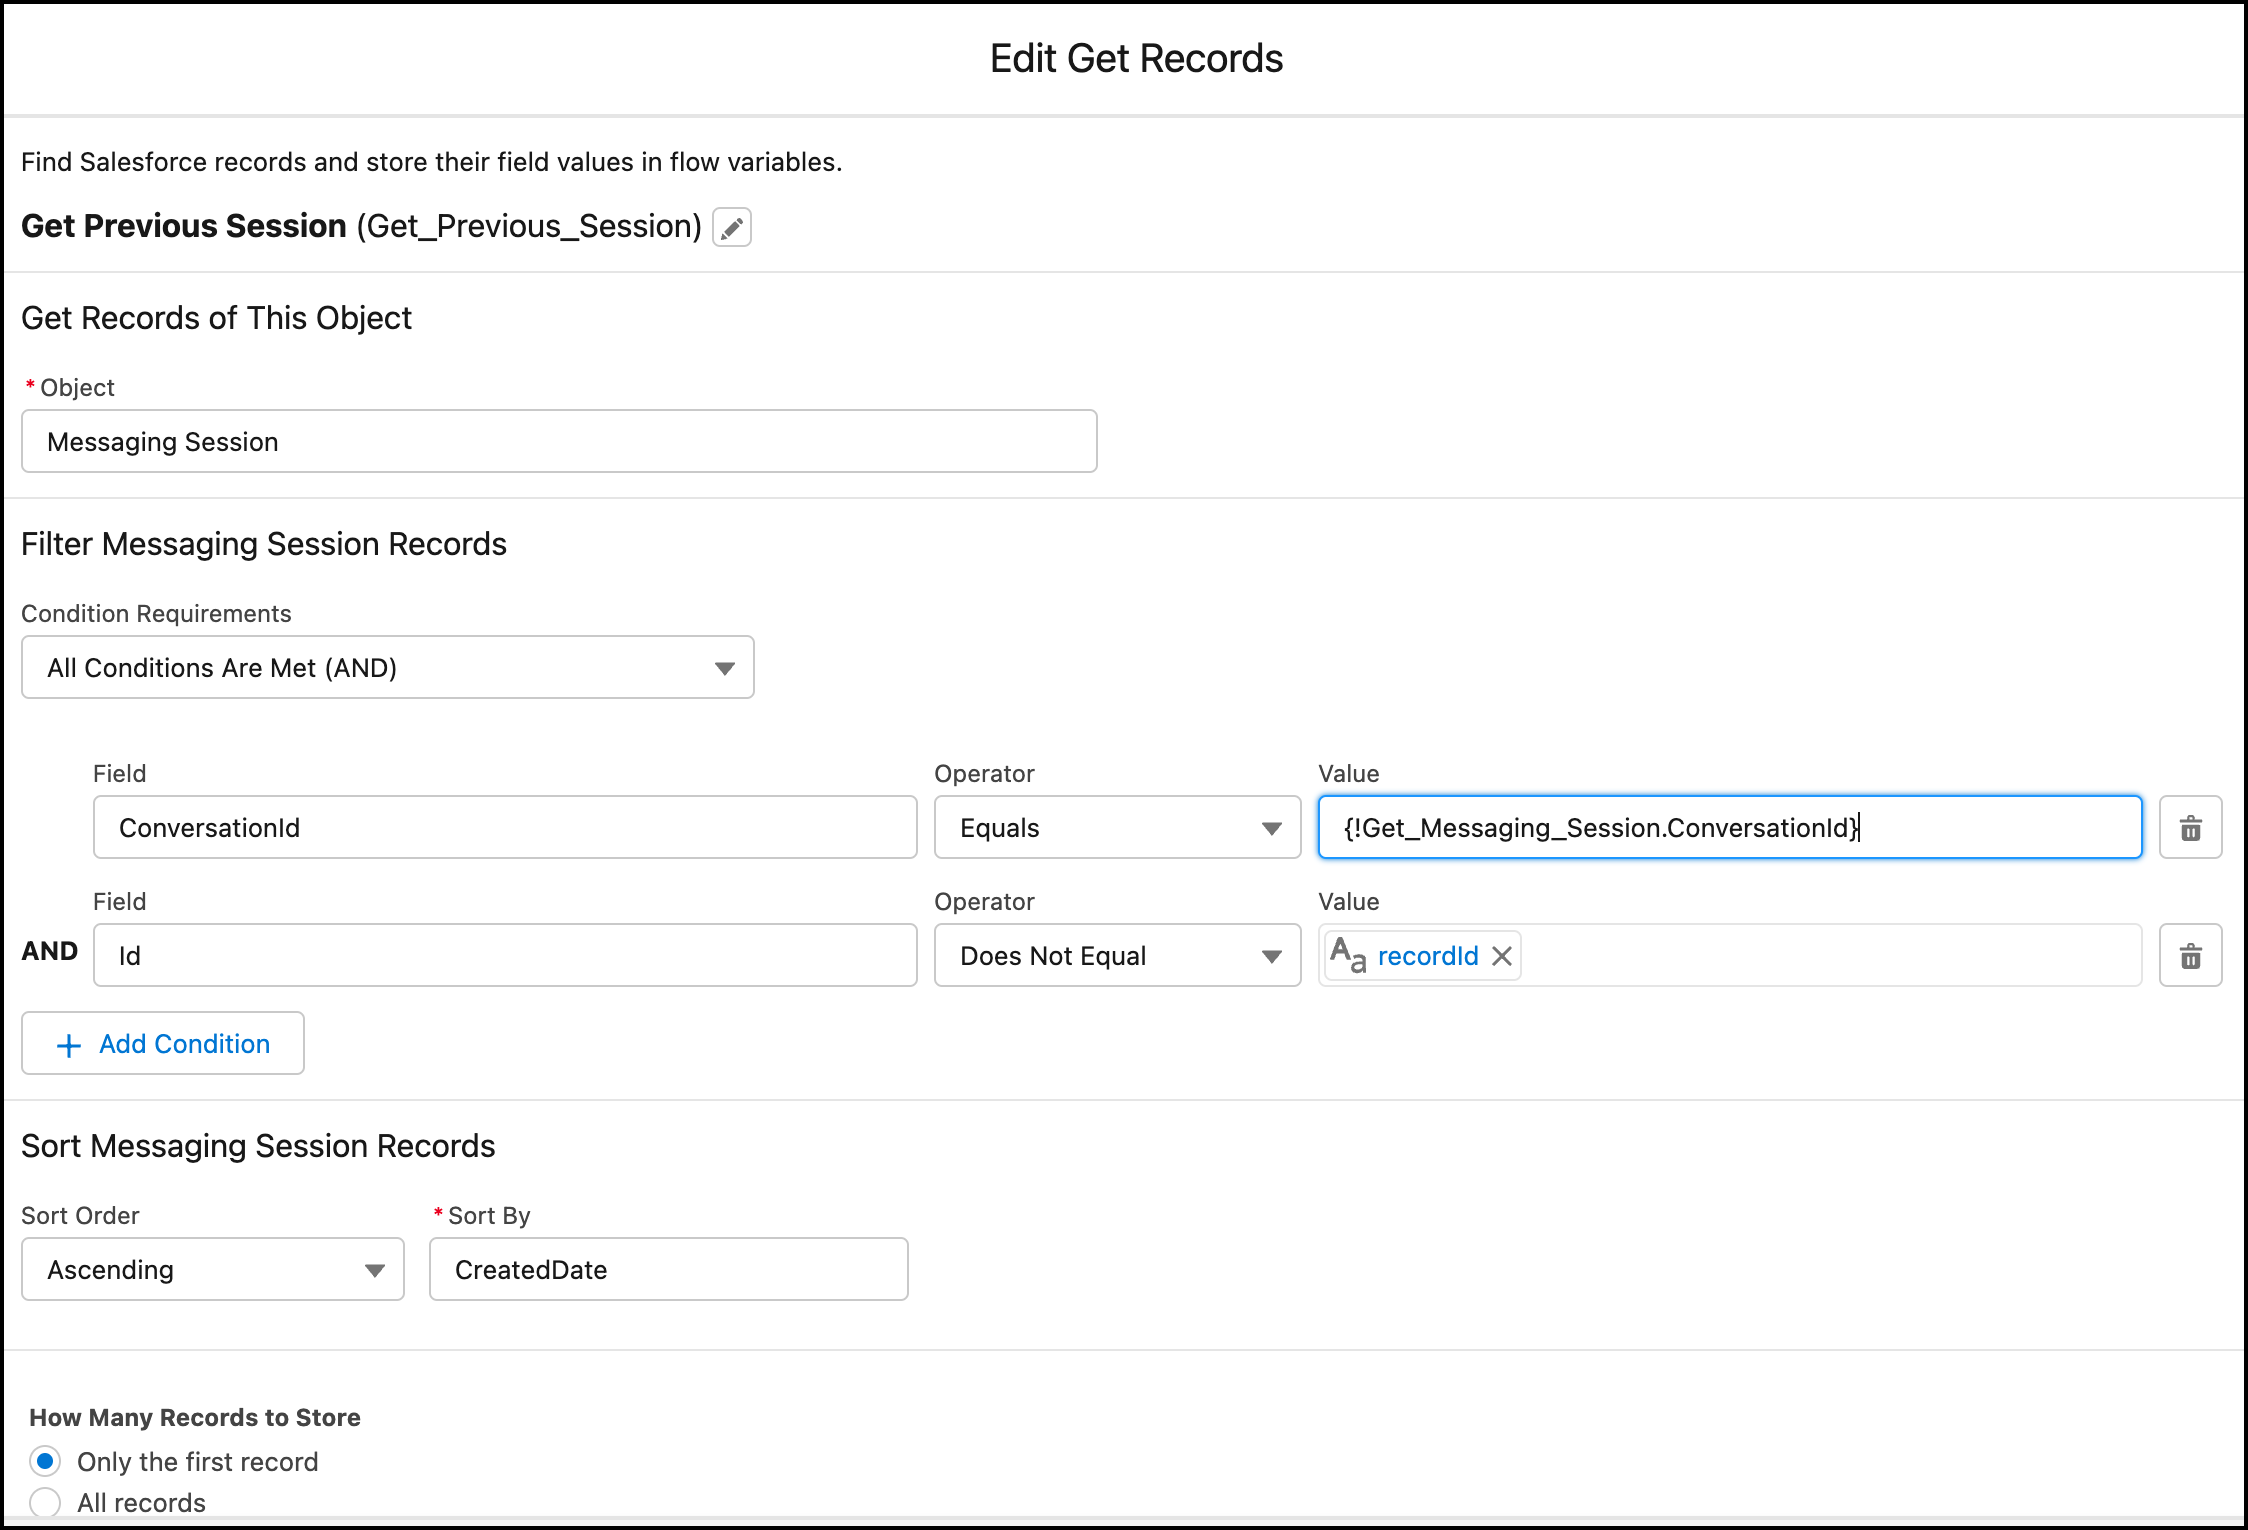
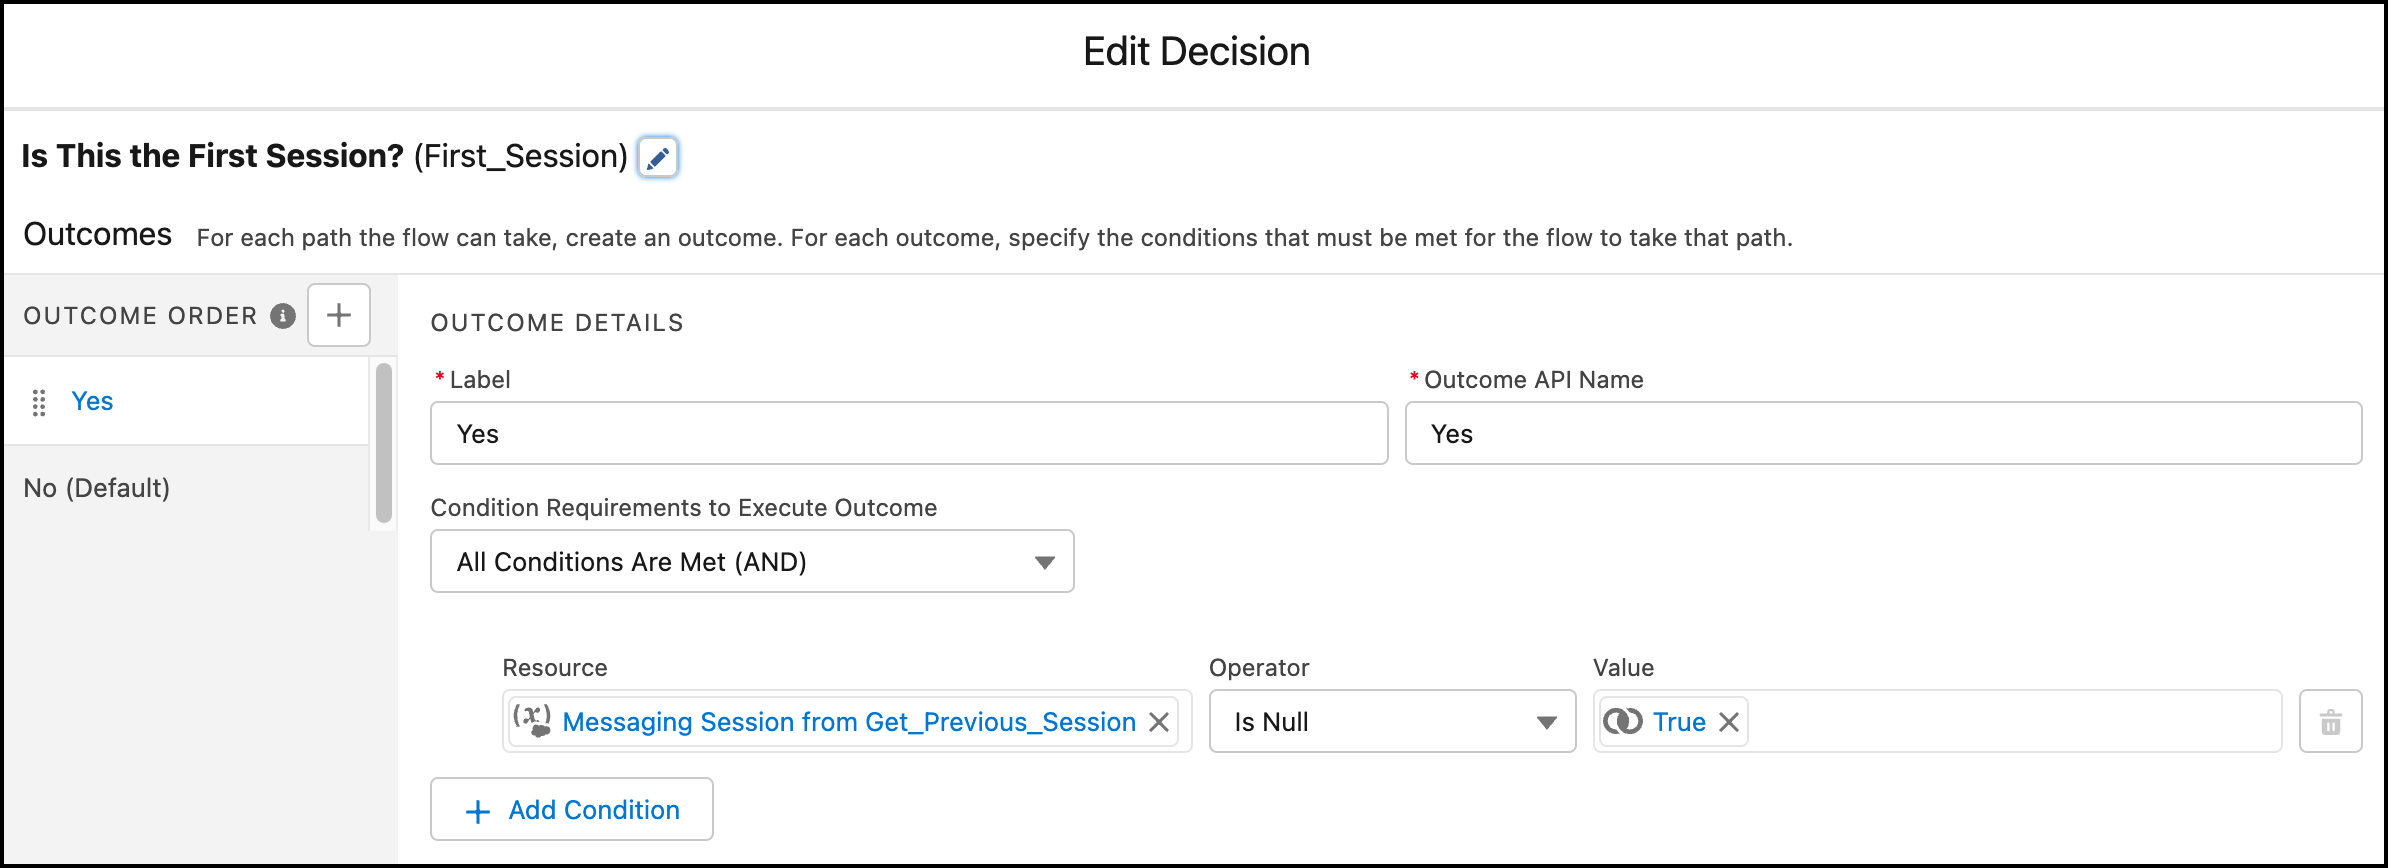
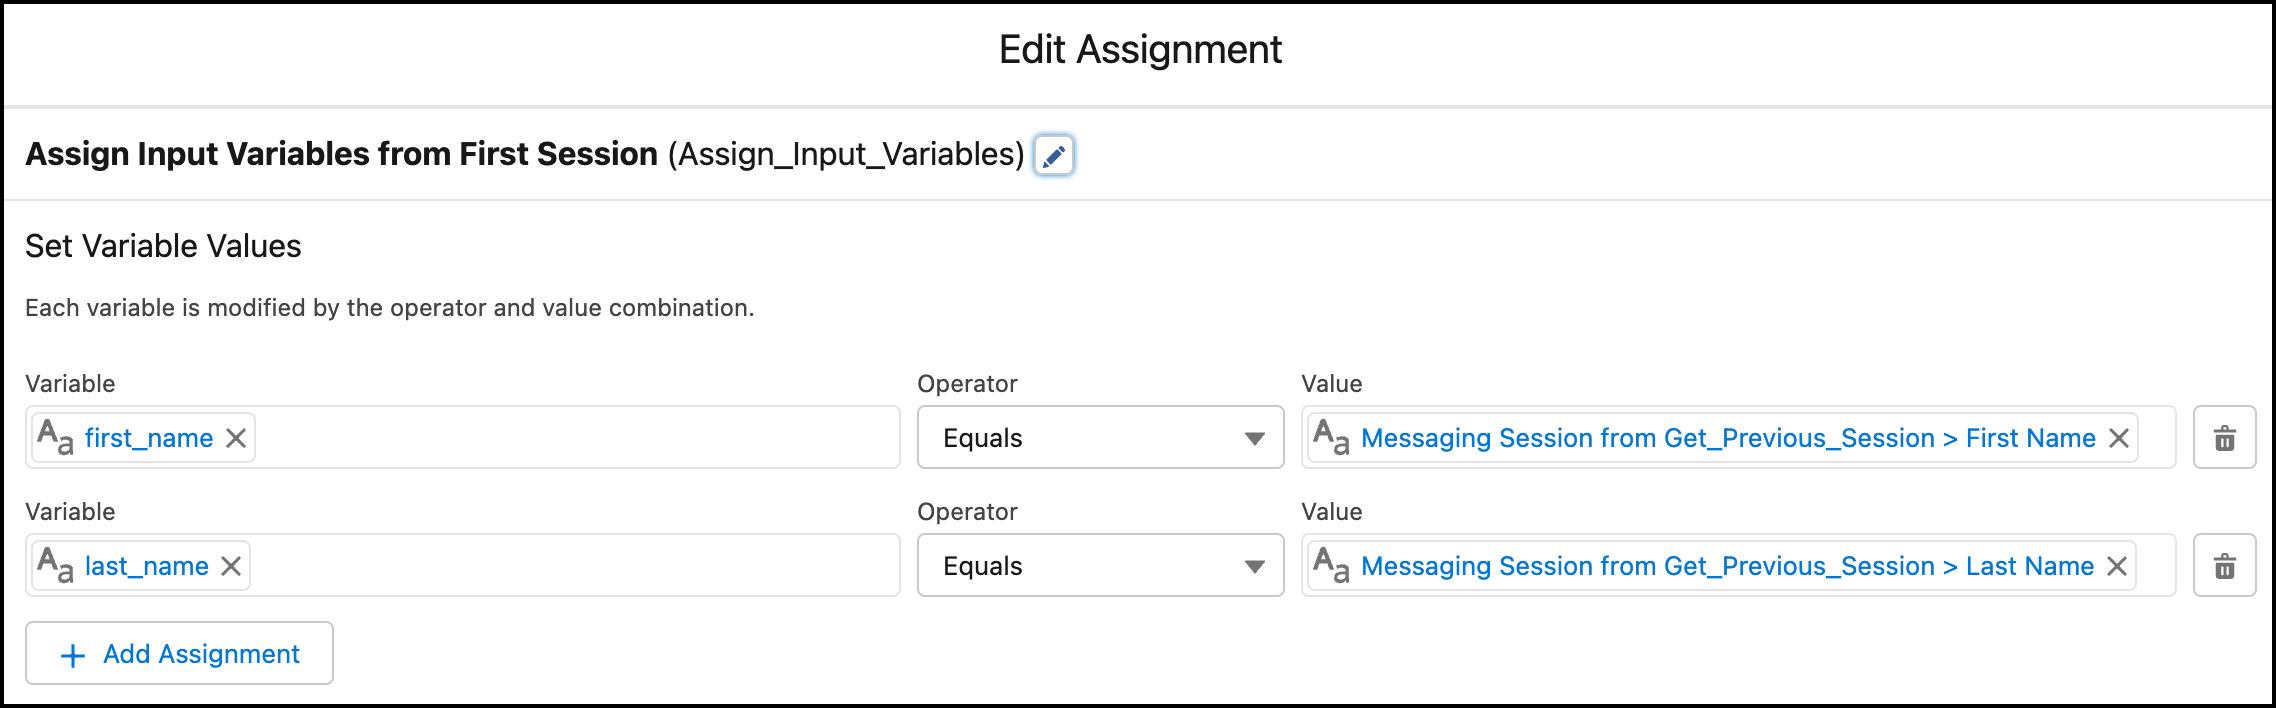
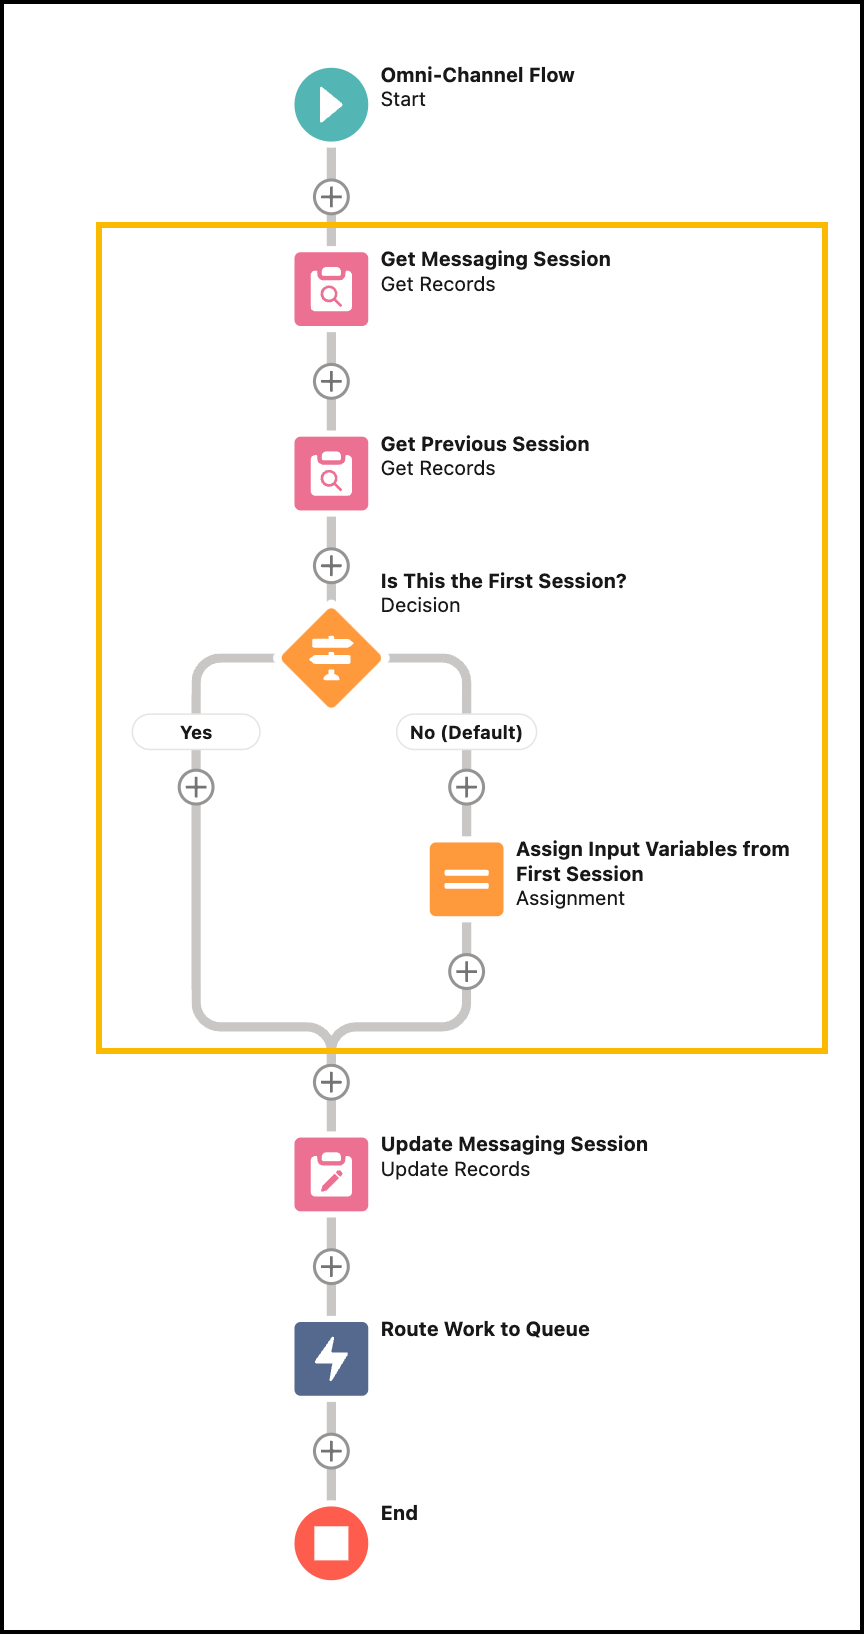
          An Enhanced Chat session ends when the service rep selects End Chat. If a customer continues to send messages, a new session is created. The conversation continues seamlessly from the customer’s perspective, but the rep loses access to the original pre-chat data. These instructions let service reps access pre-chat data across sessions. It’s not necessary to set up access to pre-chat data if you’re already using User Verification to persist messaging history.

          Required Editions

          View supported editions.
          Checkmark This article applies to: Enhanced In-App Chat and Enhanced Web Chat channels
          X icon This article doesn’t apply to: Enhanced WhatsApp, Standard and Enhanced Facebook Messenger, Standard and Enhanced SMS, Enhanced Apple Messages for Business, Enhanced LINE, and Bring Your Own Channel
          User Permissions
          To set up Omni-Channel Flow and Enhanced Chat: Customize Application
          To modify permission sets and profiles: Manage Profiles and Permission Sets

          Before you begin, you must have an Omni-Channel flow that already handles pre-chat data. To learn more, see Map Pre-Chat Values in Omni-Channel Flow.

          Since pre-chat data isn’t stored across sessions by default, you must store this data in a Salesforce record during the first session. Then, update your Omni-Channel flow to access this data from subsequent sessions. Your updated flow looks up this information using the ConversationId field of the Messaging Session record, which is the same across sessions.

          Important
          Important This scenario is more likely to occur in Enhanced In-App Chat where a customer can continue a conversation long after the service rep has ended the chat. However, it can also occur with Enhanced Web Chat customers when the customer sends more messages from the same messaging window.
          1. From Setup, in the Quick Find box, enter Flows, and then select Flows.
          2. Find and select your previous flow from the list.
          3. Before handling the pre-chat input variables or routing the work, add a check to determine if we have a pre-existing session from the same conversation. If so, we use that information to repopulate the input variables.
            1. Use a Get Records element to get the current messaging session using the recordId input.
              Diagram of get current session flow element.
            2. Use a Get Records element to find a pre-existing messaging session with the same ConversationId as the current messaging session. We also make sure that the Id isn’t the same as the current messaging session. In this example, we sort the results by creation date so that we can ensure that the first result is the first session. We then only return the first result.
              Diagram of get previous session flow element.
            3. To determine if this session is the first messaging session, use a Decision Tree element and check if the previous result is null.
              Diagram of decision tree flow element.
            4. If this session is the first messaging session, no action is necessary.
            5. If this session isn’t the first messaging session, extract the pre-chat information from wherever you previously stored it and put it in the correct input variables. In this example, we extract the values from custom fields in the original Messaging Session record.
              Diagram of get previous session flow element.
            6. After this new logic, you can handle the pre-chat input variables and route the work in just the same way as you did in your original flow.
          4. The following screenshot illustrates what your new flow could look like. The new logic is highlighted.
            Diagram of Omni-Channel Flow that works across multiple sessions.
          5. Click Done.
          6. Save this flow as a new version, and verify that it’s activated in your org.
           
          Loading
          Salesforce Help | Article