
You are here:
Prepare a Salesforce Org for Enhanced Chat
Build a strong foundation for your new messaging channel and deployment.
Required Editions
| View supported editions. | |
 This article applies to:
|
Enhanced In-App Chat and Enhanced Web Chat channels |
 This article doesn’t apply to:
|
Enhanced WhatsApp, Standard and Enhanced Facebook Messenger, Standard and Enhanced SMS, Enhanced Apple Messages for Business, Enhanced LINE, and Bring Your Own Channel |
| User Permissions | |
|---|---|
| To set up Omni-Channel Flow and Enhanced Chat: | Customize Application |
| To modify permission sets and profiles: | Manage Profiles and Permission Sets |
In this stage of Enhanced Chat for Web setup:
- Set Up Omni-Channel.
- Create an Omni Flow.
- Prepare the Messaging Session Layout.
Set Up Omni-Channel
Enable Omni-Channel for your Enhanced Chat use case.
- Enable Omni Channel.
- Create a Service Channel for Enhanced Chat.
- Create a queue where you want to route incoming messaging sessions. Add Messaging Session as a supported object.
Create an Omni-Channel Flow
Create an Omni-Channel Flow for your Enhanced Chat use case.
With Omni-Channel set up, you’re ready to create an Omni-Channel Flow. This flow is required to route Messaging requests. Get up and running with a basic flow. After you set up your Pre-Chat Form, return to this flow to map pre-chat fields to your messaging channel.
Note This section assumes that you understand how to create flows with FlowBuilder. If you
don’t, read the Flow Builder documentation or take our
Flow Builder Trailhead module.
- From Setup, in the Quick Find box, enter Flows, and select Flows.
- Create a New Flow.
- In the All + Templates tab, select Omni-Channel Flow.
- From the Manager tab, create a New Resource.
- Select Variable as your Resource Type.
-
For the API Name, enter recordId. For the
Data Type, specify text.
 Important The API name is case-sensitive and must be recordId. The messaging channel uses this value to pass information into this Omni-Channel flow.
 - Check Available for input, and then click Done.
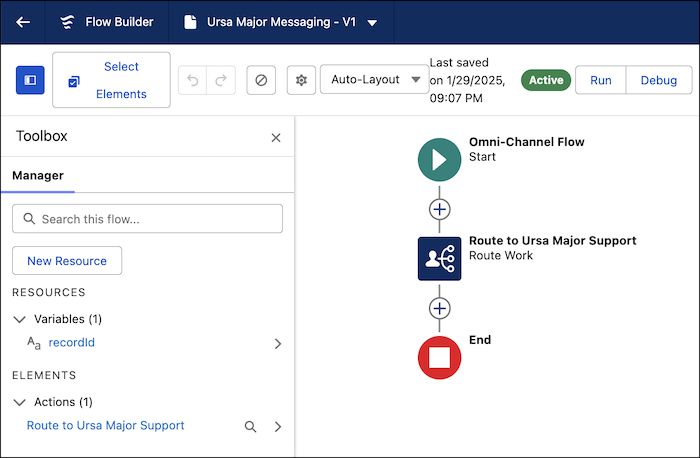
- From the Elements tab, select a Route Work action in your flow.
- Name the New Action. Use recordId variable as the input value. Select Messaging for the Service Channel.
-
Specify Queue, Agent,
Bot, or Skills as the Route To value.
- If you select Queue, use the Queue ID for the queue where you want to direct the work.
- If you select Agent, add the service rep's (agent's) name via the Agent ID field.
- If you select Bot, search for the bot name.
- If you select Skills, add the Skill Requirement List.
- Click Done.
-
Your simple flow looks like this.
- Save and activate your flow.
Did this article solve your issue?
Let us know so we can improve!