
You are here:
Manage Contact Center Queues in Salesforce and Your Telephony Provider Using Groups
If your telephony provider supports assigning groups of reps to queues, use Queue Management. With Queue Management, you manage Salesforce reps by assigning them to contact center groups. For example, you can create different groups of reps based on skills, such as product support and sales.
Required Editions
This article applies to:
- Salesforce Voice with Amazon Connect
- Salesforce Voice with Partner Telephony
- Salesforce Voice with Partner Telephony from Amazon Connect
| View supported editions. |
When you assign a group to a queue, calls in the queue are routed to reps in that group. Managing reps in groups makes contact center management more efficient. For example, if a contact center queue gets swamped with calls and all reps are running at capacity, a supervisor can reassign a group of reps from another queue–all from within Command Center for Service.
Not all telephony providers support the concept of groups. There are other providers that allow you to assign reps to groups and groups to queues, but not reps directly to queues—Amazon Connect falls in this category. Queue Management can be used with any telephony provider as long as the telephony provider supports the concept of groups.
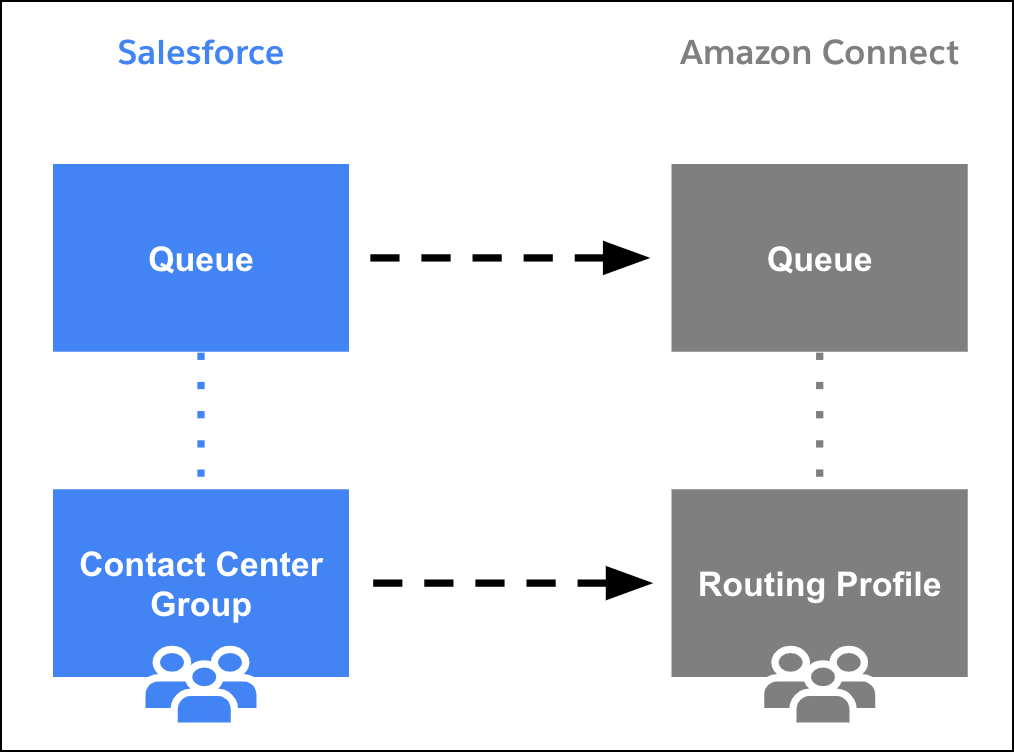
Although you set up contact centers, queues, and groups in Salesforce, behind the scenes, your telephony provider actually routes the calls using its own queues, groups, and users. To enable your telephony provider to route calls, when you add a queue to a contact center, you also associate it with a telephony provider queue. Similarly, when you create a contact center group in Salesforce, you associate it with a telephony provider group. For example, for Amazon Connect, you associate the contact center group with an Amazon Connect routing profile, which is their version of a group. Each rep in a contact center group maps to a user assigned to the corresponding telephony provider group.
When changes are made to a contact center queue or group, those changes are also updated in the associated telephony provider queues and groups if this feature is enabled. The changes synchronize one way, which means that changes in the telephony provider aren’t pushed back into Salesforce.
For example, changes to Salesforce contact center queues and groups are pushed to Amazon Connect queues and routing profiles, respectively.
- Enable Queue Management
To synchronize changes in Salesforce contact center queues to your telephony system, enable this feature in setup. - Suspend Sharing Rule Calculations
When you make changes to queues and contact center groups with sharing rules, the sharing rules are reevaluated for each impacted user. These changes can cause Apex rules and related object sharing rules to be recalculated as well. - Import Amazon Connect Queues and Memberships into Your Contact Center
If you have an Amazon Connect contact center, import Amazon Connect queues and their memberships into your Salesforce contact center. The import creates contact center queues based on Amazon Connect queues, contact center groups based on Amazon Connect routing profiles, and maps contact center users to Amazon Connect users. - Add a Queue in the Contact Center
To manage calls, add queues to the contact center. - Add a Group to the Contact Center and Queues
Create groups in the contact center to classify reps. When you associate a queue with a group, all reps assigned to the group are routed work from the queue. Groups let you manage reps and queues at scale. For example, if a queue is inundated with calls, you can add more reps to help out by associating another group with the queue. - Assign Reps to a Contact Center Group
Classify your reps by assigning them to contact center groups. For example, assign product support reps to a Support group and sales reps to a Sales group. Reps assigned to this contact center group are eligible to be routed work from all its associated queues. By grouping reps, you can manage reps with similar skills and, if needed, reassign the entire group to accept calls from another queue. - Resume Sharing Rule Calculations
Resume the sharing rule calculations after you finish setting up the contact center queues and groups.
Enable Queue Management
To synchronize changes in Salesforce contact center queues to your telephony system, enable this feature in setup.
Required Editions
| User Permissions Needed | |
|---|---|
| To enable Queue Management for Amazon Connect: | Salesforce Voice Contact Center Admin |
- From Setup, in the Quick Find box, enter Amazon Setup or Partner Telephony Setup, and then select Amazon Setup or Partner Telephony Setup.
- Based on your telephony model, enable Update Amazon Connect Queues and Routing Profiles or Update Partner Telephony Queues and Groups.
- For Salesforce Voice with Partner Telephony, associate the partner telephony users and groups with the Salesforce Voice queues.
Suspend Sharing Rule Calculations
When you make changes to queues and contact center groups with sharing rules, the sharing rules are reevaluated for each impacted user. These changes can cause Apex rules and related object sharing rules to be recalculated as well.
Required Editions
| User Permissions Needed | |
|---|---|
| To defer (suspend and resume) and recalculate sharing rules: | Manage Users AND Manage Sharing Calculation Deferral |
Performing a large number of changes to queues and groups can lead to very long sharing rule evaluations or timeouts. To avoid these issues, suspend these calculations. You can resume them after you finish changing the queues and groups.
- From Setup, in the Quick Find box, enter Defer Sharing Calculations, and then select Defer Sharing Calculations.
- In the Sharing Rule Calculations related list, click Suspend.
Import Amazon Connect Queues and Memberships into Your Contact Center
If you have an Amazon Connect contact center, import Amazon Connect queues and their memberships into your Salesforce contact center. The import creates contact center queues based on Amazon Connect queues, contact center groups based on Amazon Connect routing profiles, and maps contact center users to Amazon Connect users.
We map the users based on the Salesforce user ID that’s contained in each Amazon username. If an Amazon Connect user can’t be mapped to a Salesforce user, the user is ignored and their membership isn’t synchronized.
The import doesn’t delete existing Salesforce contact center queues. It just synchronizes their queue membership. If needed, it updates the queue membership based on the membership in the associated routing profile.
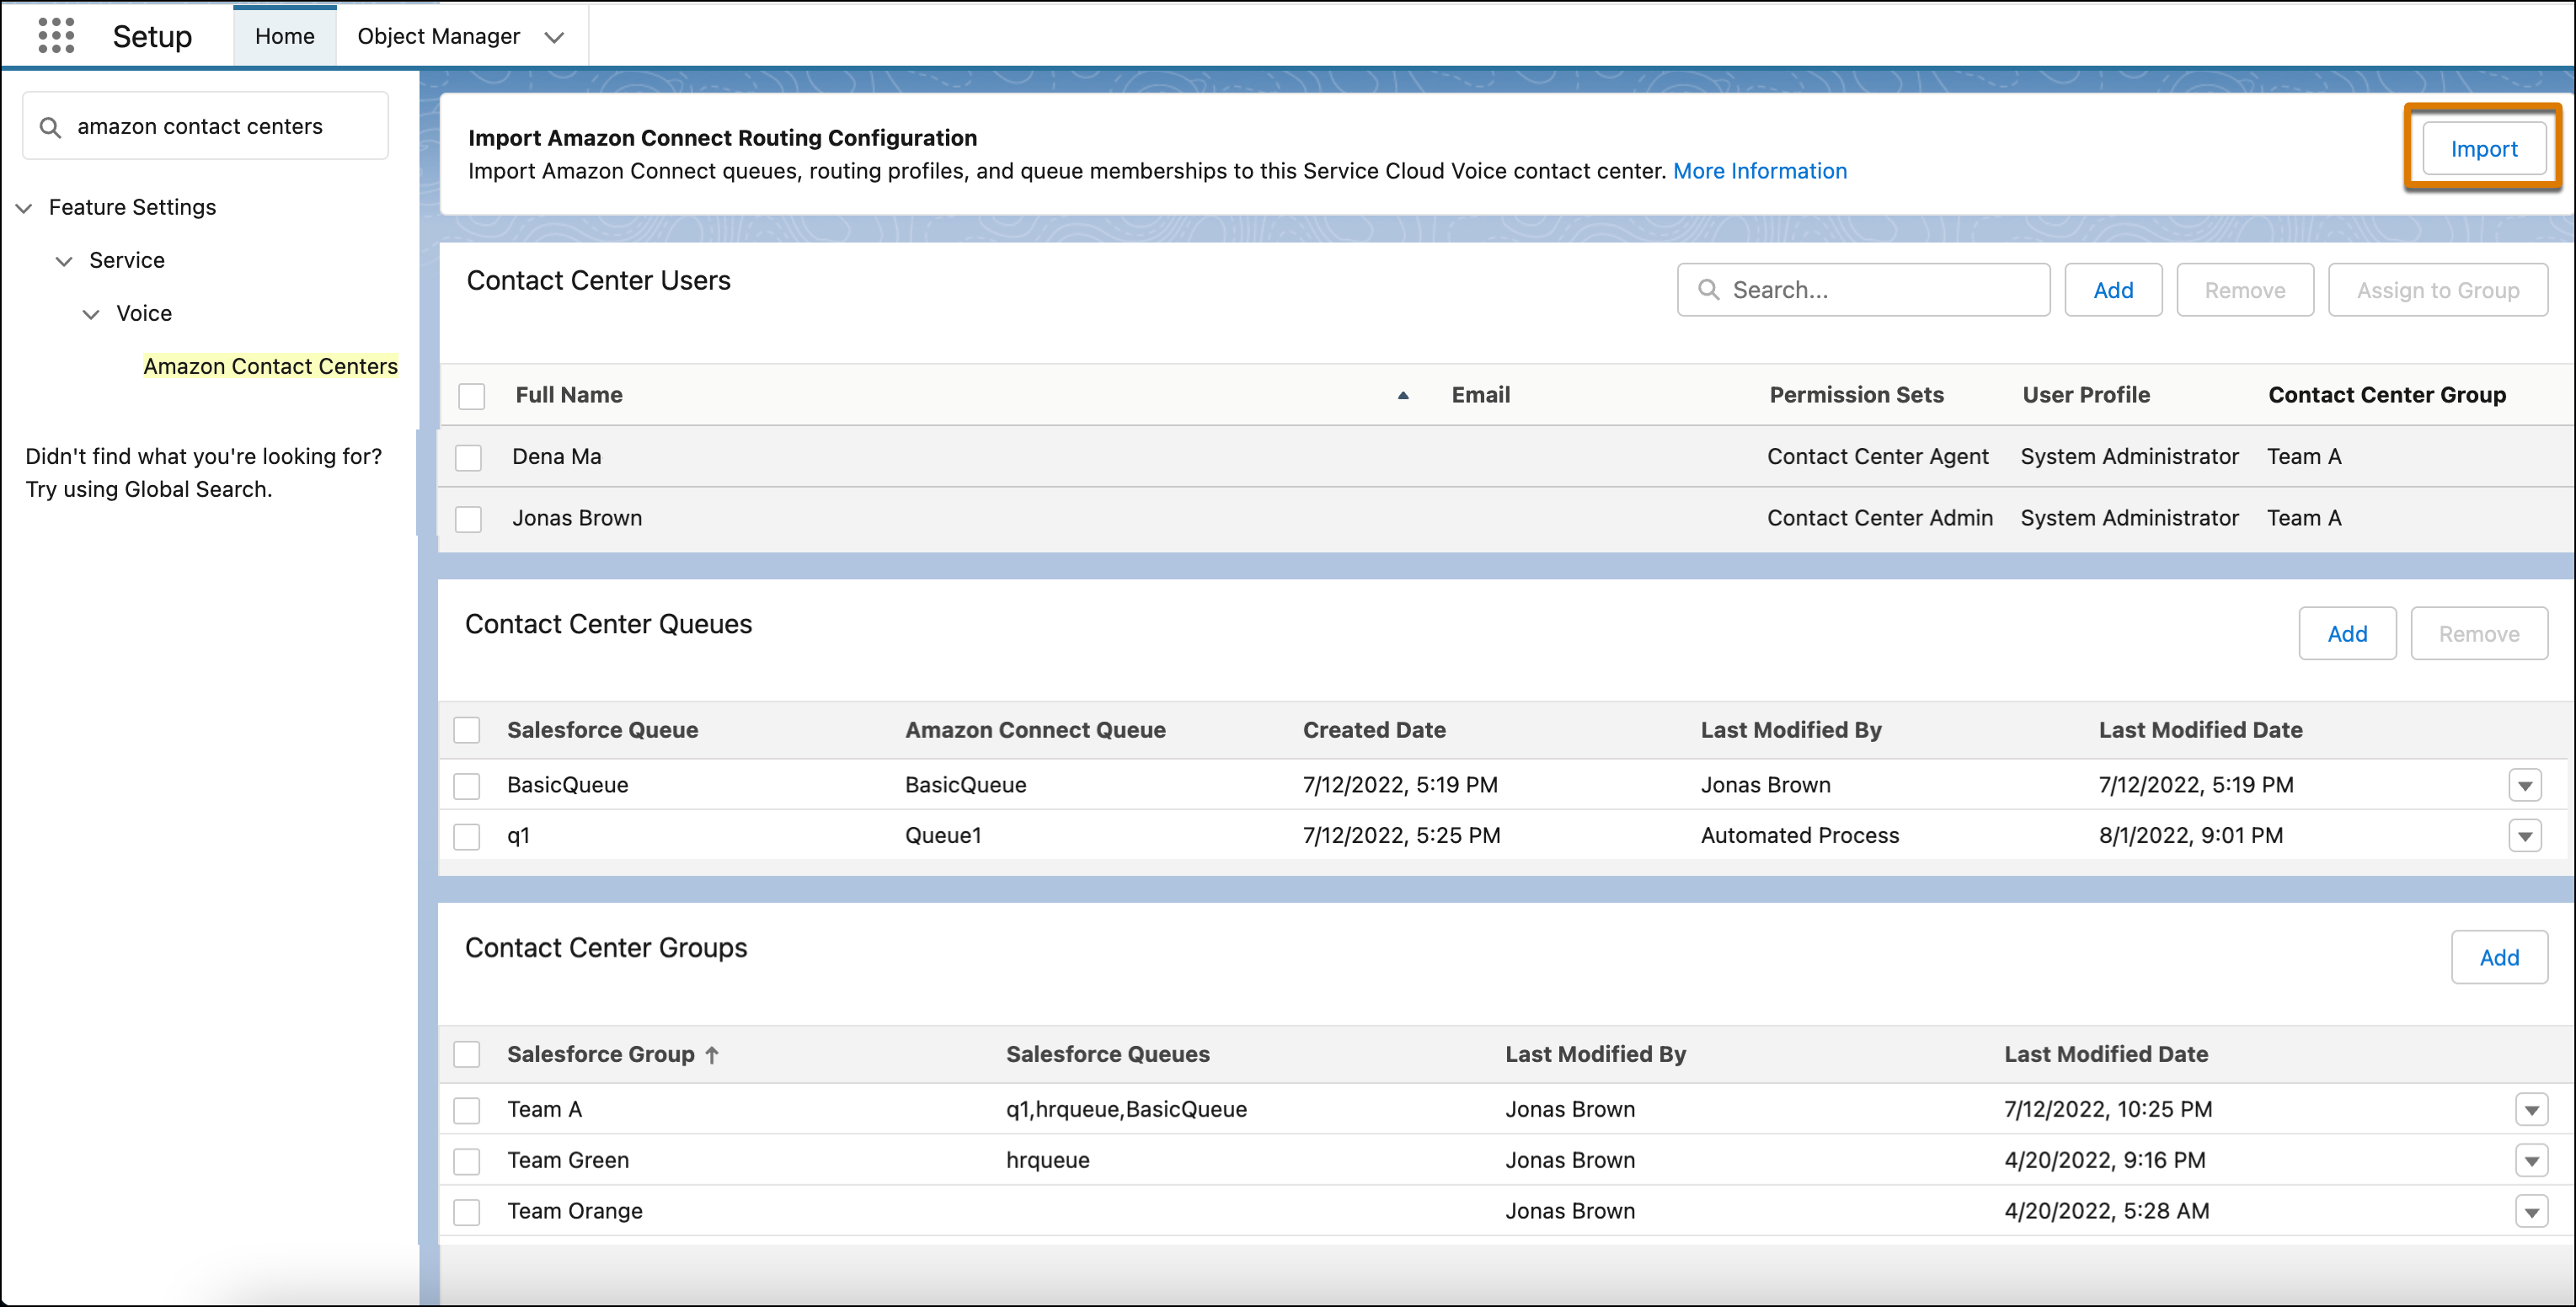
- From Setup, in the Quick Find box, enter Contact Centers, and select Amazon Contact Centers.
- To open your contact center, click its link.
-
To import queues, groups, and reps into your Salesforce contact center from Amazon
Connect, in the contact center details page, click Import.
If needed, you can add more queues and groups in the contact center. And, to continuously synchronize changes in your contact center queues and groups with Amazon Connect’s queues and routing profiles, enable queue management for Amazon Connect.
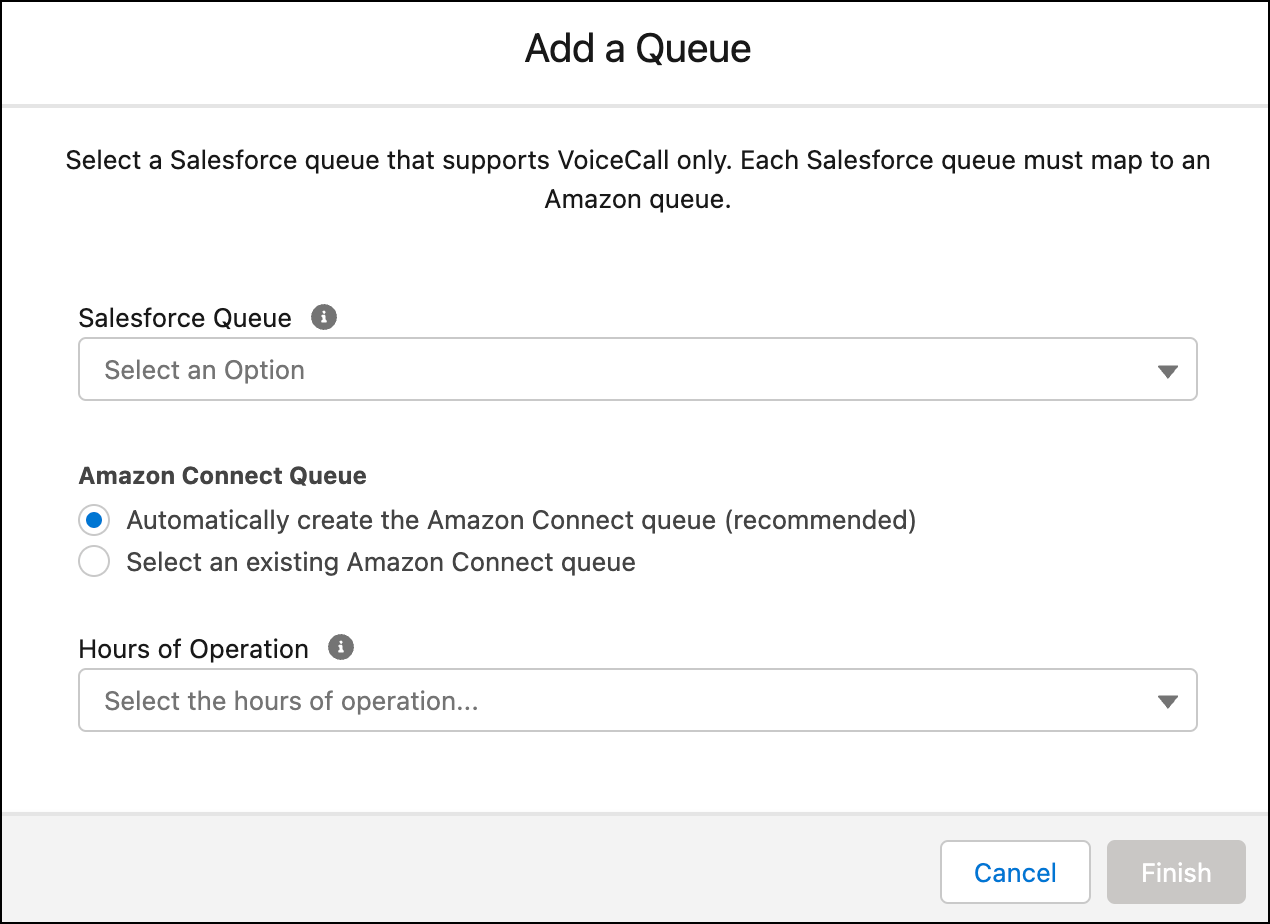
Add a Queue in the Contact Center
To manage calls, add queues to the contact center.
You can add up to ten queues at once. For adding a larger number of queues simultaneously, see Create Contact Center Queues in Bulk.
Add a Group to the Contact Center and Queues
Create groups in the contact center to classify reps. When you associate a queue with a group, all reps assigned to the group are routed work from the queue. Groups let you manage reps and queues at scale. For example, if a queue is inundated with calls, you can add more reps to help out by associating another group with the queue.
Required Editions
| User Permissions Needed | |
|---|---|
| To add contact center group: | Manage Users AND Salesforce Voice Contact Center Admin |
When you add a group to a contact center, you associate it with a partner telephony queue, and select one or more contact center queues to associate with the group. If you enable queue management, any changes you make to the group’s users or queues also updates the partner telephony users and queues assigned to the corresponding group.
- From Setup, in the Quick Find box, enter Contact Centers, and then select Amazon Contact Centers or Partner Telephony Contact Centers.
- Open the contact center.
-
In the Contact Center Groups section, click Add.
The options vary based on your telephony provider. For example, for an Amazon Connect contact center, you associate the contact center group with an Amazon Connect routing profile.
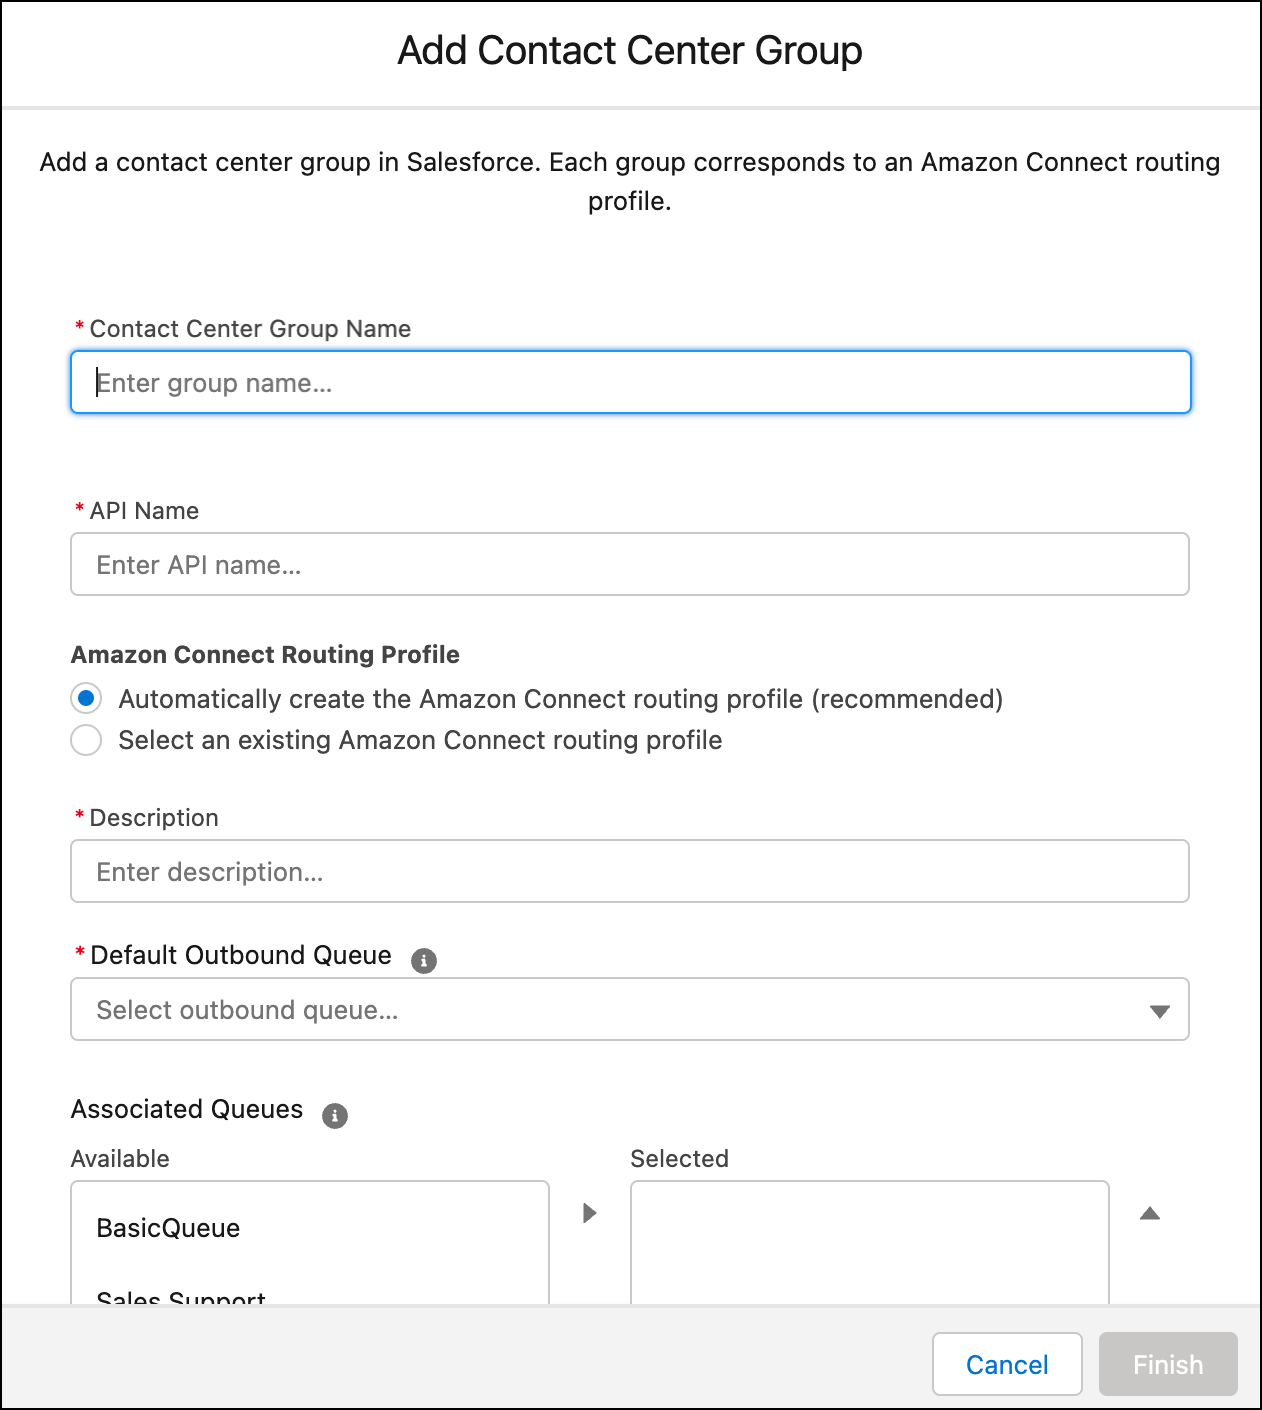
- Enter the name and API name for the group.
- In the Amazon Connect Routing Profile or Partner Telephony Group field, select a routing profile or group for this Salesforce contact center group.
-
If you create a routing profile or group, enter a description for it. If you select an
existing Amazon Connect routing profile, its description from Amazon Connect is entered in
this field and can’t be edited from Salesforce.
A routing profile name can only contain underscores and alphanumeric characters. It must be unique, begin with a letter, not include spaces, not end with an underscore, and not contain two consecutive underscores.
- In the Default Outbound Queue field, select the default queue for outbound calls from reps in this group.
-
In the Associated Queues section, select the queues to associate with this group. All
users assigned to the group can receive and accept calls routed to all associated queues.
Only queues that are added to this contact center appear in the list.
You can associate a maximum of 10 queues with a contact center group.
- Click Finish.
By default, groups contain queues that support voice calls only. To configure a group with queues that handle both Salesforce Voice and Amazon Connect Chat and Messaging, update the routing profile in Amazon Connect in the Channel Settings to support Chat as well.
Assign Reps to a Contact Center Group
Classify your reps by assigning them to contact center groups. For example, assign product support reps to a Support group and sales reps to a Sales group. Reps assigned to this contact center group are eligible to be routed work from all its associated queues. By grouping reps, you can manage reps with similar skills and, if needed, reassign the entire group to accept calls from another queue.
Required Editions
| User Permissions Needed | |
|---|---|
| To assign reps to a contact center group: | Manage Users AND Salesforce Voice Contact Center Admin |
You can assign multiple reps to each contact center group and assign each rep to only one contact center group. If you change the group that a rep is assigned to, the rep is removed from the previous group.
- From Setup, in the Quick Find box, enter Contact Centers, and then select Amazon Contact Centers or Partner Telephony Contact Centers.
- Open the contact center.
-
In the Contact Center Users section, select the reps to assign to a contact center
group, and then click Assign to Group.
If any users were previously assigned to another group, they’re removed from that group. You can assign each user to only one group. These changes are also updated in the corresponding Amazon Connect routing profile or partner telephony group.

- Select a contact center group. If all selected users are already assigned to the same contact center group, that group doesn’t appear in the list. It’s not necessary to assign users to a group to which they already belong.
- Click Save.
To reassign a user to another group, select the rep in the Contact Center Users section, and assign them to the new group. If you no longer want a user to be assigned to any group, remove the user from the contact center, and then add them back.
Resume Sharing Rule Calculations
Resume the sharing rule calculations after you finish setting up the contact center queues and groups.
Required Editions
| User Permissions Needed | |
|---|---|
| To defer (suspend and resume) and recalculate sharing rules: | Manage Users AND Manage Sharing Calculation Deferral |
- From Setup, in the Quick Find box, enter Defer Sharing Calculations, and then select Defer Sharing Calculations.
- To enable sharing rule calculations, click Resume.
- To manually recalculate sharing rules and do a full sharing rule recalculation, click Recalculate. If you don’t manually recalculate the sharing rules, changes that you made while calculations were suspended aren’t reflected in your sharing rules.