
You are here:
Set Up the Service Catalog Site Pages
Create and configure the Service Catalog site pages for customers to browse your catalog.
Required Editions
| View supported editions. |
| User Permissions Needed | |
|---|---|
| To build and configure Service Catalog site pages and components: | Permissions and licenses associated with the LWR Service Catalog Site Builder |
The setup steps guide you through creating and configuring the Service Catalog Item Definition Detail object page, Network Data Category Detail object page, and their page variations. Before you begin, review the provided information to help orient yourself with the Network Data Categories page, its structure, and how to use the Service Catalog components with it.
The standard Network Data Category page and its standard Network Data Category detail object page variation are used in the Service Catalog site to surface your data categories in the site. You must add these standard Experience components and custom Service Catalog components to the object page variation.
- Data Category Path
- Service Catalog Grid
- Subcategories List
Here’s the structure of the Network Data Category detail object page variation and the required layout of the components. Use this reference as you take the setup steps to configure the page.
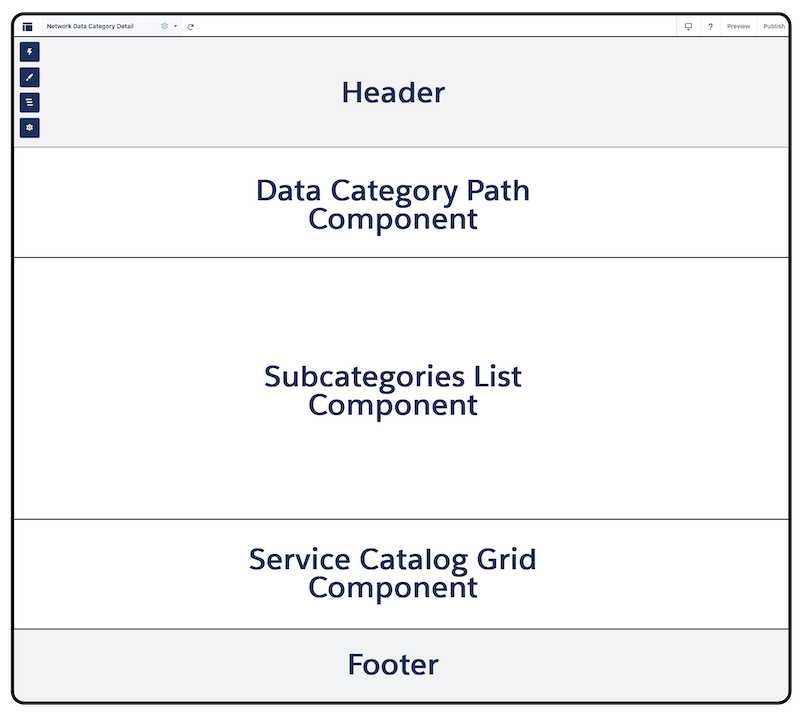
-
Create the Service Catalog Item Definition object page.
-
From the Pages menu, click
 .
.
- From the Pages dropdown, click + New Page.
-
In the New Page window, set these configurations in the workflow.
- Select Object Pages.
- In the search box, enter Service Catalog Item Definition, and then select Service Catalog Item Definition.
- Click Create.
The Service Catalog Item Definition Detail, List, and Related List pages are created. The Service Catalog Item Definition Detail page opens in the page editor.
-
From the Pages menu, click
-
Configure the Service Catalog Item Definition Detail object page variation.
-
Click
 on the left sidebar, and enter Service
Catalog Record Detail in the Components search box.
on the left sidebar, and enter Service
Catalog Record Detail in the Components search box.
-
Select Service Catalog Record Detail and place it on the middle
column of the page editor.
The component property panel opens. This component has no settings, but it has several other components that you can configure. Set a Custom Success message for the Service Catalog Automation component. The message notifies your customers that their catalog item request is submitted.
-
Click
-
Create the Network Data Category object page.
-
From the Pages menu, click .
- From the Pages dropdown, click + New Page.
-
In the New Page window, set these configurations in the workflow.
- Select Object Pages.
- In the search box, enter Network Data Category, and then select Network Data Category Detail.
- Click Create.
The Data Category Network page opens in the page editor.
-
From the Pages menu, click
-
Configure the Network Data Category Detail object page variation.
-
Click on the left sidebar, and enter Service
Catalog Grid in the components search box.
-
Select Service Catalog Grid and place in the first section of
page editor.
The component property panel opens. Keep in mind that this component has no settings, but it contains the standard Grid component that you configure in the next steps.
-
From the page editor, within the Service Catalog Grid component, click the Grid
component.
The component property panel opens.
- From the Settings tab, under the Data Source field, ensure the Self-Service List is selected.
- From the Settings tab, under the Object field, ensure the Service Catalog Item Definition is selected.
-
Click the left sidebar, and then enter Data
Category Path in the Components search box.
- Select Data Category Path and place it in the header of the page editor.
- From the Settings tab, under the Data Source dropdown, make sure Self-Service List is selected.
- From the Settings tab, under the Object dropdown, make sure Service Catalog Item Definition is selected.
-
Click on the left sidebar, and then enter
Subcategories List in the Components search box.
- Select Subcategories List and place it in the second section of the Network Data Category page.
-
Click
Next, configure all other properties for each component to your preferences.
