
You are here:
Migrate an Existing Salesforce Contact Center Created from an XML Import
If you created your contact center using the XML-import process, migrate your contact center to take advantage of easier maintenance and additional features. Perform the migration to easily update your contact center to future versions–you won’t need to manually update the serverless application anymore. The migration also gives you access to more Salesforce Voice features.
Required Editions
This article applies to:
- Salesforce Voice with Amazon Connect
- Salesforce Voice with Partner Telephony from Amazon Connect
| View supported editions. |
For a list of features that are unavailable or limited with contact centers created from an XML import, see “XML Imports” in Salesforce Voice Limits and Limitations.
The migration involves creating a Salesforce Voice contact center within your existing Amazon Connect instance. This migration allows Salesforce to assume the AWS IAM role on your behalf and integrate Voice with Amazon Connect. Voice reuses your Amazon Connect instance’s S3 bucket, contact record data stream, Kinesis video stream, and Contact Lens stream.
Creating the contact center also creates Amazon Connect components that are preconfigured to work with your new contact center. For example, you get new versions of the Lambda functions.
For more information about creating a contact center by importing the contact center definition XML file, see this PDF.
- Complete Migration Prerequisite Tasks
Before you create your contact center, complete these tasks in your existing Amazon Connect instance. - Migrate Your Existing Contact Center
Migrate your contact center within the existing Amazon Connect instance. - Test Your New Contact Center
Test your new contact center to ensure that it works. - Clean Up Your Amazon Connect Environment
To avoid conflicts with stale code from the serverless application or the previous versions of Lambda functions, delete the AWS serverless application and Lambda functions from the AWS. - Grant Access to Old Call Recordings
Perform these tasks to access call recordings in your new contact center. Because the Universal Call Recordings option isn’t supported by contact centers created using the XML-import option, you must perform these manual steps to grant users in the new contact center access to the old recordings.
Complete Migration Prerequisite Tasks
Before you create your contact center, complete these tasks in your existing Amazon Connect instance.
-
If your call recordings S3 bucket has a bucket policy, save a copy of the policy and then
remove it. You can append that policy to the new policy after the stack is created. If you
don’t remove the policy, the new stack can’t be created.
- Log in to your Amazon Connect instance.
- In the left panel of Amazon Connect, click Data Storage, then get the bucket name under the Call Recordings section. When you create your contact center, the new call recordings are saved to this same bucket.
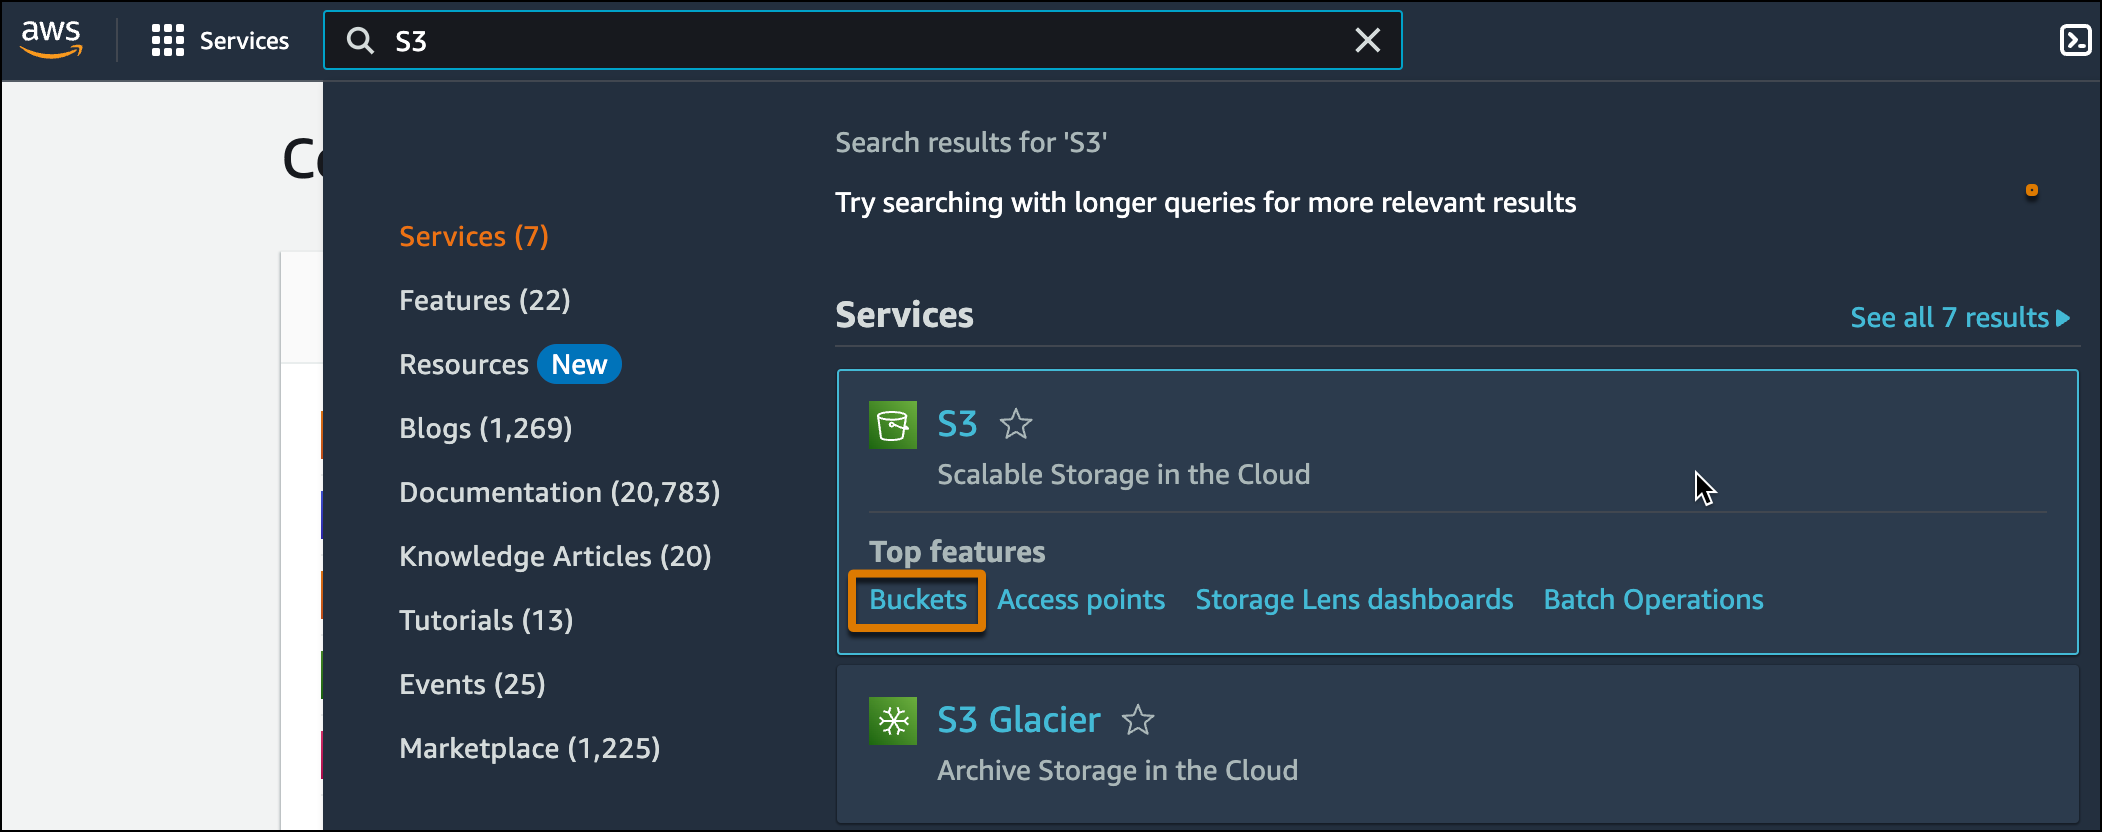
-
In Amazon Connect, search S3, hover over the S3 option, and click
Buckets.
- Find and open your call recordings S3 bucket.
- Click Permissions, copy the bucket policy, then delete it. If you have a bucket policy, the stack creation fails. To access recordings in your new contact center, you’ll append your old policy to the generated one after you create the stack.
-
Deactivate the Kinesis contact record stream event triggers in the existing CTRDataSyncFunction and
ContactLensConsumerFunction Lambda functions. When the new contact center is created, these
events automatically trigger the newly provisioned versions of these functions. You don’t want
the same stream to trigger both Lambda functions
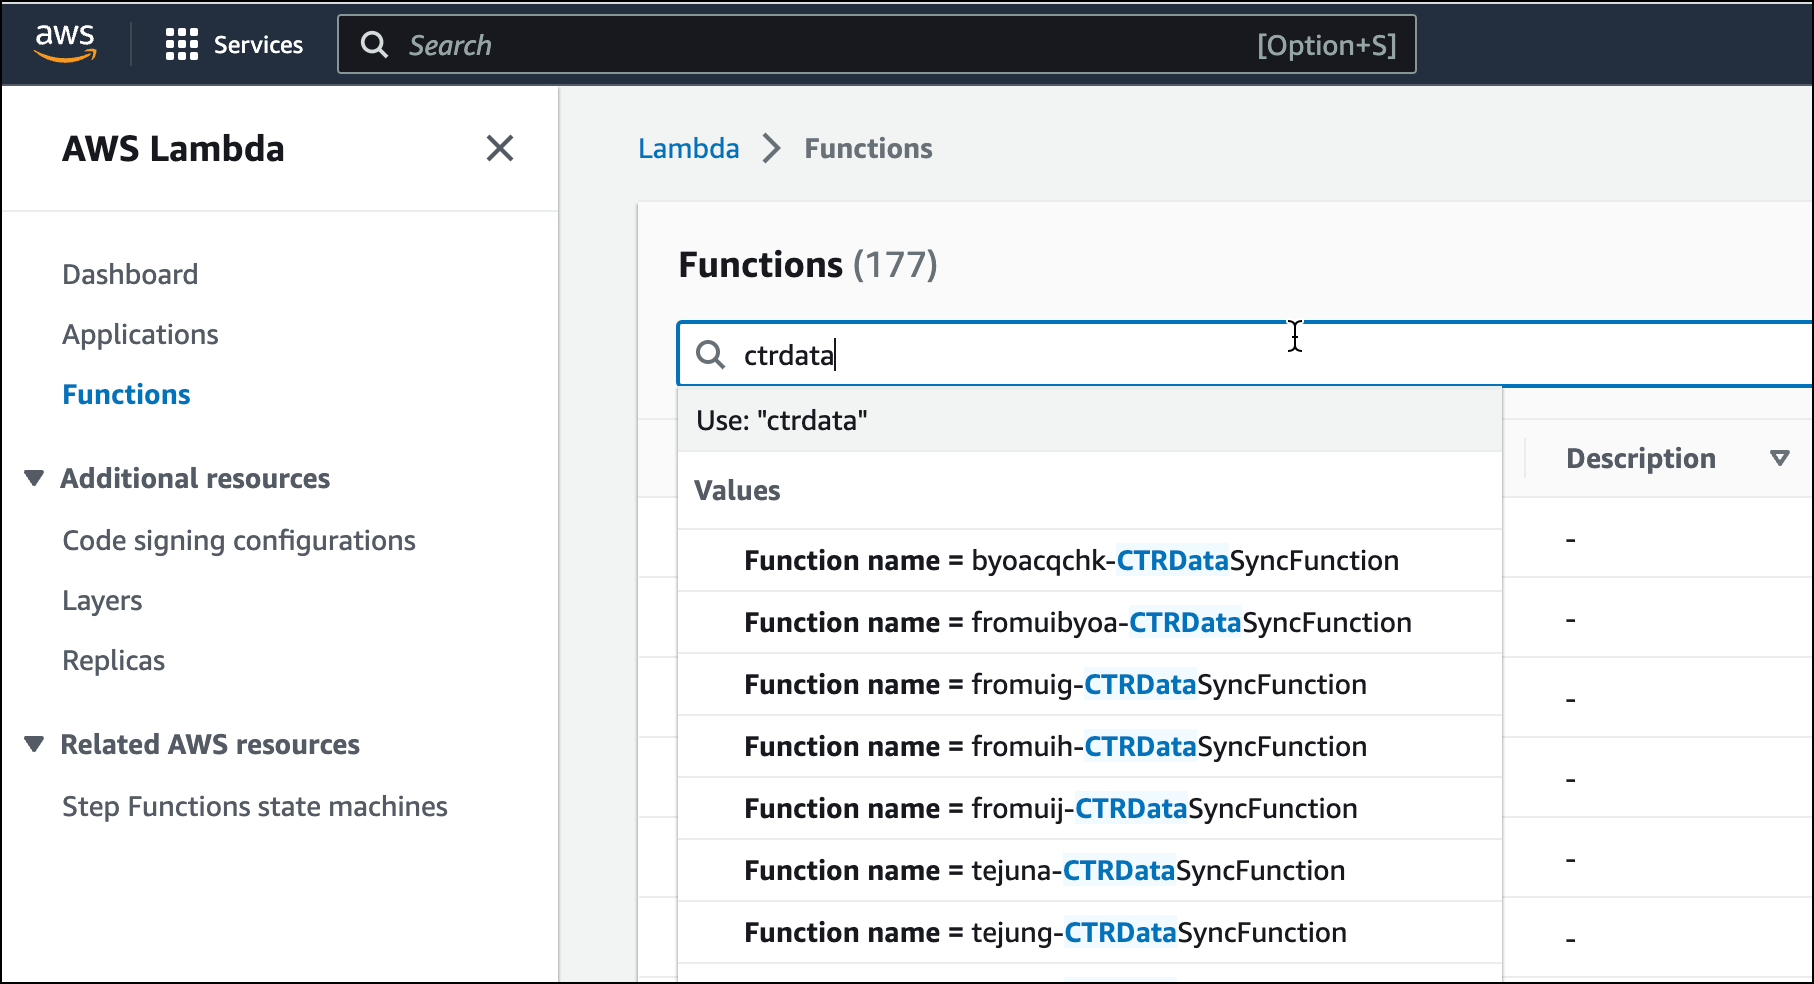
- In Amazon Connect, search Lambdas and click Lambda.
-
Search Ctrdata, then select CTRDataSyncFunction Lambda from your existing contact center.
The function names are prepended with your contact center name.
-
Select the Configuration Tab and then the Triggers subtab.
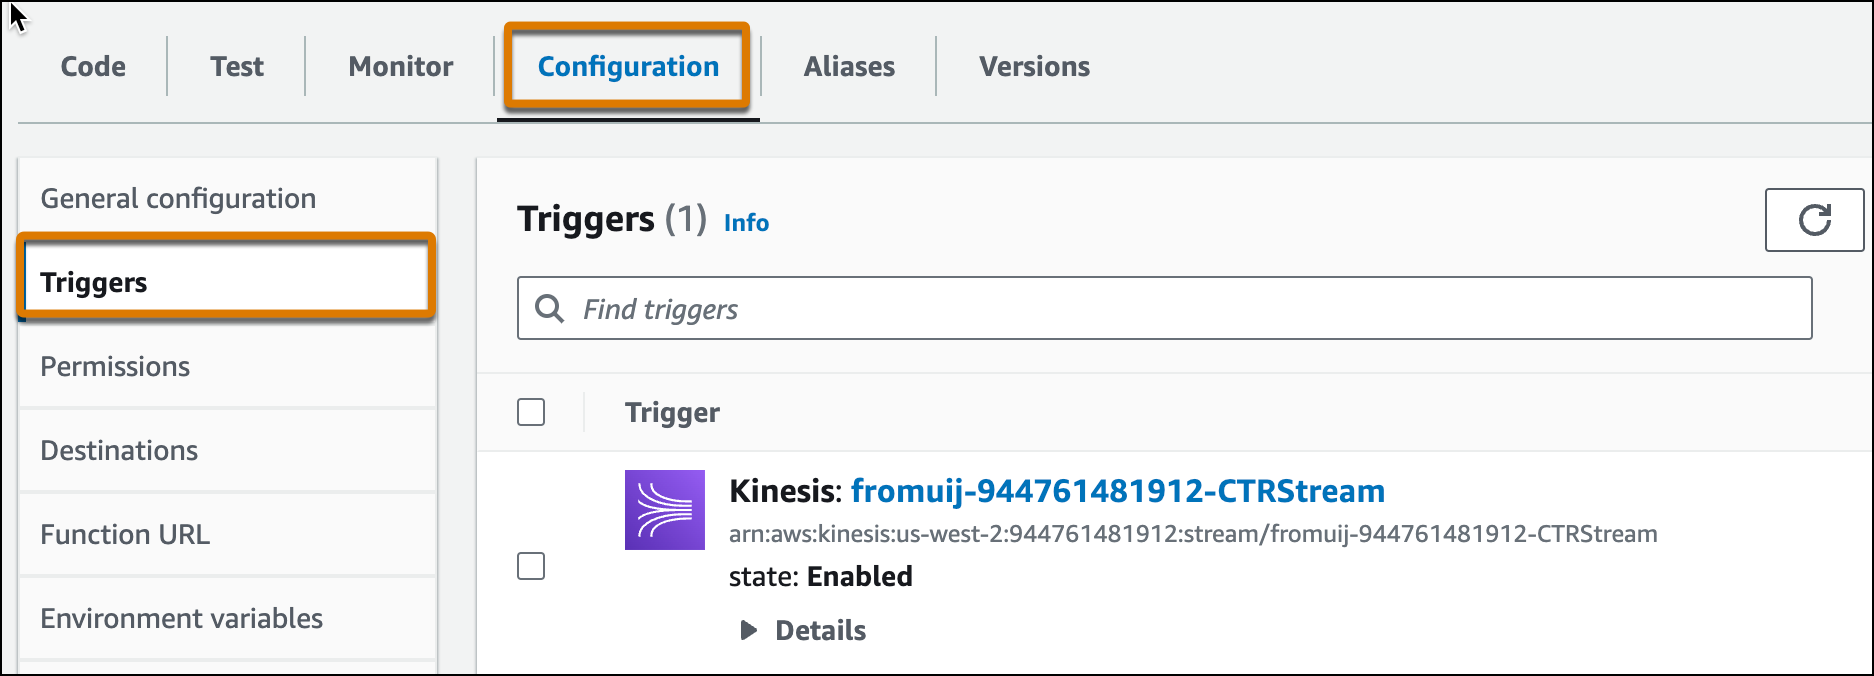
- Select the checkbox next to the Kinesis trigger and click Edit.
- To deactivate the trigger, uncheck Activate trigger and click Save.
- To deactivate the ContactLensConsumerFunction Lambda function, repeat these steps.
- In the Contact Center details page in Salesforce, delete all agents, supervisors, and admins from your existing contact center. You’ll add these users to the new contact center after it’s created. Each user can be assigned to only one contact center.
- Create an IAM role. When you add the provisioning policy for this role, get the policy from GitHub and replace all parameters. For example, replace the <BYOAC_CUSTOM_S3_BUCKET> parameter with the name of the call recordings S3 bucket. For information about creating the IAM role and applying the provisioning policy, see Configure AWS Identity and Access Management (IAM) Role for Voice.
Migrate Your Existing Contact Center
Migrate your contact center within the existing Amazon Connect instance.
- Create a contact center in Salesforce using the instructions in this help article. Use your existing Amazon Connect instance by entering your instance details. Ignore the tasks mentioned after step 9.
-
In Amazon Connect, modify your existing Amazon Connect flows to use the latest Lambda
functions. To swap out the old functions, update the references to them in the Invoke AWS
Lambda function blocks in the flows. The latest functions have names appended with the new
contact center’s internal name. After you’re done updating the flows, save and publish
them.

- Delete all users from your Amazon Connect instance. For instructions, see Delete users from your Amazon Connect instance.
-
In the Contact Center details page in Salesforce, add users to your new contact center
and create their quick connects. Adding users to the contact center also automatically
adds the users to Amazon Connect.
 Tip To ensure you’re doing this correctly, add a few users first and then run tests to verify that they can make and receive calls. Test any other features as well. Then add the remaining users. For instructions, see Add and Remove Users To Your Contact Center.
 - In the Contact Center details page, configure the new contact center. Modify the new contact center using the same changes applied to the old contact center. For example, reapply queue and presence status mappings, and add contact center channels and groups.
Test Your New Contact Center
Test your new contact center to ensure that it works.
- Verify that the Amazon Connect flows work as expected by making inbound, outbound, transfer, and callback calls.
- Verify that the queue mappings, contact center channels, presence status mapping, and contact center groups in the new contact center work as expected.
Clean Up Your Amazon Connect Environment
To avoid conflicts with stale code from the serverless application or the previous versions of Lambda functions, delete the AWS serverless application and Lambda functions from the AWS.
- In Amazon Connect, search Serverless, then click Serverless Application Repository.
- Select your serverless application and click Delete.
- Change the contact center label to something like “DO NOT DELETE <contact center name>.” You can’t delete the old contact center because existing voice calls are associated with it
Grant Access to Old Call Recordings
Perform these tasks to access call recordings in your new contact center. Because the Universal Call Recordings option isn’t supported by contact centers created using the XML-import option, you must perform these manual steps to grant users in the new contact center access to the old recordings.
-
To access old voice call recordings from the old contact center in the new one, enable
Universal Call Recording in the old contact center. To enable it, set these parameters in
the reqhvcc section of the old contact center definition XML file.
Parameter Value Universal_Call_Recording Set to true. Region Set to the region of your new contact center. TrustedRoleArn Set to the IAM role that you created. Here’s a sample of the items to add.
<sections>

<items>
<label>Universal Call Recording Access</label>
<name>reqUniversalCallRecordingAccess</name>
<value>true</value>

</items><items>
<label>Region</label>
<name>reqRegion</name>
<value>us-west-2</value>

</items><items>
<label>Trusted Role ARN</label>
<name>reqTrustedRoleARN</name>
<value>arn:aws:iam::547100965505:role/ProvisioningRole</value>

</items>
<name>reqHvcc</name>

</sections>
For more information, see “Enable Universal Call Recording in an Existing Contact Center” in this PDF.
- Append your old bucket policy to the newly generated one for the call recordings S3 bucket. You copied the old policy when you completed the prerequisite steps.
- In Amazon Connect, similar to how you created the IAM Role in the prerequisite steps, create a SCVS3Role role with the “<contact_center_internal_name>-SCVS3Role” naming convention.
-
After you create the SCVS3Role role, attach this inline policy. In the policy, replace
<BYOAC_CUSTOM_S3_BUCKET> with your call recordings S3 bucket name.
{
    "Version": "2012-10-17",
    "Statement": [
        {
            "Action": [
                "s3:GetObject",
                "kms:Decrypt",
                "s3:ListBucket"
            ],
            "Resource": [
                arn:aws:s3:::<BYOAC_CUSTOM_S3_BUCKET>
            ],
            "Effect": "Allow",
            "Sid": "byoacSCVS3Sid"
        }
    ]
}