Loading
Salesforce now sends email only from verified domains. Read More
Help Agent Performance DegradationRead More
Agentforce Contact Center
Table of Contents
Select Filters

          No results
          No results
          Here are some search tips

          Check the spelling of your keywords.
          Use more general search terms.
          Select fewer filters to broaden your search.

          Search all of Salesforce Help
          Create the Voice Call Record Page

          Create the Voice Call Record Page

          The Voice Call record page shows the rep information about the call. Add Service Cloud Voice components to the page so reps can easily access Voice features such as the softphone call features, related records, call recording, and call transcription.

          Required Editions

          This article applies to:

          • Service Cloud Voice with Amazon Connect
          • Service Cloud Voice with Partner Telephony
          • Service Cloud Voice with Partner Telephony from Amazon Connect
          View supported editions.
          User Permissions Needed
          To create and save Lightning pages in the Lightning App Builder: Customize Application

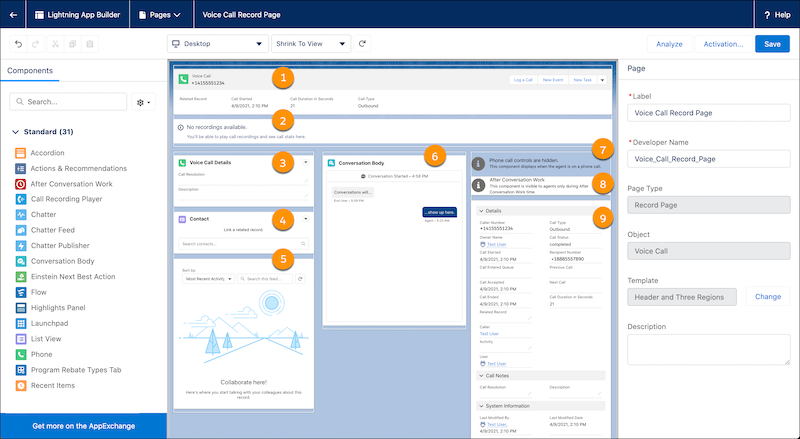
          As a best practice, configure the Voice Call record page so that reps see relevant information during the call and when looking at completed call records. We suggest arranging the components as described in the screenshot and table, but you might want to configure it differently based on your business processes. The screenshot shows a record page with the Header and Three-Column template.

          You can use different page templates, but some components, such as the Call Recording Player and Enhanced Conversation, can fit only on medium and large areas on the template.

          Voice Call Record Page with callouts describing each component
          Standard Lightning Components Used on the Voice Call Record Page
          Component Description
          [1] Highlights Panel The Highlights Panel shows high-level info about the call.
          [2] Call Recording Player

          The Call Recording component is included on the Voice Call record page by default and must be added to a medium or large area on the page template.

          Add this component for orgs using Voice with Amazon Connect. If you want to record calls, enable call recording in your Amazon Connect instance.

          For orgs using Voice with Partner Telephony, add this component only if your telephony provider supports call recording.

          [3] Related Record

          This Related Record component is configured to show details about this Voice Call.

          Reps can indicate the call disposition and add notes.

          [4] Related Record

          This Related Record component is configured to show the Contact record for the Caller.

          If reps make outbound calls, you can also add a Related Record component that shows the Contact record for the Recipient (that is, the person who was called). Related records for Voice include cases, contacts, leads, accounts, and opportunities.

          [5] Chatter The Chatter component lets reps post updates and notify other reps about the call. It’s included on the Voice Call page by default.
          [6] Enhanced Conversation

          The Enhanced Conversation component shows the real-time call transcript and must be added to a medium or large area on the page template.

          Add this component for orgs using Voice with Amazon Connect.

          For orgs using Voice with Partner Telephony, add this component only if your telephony provider supports transcription.

          Because the Call Recording Player doesn't have an alternative text-based transcript, we recommend adding the Enhanced Conversation component underneath the Call Recording Player to support accessibility.

          [7] Phone

          The Phone component gives reps easy access to some of the Voice softphone features like mute, hold, and end calls. It’s visible only when a rep is on a call.

          We recommended placing the Phone component on the upper left or upper right corner of the page, so it’s easy for reps to use.

          Use the Phone component in addition to the softphone in the Omni-Channel utility. Reps can’t answer or dial calls from the Phone component; they need the Omni-Channel utility to make or accept calls.

          [8] After Conversation Work (ACW)

          The After Conversation Work (ACW) component shows reps a countdown for wrap-up work between conversations. It’s visible only during an active countdown.

          To enable the countdown feature and set the length of time, create or edit a voice call or messaging channel and complete the After Conversation Work Time section.

          [9] Record Detail The Record Detail component shows more granular info about the call.
          Note
          Note These instructions tell you how to create a Voice Call record page from scratch.

          If you already have a Voice Call record page, you can edit it to add or reorganize these components. Navigate to the Voice Call record page, click the gear icon, and click Edit Page to open it in the Lightning App Builder.

          1. From Setup, enter Lightning App Builder in the Quick Find box, then select Lightning App Builder.
          2. Click New.
          3. Click Record Page, then click Next.
          4. For Label, give the page a name such as Voice Call Record Page.
          5. For Object, select Voice Call, then click Next.
          6. In the Create a new Lightning page window, select a page template from the Choose Page Template menu.
            For example, the screenshot shows the Header and Three Regions page template.
          7. Click Done.
          8. Select a component and drag it to the page. Repeat until you’ve added the components that you want to your page.
            Tip
            Tip To filter the component lists, enter the name of the component in the search bar.
            1. Select the Phone component onto the page, and drag it to the upper left side or upper right side of the page.
            2. Select the Call Recording Player component and drag it to the page.
            3. Select the Enhanced Conversation component and drag it to the page, and put it in a medium or large area of the page layout.
            4. If you plan to enable After Conversation Work in your voice call or messaging channels, drag the After Conversation Work component onto the upper left side or upper right side of the page.
            5. Optionally add more components to the page.
          9. Save your work, then click Activate.
          10. In the Activation window, select the App Default tab. Click Assign as App Default, then select Service Console, and click Next.
          11. In the Select Form Factor window, select either Desktop or Desktop and Phone, then click Next.
          12. Review the app default assignments, and then save your work. The record page is now available in the Lightning Service Console.
           
          Loading
          Salesforce Help | Article