You are here:
Set Up Contacts to Multiple Accounts
Let your sales reps easily track the relationships between the customers and businesses they work with. Contacts to Multiple Accounts is quick to set up and allows reps to relate a single contact record to multiple accounts.
Required Editions
| Available in: both Salesforce Classic and Lightning Experience |
| Available in: Contact Manager, Group, Professional, Enterprise, Performance, Unlimited, and Developer Editions |
| User Permissions Needed | |
|---|---|
| To enable Contact to Multiple Accounts: | Customize Application |
| To view page layouts: | View Setup and Configuration |
| To edit page layouts: | Customize Application |

If you’re using Account Contact Roles or a custom-built solution with a junction object, review how those solutions compare with Contacts to Multiple Accounts.
To help you set up Contacts to Multiple Accounts, follow the steps in the demonstration video: Set Up Contacts to Multiple Accounts
Enable Contacts to Multiple Accounts
-
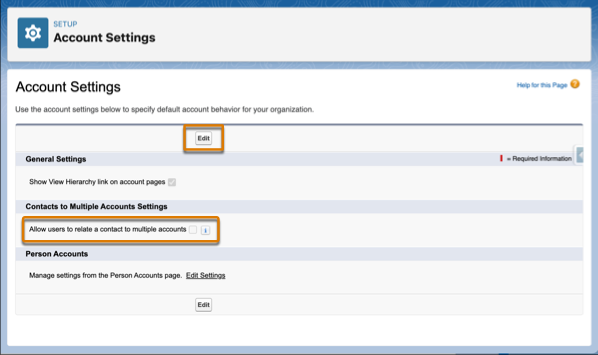
From Setup, enter Account Settings in the Quick Find
box, and then select Account Settings.
Only users with the Customize Application permission can view or edit Account Settings.
- Click Edit.
-
Select Allow users to relate a contact to multiple
accounts and click Save.
-
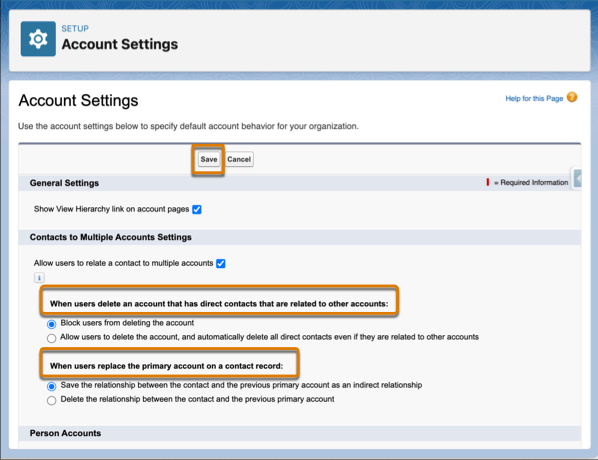
When the Contacts to Multiple Accounts Settings section appears, review the
default options and save your changes.
To capture unique information about relationships – for example, the best time to call a contact – create custom fields on the Account Contact Relationship object. Be sure to add any new fields you create to the Account Contact Relationship page layouts. To learn more on how to create custom fields and page layouts, see Help.
Disable Roll Up of Activities to a Contact’s Primary Account
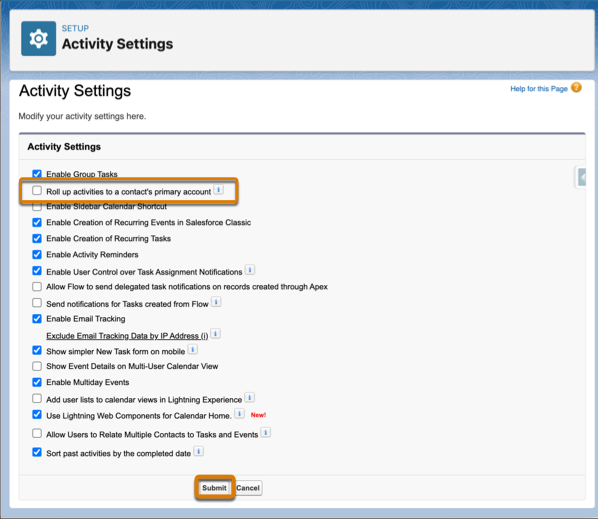
When the option to roll up activities to a contact’s primary account is enabled, activities associated with a contact are also shown on the contact’s primary account. To avoid skewed data, deselect this option when you allow users to relate contacts to multiple accounts.
- From Setup, enter Activity Settings in theQuick Find box, and then select Activity Settings.
- Deselect Roll up activities to a contact’s primary account.
-
Click Submit.
Add the Related Contacts Related List to the Account Page Layouts
- From Setup, go to the Object Manager and select the Account object.
- Select Page Layouts.
-
Click
 on a layout’s row, and select
Edit, or click the name of the layout.
on a layout’s row, and select
Edit, or click the name of the layout.
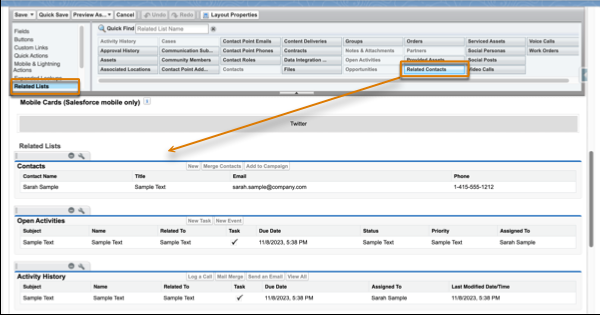
- From the palette at the top of the enhanced page layout editor, select Related Lists.
-
Drag the Related Contacts related list onto the Related Lists section of
the page layout.
-
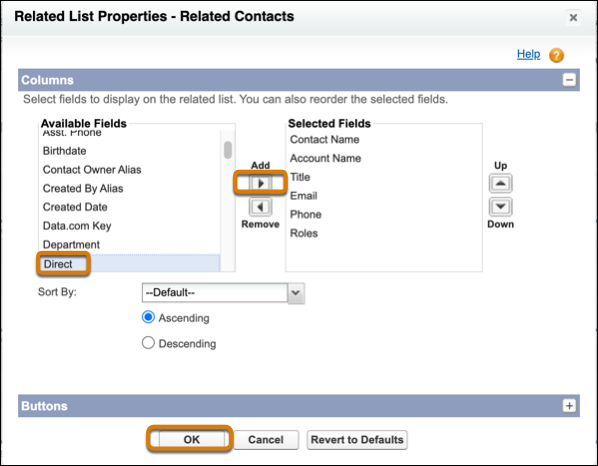
Add the Direct field to the Related Contacts related list.
-
Double-click the Related Contacts tab, or click
 .
A related list configuration window appears.
.
A related list configuration window appears. - From the Available Fields column, select the Direct field and click Add.
- Click OK.
-
Double-click the Related Contacts tab, or click
-
Because the Related Contacts related list includes all direct contacts, you
can remove the Contacts related list on your account page layouts. To remove
a related list, click the
 icon.
icon.
-
Save your changes.
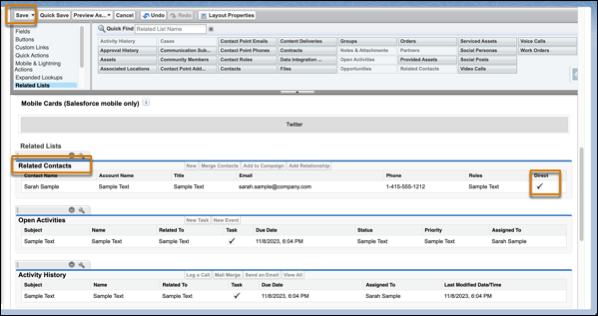
Next, repeat these steps to add the Related Accounts related list to the contact page layouts your reps use. To easily see which account is the contact’s primary account, add the Direct field to the Related Accounts related list. And, if you use person accounts, add the Related Accounts related list and the Related Contacts related list to the person account page layouts your reps use.
