You are here:
Flow Builder Tour
Use Flow Builder to build, test, and manage flows. Learn what each area of the interface does so that you can find the tools you need.
Required Editions
| View supported editions. |
| User Permissions Needed | |
|---|---|
| To open, edit, create, activate or deactivate a flow using all flow types, elements, and features available in Flow Builder, including Einstein and Agentforce for Flow: | Manage Flow |

Note You don't need to be an admin to have the Manage Flow permission.
Ask your admin to add it to your profile or permission set.
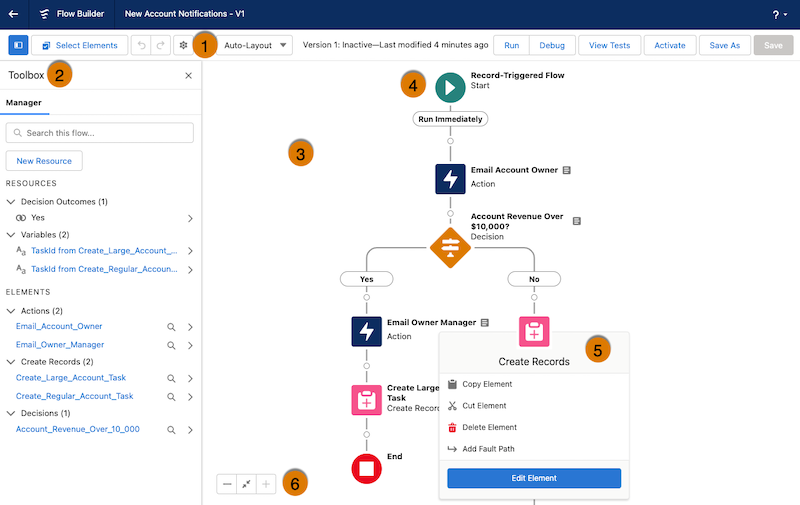
Button Bar (1)
Manage a flow as you build it.
Edit
- To copy multiple elements in auto-layout, click Select Elements,
and then click
 on each element that you want to select. To copy all selected elements to the
clipboard, click
 . To paste the elements you copied, click
 , and then select Paste Elements. The Paste Elements option
displays the number of elements that you copied. For example, Paste 3 Elements.
- To duplicate an element in free-form, select the element and click
 .
- To undo a change to your flow, click
 . To redo a change, click
 .
View
- To show or hide the Toolbox in auto-layout, click
 .
- To access the flow version's properties, such as context and API version, click
 .
- Select Auto-Layout or Free-Form. Auto-Layout is the default for all new flows.
- If the flow has warnings or errors, the Show Warnings icon (
 ) or the
Show Errors icon (
 ) appears. To see details, click the icon.
Test and run
- To run the most recent save of the flow version that's open, click Run. Next to Run, you can see the version's active or inactive status and when it was last saved.
- To test the flow that's open, click View Tests, and then click Create. Set test parameters and assertions.
- To debug the most recent save of the flow version that's open, click Debug. Define values for input variables, roll back changes so debugging doesn't impact data, view debug details about how the flow runs, and use those details to troubleshoot errors.
Publish and save
- To make the current flow version available to your users, click Activate. Only one version of each flow can be active at a time.
- To save your flow, click Save, or to save it as a new version or a new flow, click Save As. When you save, you can also add or remove flow tags.
- To choose which messaging and audience-selection assets to duplicate or link when you save an audience flow as a copy, see Audience Flows.
- To view a timeline of saves
for the current flow version, click
 . Select a save instance to preview it, see what changed, or
restore it as a new version or flow.
Toolbox (2)
View and add resources.
- To create resources, or to view a list of all elements and resources and their details, use the Manager tab.
- To view resource and element details, such as type, outputs, usage, and incoming Go To
connections, click
 for the resource or element.
- To add elements in free-form, use the Elements tab.
Canvas (3)
Build a flow on the canvas. As you add elements to the canvas, you can see a diagram of your flow.
Start Element (4)
The Start element represents the start of a flow. The flow runs the elements in order following the Start element. In Record-Triggered flows and Schedule-Triggered flows, configure the Start element to indicate when you want the flow to start running.
Elements (5)
Elements are the building blocks of a flow.
- To add elements in auto-layout, click where you want the element and select an element from
the menu, such as Create Records or Update Records.
- To see an element's description in an element menu in auto-layout, hover over
 .
- To edit or see options for an element, click the element.
- To see an element's user-provided description on the canvas in auto-layout, hover over
 next to the element.
- To collapse or expand the branching paths of an element, click
 or
 next to the
element's name.
Zoom Button Bar (6)
Use this button bar to zoom in and out of a flow.
Did this article solve your issue?
Let us know so we can improve!