
Configure User Provisioning for Connected Apps
Configure a connected app to save time when provisioning users for third-party apps. Salesforce provides a wizard that guides you through the user provisioning settings for each connected app.
Required Editions
| Available in: both Salesforce Classic and Lightning Experience |
Connected Apps can be created in: Group, Essentials, Professional, Enterprise, Performance, Unlimited, and Developer Editions Connected Apps can be installed in: All editions |
See New connected apps can no longer be created in Spring ‘26 for more details.
| User Permissions Needed | |
|---|---|
| To configure user provisioning for connected apps: | View Setup and Configuration AND Manage Users AND Customize Application |
| To read, create, update, or delete connected apps: | Customize Application AND either Modify All Data OR Manage Connected Apps |
| To update all fields except Profiles, Permission Sets, and Service Provider SAML Attributes: | Customize Application AND either Modify All Data OR Manage Connected Apps |
| To update Profiles, Permission Sets, and Service Provider SAML Attributes: | Customize Application AND Modify All Data |
| To install and uninstall connected apps: | Customize Application AND either Modify All Data OR Manage Connected Apps |
| To install and uninstall packaged connected apps: | Customize Application AND either Modify All Data OR Manage Connected Apps AND Download AppExchange Packages |
Salesforce provides a step-by-step wizard to guide you through the user provisioning process for each connected app.
Before you use the wizard, you must have the following.
- A connected app for the third-party service to provision
- Any connected app can support user provisioning, including a “bookmark” connected app, which is a connected app that hasn’t been configured beyond its basic settings. See Configure Basic Connected App Settings.
- Named credentials
- Named credentials identify the third-party system and its authentication settings. Calls to the third-party system, such as creating, editing, or deleting accounts, use the third-party authentication settings in the named credential. For the named credential, you specify a Named Principal. The Named Principal can be an account on the third-party system or an OAuth authorization for an existing Auth Provider in your org. The User Provisioning Wizard prompts for this named credential.
- A flow to manage provisioning requests to the third-party service or app
- Salesforce provides preconfigured flows to simplify your user-provisioning setup process. From AppExchange, install the Salesforce Identity User Provisioning Connectors package and the Salesforce Identity User Provisioning Utils packages. You associate one of these flows with the connected app using the User Provisioning Wizard.
- Optionally, you can create your own flow. For more information, see Create Your Own User Provisioning Flow.
Run the User Provisioning Wizard
If user provisioning is enabled for your org, use these steps to start the User Provisioning wizard for your connected app.
- From Setup, enter Connected Apps in the Quick Find box, then select Manage Connected Apps.
- Click the name of the connected app.
- On the connected app detail page, click Edit Policies.
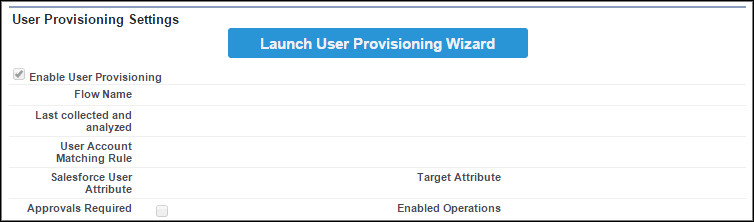
- Under User Provisioning Settings, select Enable User Provisioning.
- Click Save.
- Under User Provisioning Settings, click Launch User Provisioning
Wizard.
After you provision users for your connected app, you can update a user’s account information from the connected app detail page. All users provisioned for the app appear under User Accounts.
You can also rerun the wizard to collect and analyze the accounts on the third-party system, change the provisioning configuration, and process all accounts.
Create Your Own User Provisioning Flow
If the packaged flows don’t support the third-party system that you want to provision, or if you want to customize the user provisioning process, you can create your own flow. Creating a flow requires you to be familiar with Flow Builder and Apex triggers.
Use the UserProvisioningPlugin legacy Apex action
and the UserProvisioningRequest and UserProvAccount standard objects to create a flow of
type User Provisioning. Include these items in the flow.
- Legacy Apex action using the
UserProvisioningPluginclass with these input and output variables:- Input: User, UserProvisioningRequest, UserProvAccount
- Output: ExternalUserId, ExternalUsername, ExternalFirstName, ExternalLastName, ExternalEmail, Details, Status
- At least one legacy Apex action with these input and output parameters:
- Input: userProvisioningRequestId, userId, namedCredDevName, reconFilter, reconOffset
- Output: ExternalUserId, ExternalUsername, ExternalFirstName, ExternalLastName, ExternalEmail, Details, Status, reconState, nextReconOffset
- A “Look Up User” Get Records element to modify during user account linking between Salesforce users and users on the third-party system