Example: Create a Custom Visualforce Login Page from a Github Project
When creating custom code for your login page, it’s often helpful to start out with an
existing example for guidance. Salesforce Identity provides a Github custom login page project
that you can modify. The project includes custom Visualforce pages and Apex
controllers.
Required Editions
Available in: Salesforce Classic and Lightning Experience
Available in: Enterprise, Performance, Unlimited, and
Developer Editions
User Permissions
Needed
To create and edit Visualforce pages:
Customize Application
To edit Apex classes:
Author Apex
AND
Customize Application
Note Only LWR sites configured with a Visualforce login page before Summer ’23 and Aura sites
can use a custom Visualforce login page.
Upload the zipped _include directory from the project to
Salesforce as a static resource called include with Cache
Control set to Public.
Create a field set named Registration to contain the user
information for your site members, such as the user’s name, company name, and
email.
If you want to set up an Auth. provider for social sign-on, create a custom URL
field on the User object.
Install the Apex controllers and Visualforce pages from the Github project to your org
according to the project’s README.
Make your Visualforce pages available publicly.
From Experience Workspaces, select Administration, select
Pages, and then click Go to
Force.com.
Click Public Access Settings.
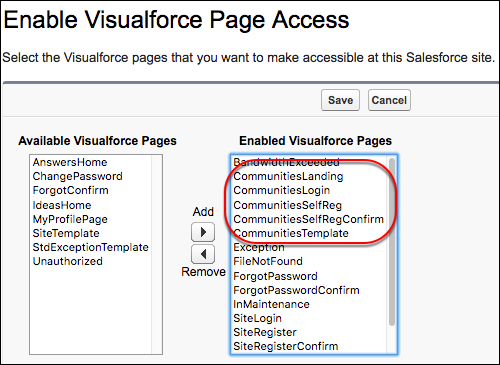
Under Enabled Visualforce Page Access, click Edit.
Select the Visualforce pages you created, add them to Enabled
Visualforce Pages, and save your changes.
Replace the site’s default pages with your new Visualforce pages.
From Experience Workspaces, select Administration, and then
select Login & Registration.
Under Login, select Visualforce for the page type, enter the
name of your Visualforce page in the search field, and click .
In the search results window, click the name of your page to select it, and click
Save.
To revert to the default page, select Default Page.
View your custom login page from a browser in private mode.
Make it your own.
Did this article solve your issue?
Let us know so we can improve!
Loading
Salesforce Help | Article
Cookie Consent Manager
General Information
Required Cookies
Functional Cookies
Advertising Cookies
General Information
We use three kinds of cookies on our websites: required, functional, and advertising. You can choose whether functional and advertising cookies apply. Click on the different cookie categories to find out more about each category and to change the default settings.
Privacy Statement
Required Cookies
Always Active
Required cookies are necessary for basic website functionality. Some examples include: session cookies needed to transmit the website, authentication cookies, and security cookies.
Functional Cookies
Functional cookies enhance functions, performance, and services on the website. Some examples include: cookies used to analyze site traffic, cookies used for market research, and cookies used to display advertising that is not directed to a particular individual.
Advertising Cookies
Advertising cookies track activity across websites in order to understand a viewer’s interests, and direct them specific marketing. Some examples include: cookies used for remarketing, or interest-based advertising.