
Configure SSO to Salesforce Using Microsoft AD FS as the Identity Provider
Let your users log in from a Microsoft environment to a Salesforce org using Microsoft Active Directory Federation Services (AD FS) 2.0. Microsoft AD FS functions as the identity provider for single sign-on authentication.
Required Editions
| Available in: Lightning Experience and Salesforce Classic |
| Available in: Enterprise, Performance, Unlimited, and Developer Editions |
Microsoft AD FS 2.0 supports the SAML 2.0 protocol. When AD FS 2.0 is set up as a Salesforce identity provider, users can log in to Salesforce using single sign-on (SSO).
The AD FS UserInfo endpoint returns only the subject claim as specified in the OpenID standards. It doesn’t provide additional claims requested via the UserInfo endpoint. If you need additional claims in the ID token, use a custom ID token.
When configuring AD FS 2.0 for use with Salesforce, it’s recommended that you select HTTP Redirect in the Salesforce Single Sign-On settings under Service Provider Initiated Request Binding. This setting improves interoperability with iOS-based devices.Prerequisites
To configure AD FS 2.0 as a Salesforce identity provider, you need:
- Microsoft Windows Server 2008 R2 Enterprise or Datacenter edition. If you’re configuring an environment for an evaluation, you can download a trial version from the Microsoft Download Center.
- Microsoft Active Directory Federation Services 2.0.
 Note Windows Server 2008 R2 includes AD FS 1.0, which doesn’t support SAML 2.0. For this reason, download the AD FS 2.0 ‘release to web’ (RTW) package.
 - A Salesforce org. You can try it out with a Developer Edition environment.
Overview
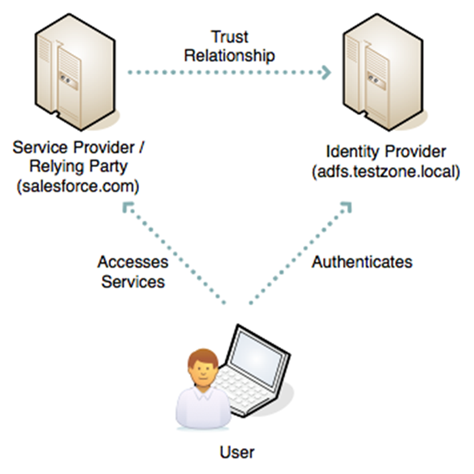
SAML 2.0 defines roles for parties involved in SSO. A user authenticates to the identity provider (IdP), in this case, AD FS 2.0. The user is then able to access a resource at one or more service providers (SP) without logging in to each service provider. The SP (also known as a “relying party”) is in this instance a Salesforce org.
This diagram shows the process for an IdP-initiated login into Salesforce.
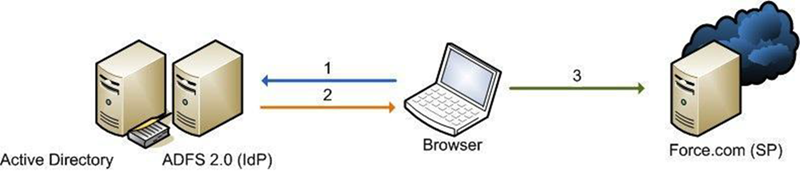
- The user authenticates to the AD FS server using Integrated Windows Authentication (Kerberos tokens over HTTP) and requests login to Salesforce. (1)
- AD FS returns a SAML assertion to the user’s browser. (2)
- The browser submits the assertion to Salesforce, which logs the user in. (3)
Here are the high-level steps to create a test deployment.
- Install Microsoft AD FS 2.0.
- Configure AD FS and your Salesforce environment.
- Test the configuration.
- Troubleshoot implementation problems as necessary.
Install Software
- Start by installing Windows Server 2008 R2. Note The AD FS server must be a member of an Active Directory domain. If you’re building a lab setup for evaluation, the AD FS server can be the domain controller. However, this configuration isn’t a recommended production configuration.
- Create a friendly DNS name for AD FS, such as adfs.testzone.local, and point it to your AD FS 2.0 server.
- Download and install AD FS 2.0. This step installs other prerequisite Windows components, such as IIS.
- In the IIS manager, create an SSL certificate for your friendly DNS name. If you have the IIS 6.0 resource kit, you can use SelfSSL to create a self-signed certificate.
- Run through the AD FS Server configuration wizard.
- Create a federation service.
- Select Stand-alone Server.
- Select the certificate that you created for your friendly DNS name.
- If an error results when the installer registers a service principal name (SPN), manually create a Kerberos SPN for the DNS name. The SPN allows Integrated Windows Authentication between the browser and the AD FS IIS instance to work correctly:
1 setspn -a HOST/adfs.testzone.local testzone\ADFSSVR012 setspn -a HOST/adfs testzone\ADFSSVR01For more information on Kerberos SPNs, see Active Directory and Kerberos SPNs Made Easy.
Configure Salesforce
To build a federation between two parties, you must establish a trust relationship by exchanging metadata. The metadata for the AD FS 2.0 instance is entered into the Salesforce configuration. Salesforce metadata is downloaded as an XML file that AD FS 2.0 can consume.
Configure SAML 2.0
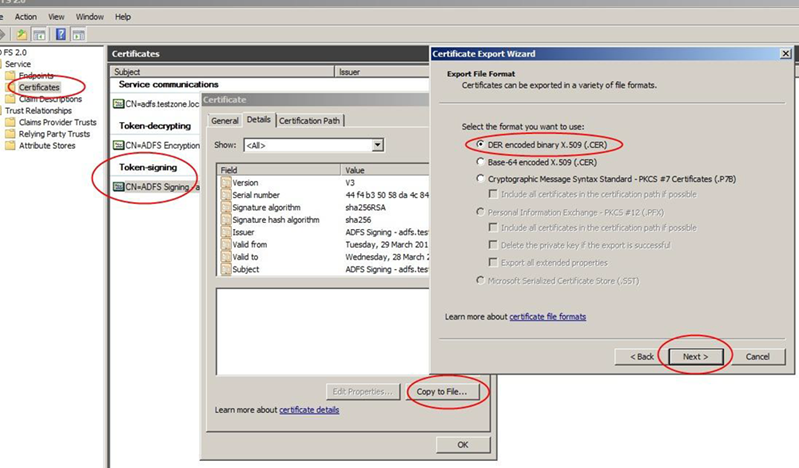
In the AD FS 2.0 MMC snap-in, select the certificates node, and double-click the token-signing certificate to view it. Click the Details tab and then select Copy to File. Save the certificate in DER format.
On the AD FS server, browse to the federation metadata URL located in the AD FS MMC at Service | Endpoints | Metadata | Type:Federation Metadata. In the example, the URL is https://adfs.testzone.local/FederationMetadata/2007-06/FederationMetadata.xml.
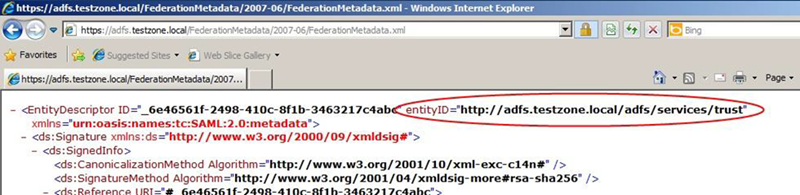
Copy the value of the entityID attribute. In the example, it’s http://adfs.testzone.local.
In Salesforce, from Setup, enter Single Sign-On in the Quick Find box and select Single Sign-On Settings. Select SAML Enabled, and click the option to create a SAML SSO configuration.
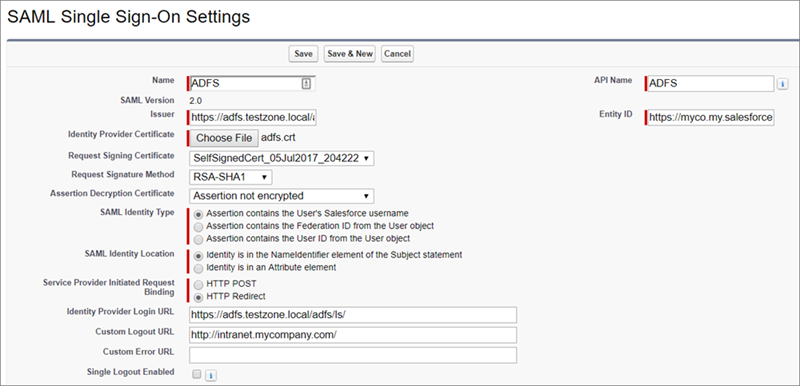
Configure the settings.
- Name—Enter a name for the SAML SSO settings.
- SAML Version—This setting is set to 2.0.
- Issuer—Paste your entityID here.
- Identity Provider Certificate—Browse and select the token-signing certificate you exported earlier.
- Request Signing Certificate—Select a self-signed certificate you created earlier. (See the procedure for generating a self-signed certificate.)
- Request Signature Method—Set this setting to RSA-SHA-1.
- SAML Identity Type—To log in a user, you can match against either the Salesforce username or the federation ID. If matching the federation ID, it must be populated in the profile of every user. For testing, select federation ID. If users use their email address as their Salesforce username, a production deployment can switch to matching against the username.
- SAML Identity Location—To log in the user, you can use either the NameID in the SAML assertion or another attribute. You can use NameID, because AD FS populates NameID in the SAML assertion.
- Service Provider Initiated Request Binding—It’s recommended that you choose HTTP Redirect.
- Identity Provider Login URL—Enter the URL of your AD FS SAML
endpoint, to which Salesforce sends SAML requests for SP-initiated login. Note Include the slash at the end of the URL.
You can find the URL in the AD FS MMC at Endpoints | Token Issuance | Type:SAML 2.0/WS-Federation. In the example, the URL is https://adfs.testzone.local/adfs/ls/.
- Custom Logout URL—You can configure a URL to which the user is sent after logging out, for example, http://intranet.mycompany.com/.
- Entity ID—This setting specifies how the AD FS IdP identifies the Salesforce SP. To enable SP-initiated SSO, enter the entity ID from your configured My Domain.
Save the settings, and download the metadata XML file.
AD FS 2.0 Configuration
Now that you have Salesforce metadata, create the AD FS side of the trust relationship. Open the AD FS 2.0 MMC snap-in, and add a new “Relying Party Trust.”
- Select Data Source—Import data about a relying party from a file. Browse to the XML file that you downloaded from Salesforce.
- Specify Display Name—Give the trust a display name, such as Salesforce Test.
- Choose Issuance Authorization Rules—Permit all users to access this relying party.
- Open Edit Claim Rules Dialog—Select.
In the claim rules editor, click the Issuance Transform Rules tab. Add a rule using the Claim Rule Template set to Send LDAP Attributes as Claims.
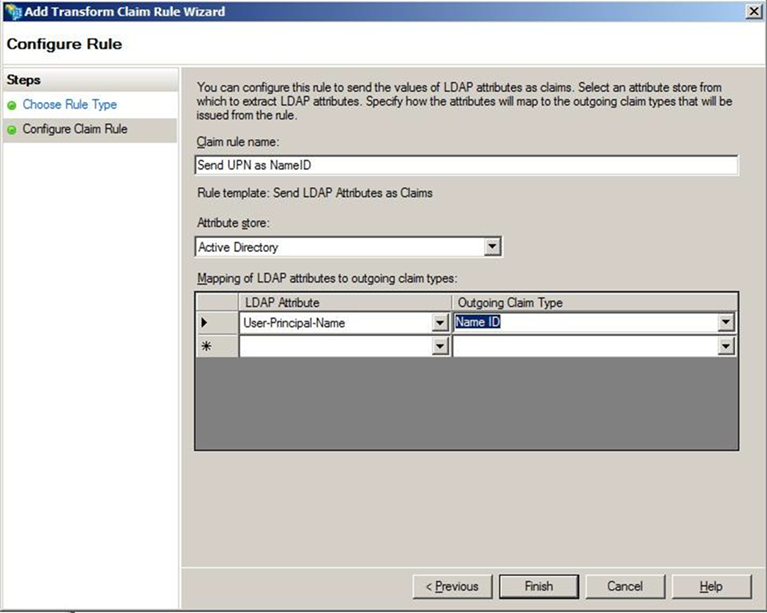
- Claim Rule Name—For testing, set the attribute User-Principal-Name as NameID, and call the rule Send UPN as NameID. In production, it’s common to send the user’s email address or employee ID. It’s important to use an attribute with a value that is unlikely to change over time, because any change invalidates SSO for that user.
- LDAP Attribute—Select User Principal Name.
- Outgoing Claim Type—Select Name ID.
SP-Initiated Login
With an IdP-initiated login process, you typically set up a link on the company intranet that users click to get access to Salesforce. SP-initiated login happens when a user clicks a direct link to Salesforce.
If you configured a My Domain entity ID in the Salesforce SAML settings (for example, https://testinfo-developer-edition.my.salesforce.com), users can go to URLs in that domain. They’re then redirected to AD FS for authentication.
When a My Domain entity ID is configured in the Salesforce SAML settings (for example, https://testinfo-developer-edition.my.salesforce.com), users can go to URLs in that domain. They’re then redirected to AD FS for authentication.
For an SP-initiated login to work, set the AD FS secure hash algorithm parameter to SHA-1. Salesforce uses SHA-1 when signing SAML requests, and AD FS defaults to SHA-256.
The SHA parameter is set in the AD FS trust properties for the Salesforce relying party on the Advanced tab.
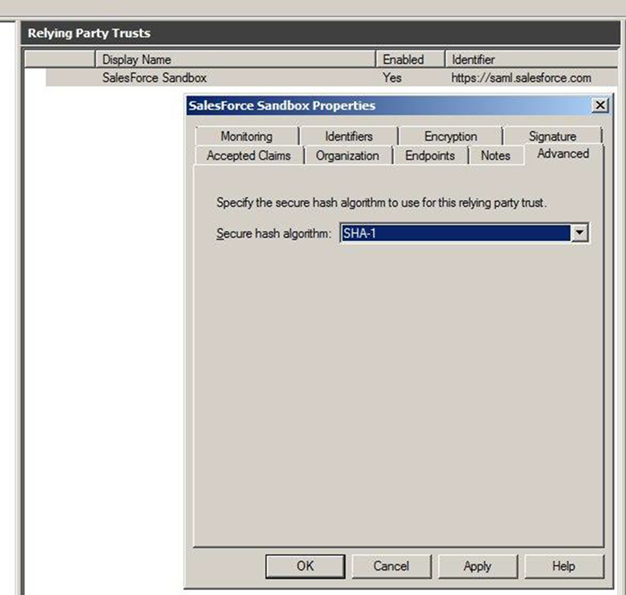
If you don’t set this parameter, you get a message in the AD FS event log.
Event ID: 378SAML request is not signed with expected signature algorithm. SAML request is signed with signature algorithm http://www.w3.org/2001/04/xmldsig-more#rsa-sha256 . Expected signature algorithm is http://www.w3.org/2000/09/xmldsig#rsa-sha1Testing
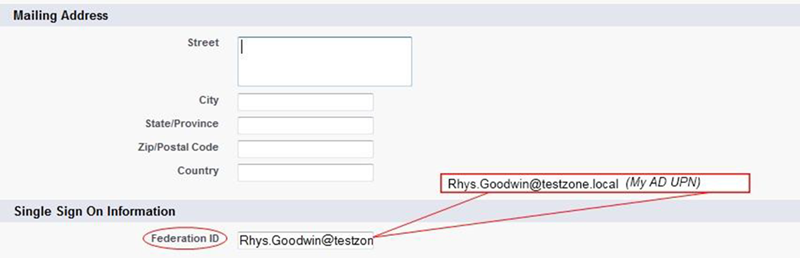
You can now set the federation ID of a Salesforce user to the UPN of the AD user account and test the login process.
For SP-initiated login, assuming you configured a My Domain entity ID, browse straight to the URL, for example, https://testinfo-developer-edition.my.salesforce.com.
For IdP-initiated login, use the AD FS login URL and specify the loginToRp parameter as the Salesforce SAML entity ID, for example, https://adfs.testzone.local/adfs/ls/idpinitiatedsignon.aspx?loginToRp=https://saml.salesforce.com.
In either case, the browser follows a chain of redirects, ultimately logging you in to your application on Salesforce. If you get a Salesforce login error, use the SAML assertion validator tool on the Salesforce SSO configuration page. It displays the results of the last failed SAML login.
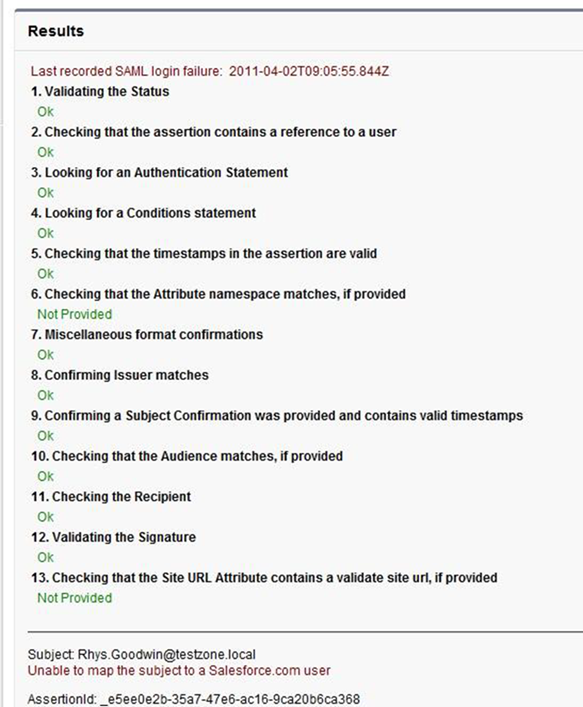
Ï
If you get an error from AD FS, check the AD FS logs in Server Manager\Diagnostics\Applications and Services Logs\AD FS 2.0\Admin. There’s also a good MSDN blog post on AD FS 2.0 diagnostics.
If you configured a My Domain entity ID, SP-initiated login works for deep-links. Bookmark a link from deep inside Salesforce and then log out. Reload your browser, and select the bookmark. You’re redirected to your IdP, authenticated, and then redirected back to the bookmarked link.
Common Issues and Troubleshooting
- Federation ID is case-sensitive.
If the federated identity is your org’s email address, enter it exactly as AD FS sends it. Otherwise, Salesforce can’t find a matching user.
You can’t write a custom claim rule to normalize the case of the LDAP attribute before sending it because the claims language has only a basic regular expression replace.
- Assertion has expired.
Assertions with a timestamp more than 5 minutes old are rejected.
Note Salesforce allows 3 minutes for clock skew. So an assertion can be as much as 8 minutes past the timestamp time or 3 minutes before it. Also, an assertion expires as specified by the validity period, which can be less 5 minutes.Ensure that your AD FS server’s system clock is synchronized to a good internet time source using Network Time Protocol (NTP).
- Can’t log in to Salesforce.
If an error prevents you from logging in to Salesforce via SSO, you can still log in with a username and password. Append ?login to the login URL, for example, https://login.salesforce.com/?login. After logging in, you can disable SSO if necessary while you troubleshoot the issue.