
Configure SSO from Salesforce to Accellion
Let your users log in to Accellion using single sign-on (SSO) from your Salesforce org configured as an identity provider.
Required Editions
| Available in: Lightning Experience and Salesforce Classic |
| Available in: Enterprise, Performance, Unlimited, and Developer Editions |
When you set up Accellion as a service provider and create a connected app in Salesforce, users can access Accellion using their Salesforce login credentials.
Follow these high-level steps to configure SSO for Salesforce to Accellion.
See Also
Set Up Your Salesforce Org as an Identity Provider
With the My Domain feature, your Salesforce org is enabled as an identity provider. My Domain is required for all orgs. If you don’t like your org’s My Domain name, you can change it.
The My Domain feature also includes a certificate and key pair. The certificate establishes trust between your Salesforce org and Accellion. Optionally, you can use another self-signed certificate or import a CA-signed certificate.
To download the Salesforce self-signed certificate:
- From Setup, enter Identity Provider in the Quick Find box, and select Identity Provider.
- Click Download Certificate.
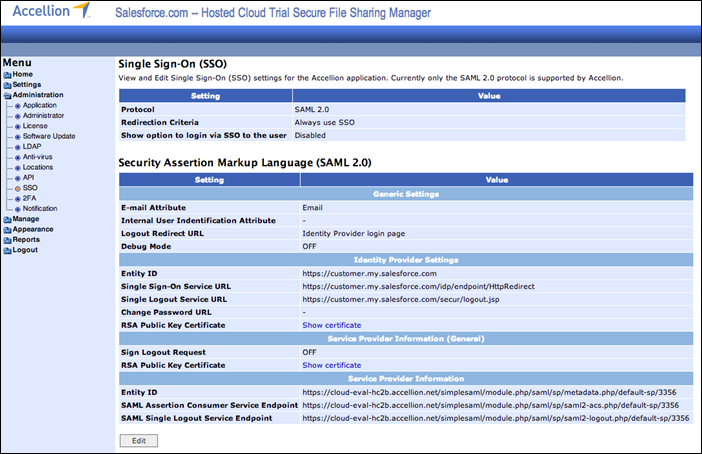
Configure SAML Settings in Accellion
- Log in to your Accellion administrative account.
- From the menu, under Administration, select SSO.
- Edit the SAML settings for your identity provider.
- For email Attribute, enter Email.
- For Entity ID, enter https://MyDomainName.my.salesforce.com.
- For Single Sign-On Service URL, enter https://MyDomainName.my.salesforce.com/idp/endpoint/HttpRedirect.
- For Single Logout Service URL, enter https://MyDomainName.my.salesforce.com/secur/logout.jsp.
- For RSA Public Key Certificate, select the Salesforce certificate that you downloaded.
- Save the settings.
- Accellion displays the service provider information that you need when you set up the
Salesforce connected app. Save these URLs:
- Entity ID, which uses the format https://domain_name/simplesaml/module.php/saml/sp/metadata.php/default-sp/3356, where domain_name is the name of your Accellion domain. For example, https://cloud-eval-hc2b.accellion.net/simplesaml/module.php/saml/sp/metadata.php/default-sp/3356.
- SAML Assertion Consumer Service Endpoint, which uses the format https://domain_name/simplesaml/module.php/saml/sp/saml2-acs.php/default-sp/3356, where domain_name is the name of your Accellion domain. For example, https://cloud-eval-hc2b.accellion.net/simplesaml/module.php/saml/sp/saml2-acs.php/default-sp/3356.
Create a Connected App in Salesforce
- In Salesforce, create a connected app
- In Lightning Experience, from Setup, enter App in the Quick Find box, and select App Manager. Click New Connected App.
- In Salesforce Classic, from Setup, enter Apps in the Quick Find box, and select Apps. Under Connected Apps, click New.
- Configure the connected app Basic Information settings.
- Enter a name for the Accellion connected app. Salesforce uses this name to populate the API name.
- Enter your email address in case Salesforce must contact you or your support team.
- Optionally, upload or specify a logo and icon to represent your Accellion application in the Salesforce App Launcher.
- Configure the connected app Web App Settings.
- Select Enable SAML.
- For Entity Id, enter the URL that Accellion provided, for example, https://cloud-eval-hc2b.accellion.net/simplesaml/module.php/saml/sp/metadata.php/default-sp/3356.
- For ACS URL, enter the URL that Accellion provided, for example https://cloud-eval-hc2b.accellion.net/simplesaml/module.php/saml/sp/saml2-acs.php/default-sp/3356.
- For Subject Type, select Persistent ID.
- For Name ID Format, select urn:oasis:names:tc:SAML:1.1:nameid-format:unspecified.
- For Issuer, keep the default value, which is your My Domain login URL.
- For IdP Certificate, keep the default (Default IdP Certificate).
- Save the settings.
- Configure a custom attribute for the connected app.
- From Setup, enter Apps in the Quick Find box.
If you’re using Lightning Experience, select Manage Connected Apps.
If you’re using Salesforce Classic, under Manage Apps, select Connected Apps.
- Click the name of your connected app for Accellion. The connected app detail page appears.
- Under Custom Attributes, click New.
- Enter the attribute key Email with a value of $User.Id.
- Save the settings
- From Setup, enter Apps in the Quick Find box.
- Configure profiles and permission sets for the connected app.
- From Setup, enter Apps in the Quick Find box.
If you’re using Lightning Experience, select Manage Connected Apps.
If you’re using Salesforce Classic, under Manage Apps, select Connected Apps.
- Click the name of your connected app for Accellion. The connected app detail page appears.
- Click Manage Profiles or Manage Permission Sets, and add profiles or permission sets for the users who can access this app.
- From Setup, enter Apps in the Quick Find box.
- In Salesforce, enter the start URL for the connected app.
- On the connected app detail page, click Edit Policies.
- For Start URL, enter the URL for your Accellion domain, for example https://cloud-eval-hc2b.accellion.net.
- Save the settings.
