
You are here:
Activate and Publish a Flexcard
After you confirm that the Flexcard is ready, activate it. After activation, add the Flexcard to a Lightning page or to a page in an Experience Builder site.
If you use Omnistudio for Vlocity, or Omnistudio Standard in Summer '22 or earlier, when you activate a Flexcard, Omnistudio generates a custom Lightning web component. Add the generated LWC to a Lightning page or Experience Builder page. See Activate, Configure, and Publish Flexcards for Omnistudio Vlocity.
If you use Omnistudio Standard in Summer '22 or later, add the standard Flexcard component to a Lightning page or Experience Builder page after activation.
You can’t edit or delete an active Flexcard. To make changes, deactivate it first.
To reference your Flexcard on an Experience Cloud site, or on a Lightning page, use the Flexcard wrapper component available from the Salesforce Lightning Component Library. See Component Library for more information.
If you’re referencing a Flexcard on a Lightning Web Runtime
(LWR) Experience Cloud site, you must use a wrapper component that takes in the name
of the Flexcard you want to load at runtime, as shown. The
flexcard-name attribute is mandatory.
<namespace-flex-card-standard-runtime-wrapper
    flexcard-name="name"
    record-id="recordId"
    object-api-name="objectApiName"
    records="records"
    exposed-attributes="exposedAttributes">
</namespace-flex-card-standard-runtime-wrapper>- Publish a Flexcard
Define metadata values, such as where your Flexcard is visible, and update the component SVG icon for your Flexcard before publishing your component to a Lightning or Experience page. For example, to view your Flexcard on an Experience site you can enable Community Page under Targets in Publish Options. - Add a Flexcard to a Lightning Page
Add a Flexcard that you created or an existing Flexcard to Lightning pages and set up how you want it to appear to users. - Add a Flexcard to an Experience Builder Page
Add a Flexcard that you created or an existing Flexcard to the pages of Experience Builder sites. - Considerations for Using Flexcards on Lightning Web Runtime Sites
Learn about some considerations for using Flexcards on Lightning Web Runtime (LWR) Experience Cloud sites.
Publish a Flexcard
Define metadata values, such as where your Flexcard is visible, and update the component SVG icon for your Flexcard before publishing your component to a Lightning or Experience page. For example, to view your Flexcard on an Experience site you can enable Community Page under Targets in Publish Options.
- From the App Launcher, find and select Flexcards.
- From the list page, select a Flexcard version.
- If needed, activate the Flexcard.
-
Click
 , and then select
Publish Options.
, and then select
Publish Options.
-
Enter information as needed. Publish the Flexcard to one of these target pages:
- App Page - Enables the Flexcard to be used on an App page in Lightning App Builder.
- Home Page - Enables the Flexcard to be used on a Home page in Lightning App Builder.
- Record Page - Enables the Flexcard to be used on a record page in Lightning App Builder.
- Community Page - Enables the Flexcard to be used as a drag-and-drop component on a page in Experience Builder.
- Community Default - Enables the Flexcard in Experience Builder to expose editable properties when the component is selected.
When you select publishing options for a parent Flexcard, at least one target must be selected. If you uncheck all targets and click Save, Omnistudio automatically enables the App Page, Home Page, and Record Page options as default targets. - Save your changes.
Add a Flexcard to a Lightning Page
Add a Flexcard that you created or an existing Flexcard to Lightning pages and set up how you want it to appear to users.
- From Setup, in the Quick Find box, enter Lightning App Builder, and then select Lightning App Builder.
- Find the page that you want to add the Flexcard to and then click Edit.
- Drag the Flexcard component from the Standard section of the Components pane onto the canvas.
-
If needed, click Flexcard Name and then select a Flexcard.
By default, the builder uses the most recent active Flexcard.
- To track Flexcard user interactions, select Enable Omnistudio Analytics.
- If needed, configure visibility settings, for example, by using display conditions.
- Activate your page and configure activation properties.
- Save your changes.
Add a Flexcard to an Experience Builder Page
Add a Flexcard that you created or an existing Flexcard to the pages of Experience Builder sites.
You can add a Flexcard to an Aura or Lightning Web Runtime (LWR) Experience Cloud site. To know how to create LWR-compatible Flexcards, see Activate and Publish a Flexcard.
- From Setup, in the Quick Find box, enter Digital Experience, and then select All Sites.
- Find the site that you add the Flexcard to and then click Builder.
-
Click
 . If you're using an Aura-based Experience Cloud site, find the Flexcard component
under Process Automation and drag it to the canvas. If you're using an LWR site, find the
Flexcard component in the Customer Interactions section.
. If you're using an Aura-based Experience Cloud site, find the Flexcard component
under Process Automation and drag it to the canvas. If you're using an LWR site, find the
Flexcard component in the Customer Interactions section.
- From the Flexcard Name picklist, select a Flexcard.
-
If needed, in Exposed Attributes, enter a configurable public property as JSON code.
For example, to show up to five accounts on the Flexcard, if the variable is AccountRecordLimit, enter
{"AccountRecordLimit": 5}. For multiple properties, separate key and value pairs with a comma, such as{"AccountRecordLimit": 5, "Greeting": "Hello"}. -
If the Flexcard uses the record ID context variable, then to view the related record
data, enter a record ID.
For information about exposed attributes and a Flexcard’s context ID, see Configure Flexcard Settings.
-
If needed, enter the object API name as a parameter in the {!objectApiName} format.
For example, for an Account record page, enter
{!Account}. - To track Flexcard user interactions, select Enable Omnistudio Analytics.
- Preview your Experience Builder site, and make changes as needed.
- Publish your Experience Builder site.
Considerations for Using Flexcards on Lightning Web Runtime Sites
Learn about some considerations for using Flexcards on Lightning Web Runtime (LWR) Experience Cloud sites.
Both existing and newly created Flexcards can be used on LWR sites. Learn about some key considerations before you choose a Flexcard to embed in your LWR sites.
You can use Flexcards through the LWR site builder under the Customer Interactions category. To make sure that your Flexcards display correctly and function well, note these pointers and choose only compliant Flexcards for your LWR sites.
- If you make changes to your Flexcard, whether it is a child or parent Flexcard, make sure
that you republish the sites that use it.
 Note Before republishing your sites via the site builder, consider other elements from other products that you've embedded in your site. Only republish if everything is production-ready.
 - To use the Open Omniscript option on an LWR site, make sure that you select the Load Omniscript from URL checkbox in the Properties section of the page. This checkbox is added to the Omniscript component and loads the Omniscript present in the URL configured via the Action Type. You must also create an lwcos page for this action to work. For more information, see Launch an Omniscript from an Omniscript Action on a Flexcard in Experience Cloud.
- The Style tab on LWR sites don't work with Flexcard elements. You can continue to control the style of the Flexcard through the options available within the Flexcard designer, but they aren't compatible with the settings native to the LWR site builder.
- Custom LWCs are supported. However, due to a technical limitation, nested custom LWCs
require a workaround to work as expected. Because LWR sites work on cached data, they look
for Flexcards and Omniscripts nested within your custom LWCs on the site. If present, they
load the appropriate component at build time. To do this, you can pick one of the two
methods outlined here.
- Create a page on your site and add all nested components in your main LWC component to this page. Hide the page so it doesn’t show up for users as a navigation option.
- On the page that you’re adding your custom LWC, add the dependent Flexcards and Omniscripts. Then, for each component, control the visibility via the Visibility tab. For instance, you can switch the Show Component on Desktop toggle on and add a condition that says User ID equals Invalid_User. Since Invalid_User is a value that never matches a real user ID, this condition is always false. As a result, the dependent components remain hidden from users but are still available for the LWR site to discover and cache.
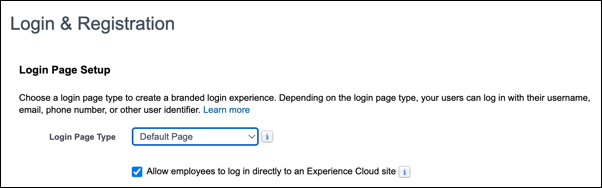
- When you open an LWR site from the Digital Experiences page, the site considers you an unauthenticated user and shows only Flexcards that have data available to guest users. To make sure that you see the full data, implement a login page on your site. Then, go to the Workspaces link next to the site name. Click Administration and find the Login & Registration tab in the left navigation pane. Make sure that the Login Page Type dropdown has a value and that the Allow employees to log in directly to an Experience Cloud site checkbox is selected.
-
- Streaming APIs as data sources don’t work on LWR.