You are here:
Define Custom Label Translations in Multi-Language Omniscripts
Define translations in various languages for custom labels in multi-language Omniscripts. Create localized content so that users see the Omniscripts in the language based on their locale. Create custom labels in English first, followed by translations for other languages.
To avoid duplications and improve querying, use naming conventions when you create custom labels in a Salesforce org with multiple developers. For example, jSmithCustomTextLabel.
In addition to Salesforce custom labels, Omnistudio provides default custom labels with translations. Omnistudio doesn't support Salesforce standard labels.
The Set Values and Set Errors actions don’t support custom labels.
-
Create a multi-language Omniscript.
- From the App Launcher, find and select Omniscripts.
- On the Omniscripts tab, click New.
- Enter a unique name, type, and subtype for your Omniscript.
- From the language dropdown list, remove English and select Multi-Language.
- Save your changes.
- Create the Omniscript's basic structure by adding elements and their properties.
-
Add or edit translations for custom labels for elements in the Omniscript.
The Edit Your Omniscript Translations window opens.
- Add English translations for the custom labels.
- Create another translation.
- Add other languages as necessary.
-
Preview the Omniscript and test each language.
Sometimes it takes a few minutes for the custom labels to be created. If the labels don't appear in the preview at first, try again in a few minutes.
If the Save operation is not completed error appears, or if labels don't appear in preview after a few minutes, add the custom labels in Setup. See Create and Edit Custom Labels.

- Access Custom Labels in an Omniscript Custom Lightning Web Component
Provide custom Lightning web components access to Salesforce custom labels in your Omniscript. - Translate Tooltip Help Text in Omniscripts
Display tooltip help text with multiple translations in multi-language Omniscripts. You must use custom labels to add help text in multi-language Omniscripts. If a custom label is not defined for a help text tooltip, an error renders. - Translate Custom Labels for Date and Time Components
Define custom label translations for date and time pickers using JSON strings and Omniscript custom labels. For example, if a Spanish translation is defined, the date picker displays Spanish translations for the months and days of the week. - Create Multi-Language Select Elements
Populate Select, Multi-select, and Radio elements for a multi-language Omniscript using custom configuration options. - Omniscript Custom Label Reference
Review the Omniscript element properties for which you must define custom labels and translations for multi-language Omniscripts. To use a default translation, clear the property.
Example: Translate an Omniscript by Using Custom Labels
This example illustrates how you can translate Text and Text Block elements by using custom labels. You can follow similar steps to translate other Omniscript elements.
-
Create a multi-language Omniscript.
- From the App Launcher, find and select Omniscripts.
- On the Omniscripts tab, click New.
- Enter a unique name, type, and subtype for your Omniscript.
- From the language dropdown list, remove English and select Multi-Language.
- Save your changes.
-
Configure
the multi-language Omniscript.
- From the elements panel, drag a second step in the Omniscript.
-
In the properties of the second step, remove the
Step2value from the field label. - Expand both steps.
- From the elements panel, drag a Text element into the first step.
- From the elements panel, drag a Text Block element into the second step.
-
In the Edit Your Omniscript Translations window, edit the custom label values in
English.
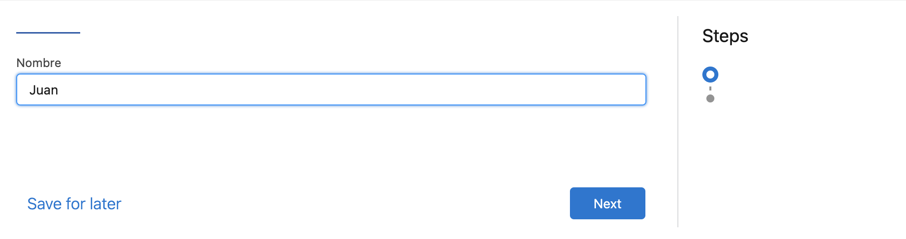
- In the Text1 element's field label row, in Custom Label Name, enter Name and in Custom Label Value in English (US), enter Name.
-
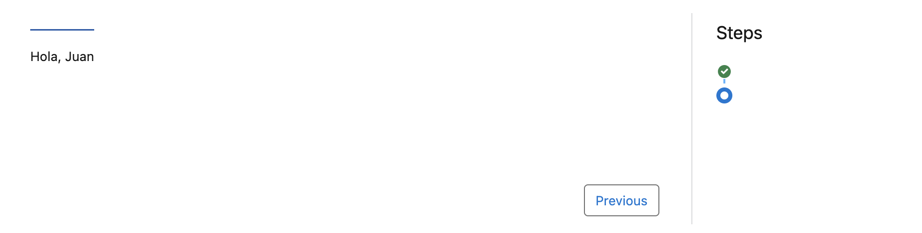
In the TextBlock1 element's text key row, in Custom Label Name, enter
Greeting and in Custom Label Value in English
(US), enter <ph>Hello,
</ph><ph>%Step1:Text1%</ph>.
A custom label value for a Text Block can contain HTML markup. To ensure that a merge field value renders correctly, put the merge field between
<ph>HTML tags. To begin on a new line, use<br/>. - Save the English translations.
Two custom labels are created: Name and Greeting. -
Create a Spanish translation for the Omniscript.
- In the Text1 element's field label row, enter Nombre for the custom label value in Spanish.
- In the TextBlock1 element's text key row, enter <ph>Hola, </ph><ph>%Step1:Text1%</ph> for the custom label value in Spanish.
- Save the Spanish translations.