
Headless Identity APIs: Headless Registration Flow for Private Clients
For apps that are able to keep confidential information, such as web apps with a client-server architecture, you can set up headless registration for customers and partners using the Headless Registration Flow. The Headless Registration Flow extends the Authorization Code and Credentials Flow, which is built on the OAuth 2.0 Authorization Code grant type. With this flow, you control the front-end user registration experience in a third-party app. You call Salesforce Headless Registration API via your Experience Cloud site to create users, log them in, and give them access to Salesforce resources. By separating these two processes, your users can register for your app and access Salesforce data without leaving the app.
Required Editions
| Available in: both Salesforce Classic (not available in all orgs) and Lightning Experience |
| Available in: Enterprise, Unlimited, and Developer Editions |
Here’s an example use case for the Headless Registration Flow. You work for a travel company that manages customer information in Salesforce. It’s important for you to have complete control over the user experience in the app. You also want to retain more customers by encouraging them to register for your app, which requires identity services. Because your company already uses Salesforce, Headless Identity is the way to go. You build a traditional client-server app and configure the Headless Registration Flow. When new users sign up for your app, they’re greeted with your customized registration experience. They register, verify their identity, and access Salesforce data without interacting directly with Salesforce.
To expand your email template options for the one-time password (OTP) email sent to end users during the flow, opt in to email template allowlisting and create an allowlist with custom templates. See Use Multiple Email Templates for Headless Flows.
Before setting up this flow, configure the necessary settings and access policies on your connected app or external client app See Configure a Connected App for the Authorization Code and Credentials Flow or Configure an External Client App for the Authorization Code and Credentials Flow
Here’s an overview of the flow.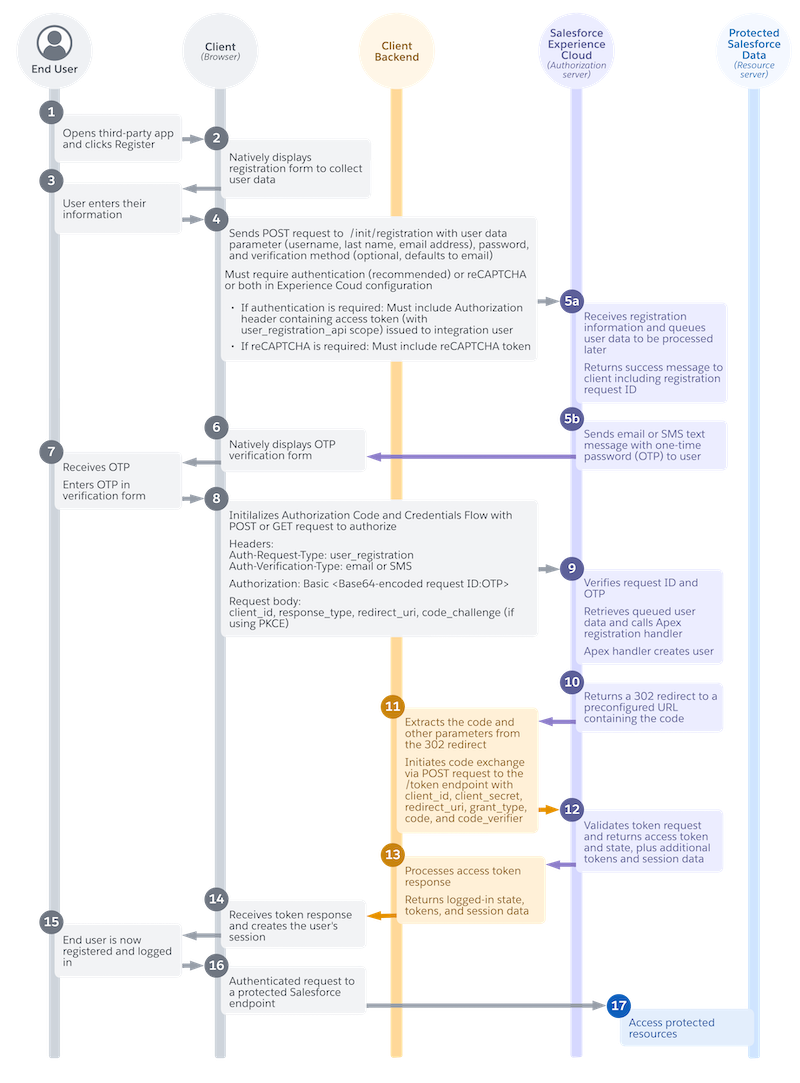
- A user opens your app and clicks Register. (1)
- In your app, you natively display a registration form to collect user data. You design this form and customize the information that you want to collect. (2)
- The user enters their information in the app. For example, they enter their new username, password, and first name. (3)
- Your app submits the user information to the Headless Registration API /services/auth/headless/init/registration endpoint on your Experience Cloud site. (4)
- Salesforce receives the user information and queues it to be processed later. Salesforce returns a success message that includes a registration request ID to your app. (5a)
- Salesforce then sends an email or an SMS text message containing a one-time password (OTP) to the user. (5b)
- In your app, you natively display an OTP verification form. You choose how you want this form to look. (6)
- The user receives their OTP and enters it in the verification form. (7)
- Your app then initializes the Authorization Code and Credentials Flow with an authorization code request to Headless Login API. The request includes the OTP and a request ID, along with other parameters. (8)
- Salesforce verifies the request ID and OTP. It retrieves the queued user data that it stored earlier and calls the headless registration handler. The headless registration handler creates a user in Salesforce. (9)
- Salesforce returns a 302 redirect to a preconfigured URL containing the authorization code. The 302 redirect is processed within the browser, and the response is delivered headlessly to the preconfigured callback handler on your server. (10)
- Your server-side callback handler extracts the code and other parameters from the 302 redirect. It then initiates the code exchange via a POST request to the token endpoint. (11)
- From the token endpoint, Salesforce returns an access token response to the server-side callback handler. (12)
- The server-side callback handler processes the token response and returns the logged-in state to the app. This response can include session details, user info, and possibly the access token, depending on your app design and security posture. (13)
- The browser receives the logged in response and creates the user’s session. (14)
- The user is now logged in, and they perform an action in your custom app that initiates a request for Salesforce data. For example, they click a button to access their travel booking history, which is stored in the Salesforce Experience Cloud site. (15)
- Your custom app makes an authenticated request to a protected Salesforce endpoint, such as a Salesforce API. (16)
- The customer can now access their protected data in your custom app. For example, they can see their travel booking history. (17)
User Opens Third-Party App and Clicks Register
Your user opens your app and clicks a registration link, or they click a link to access a resource that requires registration.
Your App Displays a Registration Form
In your app, you natively display a registration form to collect user data. You control everything about this form, including its look, feel, and the user information that you want to collect.
There are a few considerations about what information you want to gather from users. When your app submits user information to Headless Registration API, Salesforce checks for an email address, username, last name, and password. You can collect this information from users or autogenerate it, but it must be included in your POST request. When deciding what information to include, make sure to collect an email address or phone number so that the user can verify their identity.
User Enters Their Information
In your app, the user enters their information in your registration form.
Your App Headlessly Sends the User Information to Headless Registration API
From the browser, your app sends a POST request to the headless registration endpoint (/services/auth/headless/init/registration) on your Experience Cloud site using Asynchronous Java and XML (AJAX).
Include these headers in your registration request.
| Header | Required? | Description |
|---|---|---|
Authorization: Bearer
|
This header is required if you enable Require authentication to access this API on the Experience Cloud Login & Registration page. We strongly recommend that you always enable this setting for private clients. | Contains an access token issued to an internal integration user. To get the
access token, you can use any standard OAuth flow that Salesforce supports. Ensure
that you assign the user_registration_api scope
to your connected app or external client app, or pass it as a parameter during your
flow. |
Content-Type
|
No. If you’re using Postman to build and test your flow, it sometimes adds this header. Verify that it’s correct by checking the hidden headers. | Specifies the format of your request, such as application/json. |
Include these parameters in the request body.
| Parameter | Required? | Description |
|---|---|---|
password
|
Yes. | The user’s password. The password is subject to any password policies configured for the profile or org. |
userdata
|
Yes. Even if you don’t collect this information from the user, you must
autogenerate it and pass it in the userdata parameter. |
Contains all required user information. At minimum, Salesforce requires this
information in the
|
recaptcha
|
Required if these conditions apply to you.
|
An encrypted token issued by the Google reCAPTCHA API when a user completes a reCAPTCHA challenge. |
recaptchaevent
|
Required if these conditions apply to you:
|
A JSON object containing these subparameters.
For more information, see Google's reCAPTCHA documentation. |
verificationmethod
|
No. If you don’t include this parameter, Salesforce defaults to verifying the user’s identity with email. If you include this parameter, include an
|
The method used to verify the user’s identity. Salesforce supports two values
for the verification method: email and
sms. |
customdata
|
No. | Contains any custom user information that you collect. For example, you can include the user’s street address. |
emailtemplate
|
Required to specify multiple email templates if email template allowlisting is enabled. If you didn’t enable email template allowlisting, you can’t include this parameter. If you don’t include this parameter, Salesforce uses the default email template configured in your Experience Cloud settings, regardless of whether allowlisting is enabled. If there’s no template configured, Salesforce uses a default OTP email template. |
The custom email template developer name. This parameter can include only an email template from the allowlist. |
Here’s an example POST request. In this example, the Experience Cloud settings are configured to require both authentication and reCAPTCHA, so the request includes an access token and a reCAPTCHA token.
POST /services/auth/headless/init/registration? HTTP 1.1
Host: MyDomainName.my.site.com
Content-Type: application/json
Authorization: Bearer **************
{
 “userdata”: {
  “firstName”: “Janice”
   “lastName”: “Edwards”
   “email”: “janice.edwards@example.com”
   “username”: “jedwards@myapp.com”
    }
 “customdata”: {
   {”mobilePhone”=”<mobile phone number>”
   }
 “password”: “*******”
 “recaptcha”:”***********”
 “verificationmethod”: “email”
“emailtemplate”: “unfiled$public/SalesNewCustomerEmail”
}
Salesforce Receives the Information and Returns a Request Identifier
Salesforce receives the user information. Because Salesforce hasn’t verified the user’s identity, it queues this information to be processed later.
If the information in the POST request is valid, Salesforce returns a success message to the app. This message includes a registration request identifier, which is important later in the flow. Here’s an example success message.
{
    "status": "success",
    "email": “jedwards@myapp.com”
    "identifier": “0RXXXXXXXX”
}
Salesforce Sends a One-Time Password to the User
Immediately after Salesforce receives the user data and sends a success message to the app, it sends a one-time password (OTP) via email or SMS, depending on the user’s verification method.
Your App Natively Displays a Verification Form
When you receive the success message, you natively display an OTP verification form in your app. Again, the look and feel of the verification experience is entirely up to you.
User Enters OTP in Verification Form
Your user receives the OTP via email or SMS and enters it in your verification form.
Your App Initializes the Authorization Code and Credentials Flow
When the user proves their identity, the app immediately initializes the Authorization Code and Credentials Flow with a request to Headless Login API.
Include these headers in the authorization request
| Header | Required? | Description |
|---|---|---|
Auth-Request-Type
|
Yes. | Specifies the type of request you want to make to Salesforce. For headless
registration, this value must be set to user-registration. |
Authorization
|
Yes. | A Basic header that identifies the registration request so that Salesforce can link the request to the user’s stored data. You must include the request identifier provided by Salesforce and the OTP used to verify the user’s identity. Append
these values to each other in the format |
Content-Type
|
No. If you’re using Postman to build and test your flow, it sometimes adds this header. Verify that it’s correct by checking the hidden headers. | Specifies the format of your request, such as application/x-www-form-urlencoded. |
Auth-Verification-Type
|
Required if you specified an identity verification method in your initial
registration request. The value of this header must match the value in the verificationmethod body parameter from your request
to the /services/auth/headless/init/registration endpoint. |
Specifies the method used to verify the user’s identity. Salesforce supports
two values for the verification method: email
and sms. |
Uvid-Hint
|
No. If you implement the guest user flow on your app, you can optionally use this header to pass in a JSON Web Token (JWT)-based access token containing a unique visitor ID (UVID) tied to a guest user’s identity. By passing the UVID into a named user flow, you can carry contextual information from a guest user session, like the user’s cookie preferences, into a named user session. Instead of passing a JWT-based token with a UVID in a header, you can also pass the plain UVID value in the request body. |
A JWT-based access token containing a UVID value, which is a Version 4 universally unique identifier (UUID) that’s generated and managed entirely by your app. To get an access token with a UVID, you must enable your connected app or external client app to issue JWT-based access tokens and implement the headless guest flow on your app. |
Include these parameters in the request body.
| Parameter | Required? | Description |
|---|---|---|
client_id
|
Yes. | The connected app or external client app consumer secret. |
response_type
|
Yes. | The OAuth 2.0 grant type that the connected app or external client app
requests. For the Authorization Code and Credentials Flow, the value must
code_credentials. |
redirect_uri
|
Yes. | The URL where users are redirected after a successful authentication. The redirect URI must match one of the values in the connected app or external client app Callback URL field. Otherwise, the approval fails. This value must be URL encoded. |
uvid_hint
|
No. If you implement the guest user flow on your app, you can optionally use this parameter to pass in a UVID value tied to a guest user’s identity, carrying contextual information from a guest user session into a named user session. Instead of passing the UVID in the request body, you can also pass it
in a JWT-based token with a UVID via the |
A plain UVID value, which is a Version 4 UUID that your app generates and manages. To get a UVID, you must enable your connected app or external client app to issue JWT-based access tokens and implement the headless guest flow on your app. |
code_challenge
|
Only if you’re using PKCE. | Required if using the PKCE extension. Specifies the SHA256 hash value of the
This parameter is required if a
|
Here’s an example request to Headless Login API, including PKCE.
POST /services/oauth2/authorize? HTTP 1.1
Host: MyDomainName.my.site.com
Auth-Request-Type: user-registration
Auth-Verification-Type: email
Content-Type: application/x-www-form-urlencoded
Authorization: Basic <base64-encoded request ID:OTP>

response_type=code_credentials&
client_id=******&
redirect_uri=https://www.MyDomainName.my.site.com/services/apexrest/code/exchange&
code_challenge=Y29kZ*******
Salesforce Verifies the Request, Retrieves the User Data, and Creates the User
Salesforce receives the authorization request and verifies the request ID and OTP. Salesforce uses this information to retrieve the queued user data and call the headless registration handler configured in your Experience Cloud site. The Apex handler creates the user in Salesforce and links them to an account.
Salesforce Returns a 302 Redirect to a Preconfigured URL Containing the Code
Salesforce returns an HTTP 302 redirect to a preconfigured URL containing the authorization code. The 302 redirect is processed within the browser, and the response is delivered headlessly to the redirect URL, which is a preconfigured callback endpoint on your server. Here’s an example URL.
https://www.MyDomainName.my.site.com/services/apexrest/code/exchange?code=aPrxC1*******
&sfdc_community_url=https%3A%2F%2FMyDomainName.my.site.com&sfdc_community_id=0DBxxxxxxxxxxxx
Callback Handler Extracts Code and Performs Code Exchange
The server-side callback handler extracts the authorization code and other parameters from the 302 redirect. It then initiates the code exchange by sending a headless POST request to the token endpoint.
For the access token request, you can use only a POST request—GET requests aren’t
supported. There are no required headers for this request, but you can include a Content-Type header.
| Header | Required? | Description |
|---|---|---|
Content-Type
|
No. If you’re using Postman to build and test your flow, it sometimes adds this header. Verify that it’s correct by checking the hidden headers. | Specifies the format of your request, such as application/x-www-form-urlencoded. |
Include these parameters in the request body.
| Parameter | Required? | Description |
|---|---|---|
client_id
|
Yes. | The consumer key of the connected app or external client app. |
client_secret
|
Yes. | The consumer secret of the connected app or external client app. |
code
|
Yes. | The authorization server creates an authorization code, which is a short-lived token, and passes it to the client after successful authentication. The client sends the authorization code to the authorization server to obtain an access token and, optionally, a refresh token. |
code_verifier
|
Required if using the PKCE extension. | Specifies 128 bytes of random data with high entropy to make guessing the
|
format
|
No. | The expected format of the response. Salesforce supports these formats.
|
grant_type
|
Yes. | The type of validation that the connected app or external client app can
provide to prove it’s a safe visitor. For the Authorization Code and Credentials
Flow, the value must be authorization_code. |
redirect_uri
|
Yes. | The URL where users are redirected after a successful authentication. The redirect URI must match one of the values in the connected app or external client app Callback URL field. This value must be URL encoded. |
Here’s an example token request.
POST /services/oauth2/token HTTP 1.1
Host: MyDomainName.my.site.com
Content-Type: application/x-www-form-urlencoded

grant_type=authorization_code&
code=aPrxC1*******&
client_id=******&
client_secret=******&
redirect_uri=https://www.MyExperienceCloudSite.my.site.com/services/apexrest/code/exchange&
code_verifier=Y29kZ*******
Salesforce Grants an Access Token
Salesforce validates the token request and returns an access token response to the server-side callback handler. Here’s an example access token response in JSON format.
{
"access_token":"*******************",
"sfdc_community_url":"https://MyDomainName.my.site.com",
"sfdc_community_id":"0DBxxxxxxxxxxxx",
"signature":"ts6wm/svX3jXlCGR4uu+SbA04M6qhD1SAgVTEwZ59P4=",
"scope":"openid api",
"id_token":"XXXXXX",
"instance_url":"https://yourInstance.salesforce.com",
"id":"https://yourInstance.salesforce.com/id/00Dxxxxxxxxxxxx/005xxxxxxxxxxxx",
"token_type":"Bearer",
"issued_at":"1667600739962"
}
The access token response contains these parameters.
| Parameter | Required? | Description |
|---|---|---|
access_token
|
Yes. | OAuth token that a connected app or external client app uses to request access to a protected resource on behalf of the client application. Additional permissions in the form of scopes can accompany the access token. |
id
|
Yes. | An identity URL that can be used to identify the user and to query for more information about the user. See Identity URLs. |
id_token
|
No. | |
instance_url
|
Yes. | A URL indicating the instance of the user’s org. For example: https://yourInstance.salesforce.com/. |
issued_at
|
Yes. | Time stamp of when the signature was created, expressed as the number of milliseconds from 1970-01-01T0:0:0Z UTC. |
refresh_token
|
No. | Token obtained from the web server, user-agent, or hybrid app token flow. This
value is a secret. Take appropriate measures to protect it. This parameter is
returned only if your connected app or external client app is set up with a refresh_token scope. |
signature
|
Yes. | Base64-encoded HMAC-SHA256 signature signed with the client_secret. The signature can include the
concatenated ID and issued_at value, which you
can use to verify that the identity URL hasn’t changed since the server sent
it. |
sfdc_community_url
|
Yes. | The URL of the Experience Cloud site. |
sfdc_community_id
|
Yes. | The user’s Experience Cloud site ID. |
state
|
No. | The state requested by the client. This value is included only if the state parameter is included in the original query
string. |
token_type
|
Yes. | A Bearer token type, which is used for all
responses that include an access token. |
Callback Handler Processes Token Response and Returns Parameters to App
The server-side callback handler gets the access token from the response. The server-side callback handler then returns the access token and state to the browser, along with user data, tokens, and session data. As a best practice, we recommend that you configure your server to store the access token, create a session for the app, and return the session to the app, instead of returning the access token. As the developer, you’re in full control of creating the session, storing the access token, and managing the logged-in state, so your specific implementation is up to you.
Here’s an example of a successful response in the browser console log.
{"success":true,"state":"https://MyExperienceCloudSite.my.site.com/","errMsg":null,"access_token":"00*******"}App Processes Token Response and Creates the User Session
The app receives the token response, processes it, and creates the user session.
User Is Registered and Performs an Action in the App
Your user is now registered and logged in. They perform an action in your app that requires access to Salesforce data. For example, they click a button to view their travel booking history, which is stored in Salesforce.
App Makes an Authenticated Call to a Salesforce Endpoint
To access the user’s Salesforce data, your app uses the access token to make an authenticated call to a protected Salesforce endpoint, such as a Salesforce API.
User Can Access Salesforce Data
The user can now access protected Salesforce data in your app. For example, they can see their travel booking history.