Loading
Salesforce now sends email only from verified domains. Read More
Identify Your Users and Manage Access
Table of Contents
Select Filters

          No results
          No results
          Here are some search tips

          Check the spelling of your keywords.
          Use more general search terms.
          Select fewer filters to broaden your search.

          Search all of Salesforce Help
          Create a Native Single Sign-On Experience in Your App

          Create a Native Single Sign-On Experience in Your App

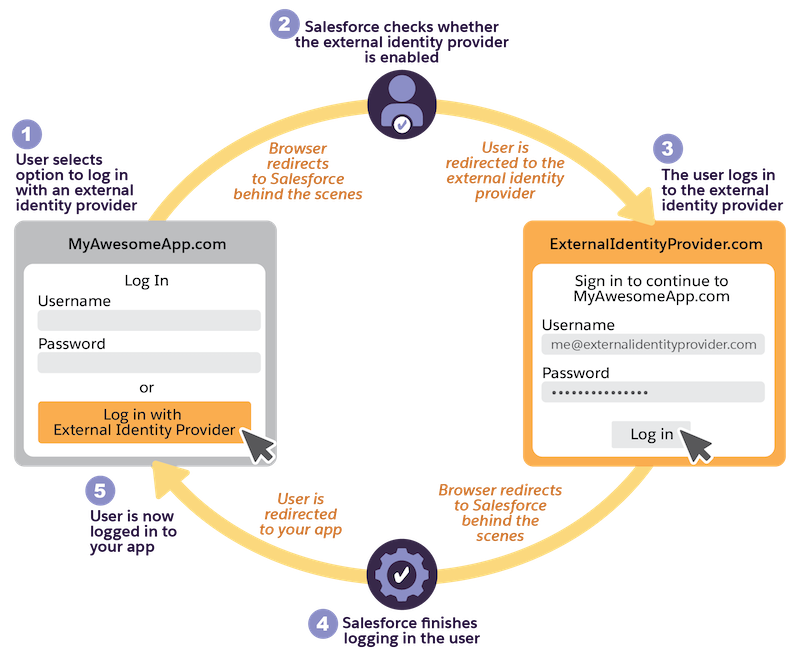
          With an optional parameter in the OAuth 2.0 web server flow and user-agent flow, you can build a single sign-on (SSO) experience that feels like your third-party app is integrated with an external identity provider. With this process, you link an OAuth flow to an SSO flow while maintaining control of the experience within your app. This parameter is supported for Experience Cloud sites, so you can use this capability to add SSO to a Headless Identity implementation. This parameter is also supported for My Domain.

          Required Editions

          Available in: both Salesforce Classic and Lightning Experience
          Available in: Enterprise, Unlimited, and Developer Editions

          For example, you host a login button within your app that directs users to Google, where they enter their Google credentials. The users are then redirected back to your app. Behind the scenes, the browser briefly redirects to your Experience Cloud site before automatically redirecting to your app or Salesforce. The redirection to Experience Cloud happens so quickly that users don’t see the Experience Cloud login page, so it feels like they went between your app and Google. At the end of the flow, they’re logged in to Google and your app. Diagram showing flow of native single sign-on

          Here’s how the flow works.

          • In your app, a user chooses to log in with an external identity provider, kicking off a web server flow or user-agent flow with a request to the My Domain or Experience Cloud site authorization endpoint (1). The request includes an sso_provider parameter that specifies the name of an external identity provider configured in Salesforce, such as an authentication provider or SAML identity provider.
          • The browser briefly redirects to the My Domain or Experience Cloud site URL.
          • Salesforce confirms that an external identity provider is enabled on the org or site’s login page (2). The developer name of the external identity provider configured on the login page must match the name sent in the sso_provider parameter.
          • Salesforce starts an SSO flow and redirects the user to the external identity provider. The user logs in to the provider (3).
          • The browser briefly redirects to Salesforce again. Your registration or Just-in-Time (JIT) provisioning handlers fire. If you have a login flow enabled for the user’s profile, it runs at this point. Salesforce finishes logging the user in and processes the initial authorization request from your app (4).
            Note
            Note To ensure that your user doesn’t interact with Salesforce, configure your external client app policies to pre-authorize admin-approved users and ensure that the user profile doesn’t have a login flow.
          • The browser redirects back to your app and completes the web server or user-agent flow.
          • The user is now logged in to your app (5). They’re also logged in to the external identity provider.

          To configure this SSO experience, complete these high-level steps.

          1. Set up SSO with an external provider. You can set up a SAML identity provider or an authentication provider. When you set up SSO, note the developer name
          2. Add the external identity provider to your My Domain or Experience Cloud login page. Because you configure Headless Identity through Experience Cloud sites, this step is required to configure SSO for a Headless Identity implementation, even though users never see the Experience Cloud login page.
          3. Configure the web server flow or user-agent flow. When you set up the flow, include the sso_provider parameter in the authorization request. The value of this parameter must match the developer name of the external identity provider that you set up.
           
          Loading
          Salesforce Help | Article