
Configure SAML SSO Between Salesforce Orgs or Experience Cloud Sites
If your company deploys more than one Salesforce org or Experience Cloud site, set up SAML single sign-on (SSO) so users can easily move between them. In this SSO configuration, a single org or site acting as the identity provider authenticates users for one or more orgs or sites in the service provider role. Users can log in to all orgs or sites with a single set of credentials.
Required Editions
| Available in: both Salesforce Classic and Lightning Experience |
Federated Authentication is available in: All Editions Delegated Authentication is available in: Professional, Enterprise, Performance, Unlimited, Developer, and Database.com Editions Authentication Providers are available in: Professional, Enterprise, Performance, Unlimited, and Developer Editions |
Configuring SSO between an org and a site is largely the same as configuring SSO across orgs, with a few small differences in endpoint URLs that point to sites.
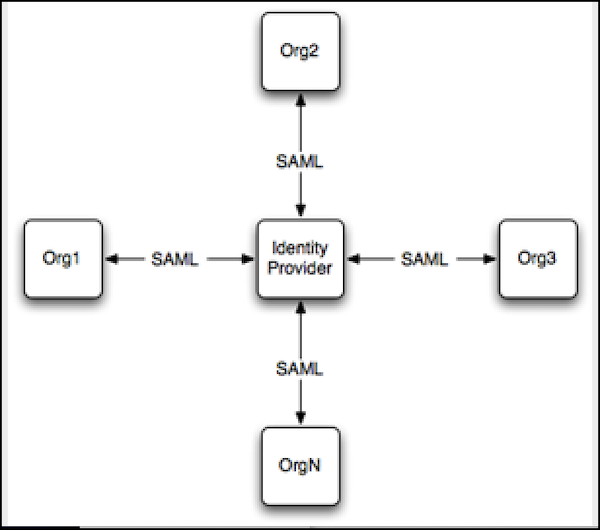
SSO across multiple service providers uses hub-and-spoke architecture. The identity provider is the authentication hub at the center. The identity provider validates credentials and asserts the user’s identity to the spokes—the orgs or sites that are the service providers.
Salesforce supports identity provider-initiated and service provider-initiated logins. For more information, see SAML Login Flows.
To configure SSO between multiple Salesforce service providers, follow these high-level steps.
- Set up a Salesforce identity provider.
- Set up one or more Salesforce service providers.
- In the identity provider, integrate your service providers as connected apps.
- Test the SSO connection.
Set Up Your Salesforce Identity Provider
Configure an org or site as an identity provider to act as your authentication hub. To enable a site as an identity provider, complete these steps in the org where the site is set up.
- From Setup, in the Quick Find box, enter Identity Provider, and select Identity Provider. Click Enable Identity Provider.
- Select a certificate that the identity provider and service provider can use to trust each other. Salesforce automatically creates a self-signed certificate when you enable your org as an identity provider. To create your own certificate, select Create a new certificate.
- Save your certificate. If you changed your certificate, click OK to accept the warning message.
- On the Identity Provider page, click Download Certificate. Use it when you set up your service provider.
- Get SAML metadata to share with the service provider. Use this metadata when you
configure SAML settings in the service provider. This step is different for orgs and
sites.
- If your identity provider is an org, click Download Metadata to get the metadata in an XML file. To get a URL that references an XML metadata file, copy the Salesforce Identity URL listed under SAML Metadata Discovery Endpoints.
- If your identity provider is a site, copy the Experience Cloud Site Identity URL under SAML Metadata Discovery Endpoints.
Set Up Your Salesforce Service Providers
Configure your service provider orgs or sites—the spokes that rely on your authentication hub. Complete these steps in the service provider org or the org where your service provider site is enabled.
- From Setup, in the Quick Find box, enter Single Sign-On Settings, then select Single Sign-On Settings.
- Click Edit. To see SAML SSO settings, select SAML Enabled. Save the change.
- Under SAML Single Sign-On Settings, click the appropriate button to create a
configuration.
- If you downloaded an XML metadata file from the identity provider, click New from Metadata File. Upload the metadata file that you saved and click Create. This option uses the metadata from the XML file to complete SSO settings.
- If you copied the Salesforce Identity URL or the Experience Cloud Site Identity URL from the identity provider, click New from Metadata URL. Paste the URL and click Create. This option reads the XML file at the Salesforce Identity URL and uses it to complete SSO settings.
The metadata options fill in the required SAML settings, including the Issuer, Entity ID, and Identity Provider Login URL fields. - For Identity Provider Certificate, upload the certificate you downloaded earlier from the identity provider.
- For SAML Identity Type, select Assertion contains the Federation ID from the User object.
- Save your settings. Then, from the Single Sign-On Settings pages, copy and save the Entity ID. You share this value with the identity provider when you create a connected app.
- From the same page, get the SAML login endpoint to share with the identity
provider. This step is different for orgs and sites.
- To configure your org as a service provider, copy the Login URL under Your Organization.
- To configure your site as a service provider, click the dropdown arrow next to For Communities. Your site's SAML endpoints appear. Copy the Login URL for your site.
- In the service provider, add the identity provider as an authentication
service.
- From Setup, in the Quick Find box, enter My Domain, then select My Domain.
- Under Authentication Configuration, click Edit.
- Select the authentication service for your identity
provider.
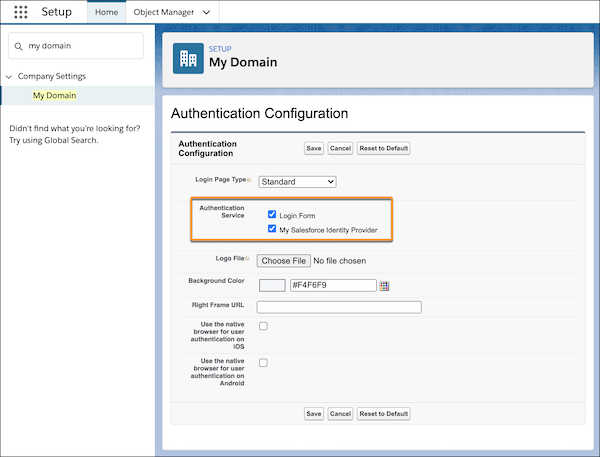
To prevent users from logging in directly to the service provider, deselect Login Form. When users go to the service provider Login URL, they're redirected to the identity provider to log in.
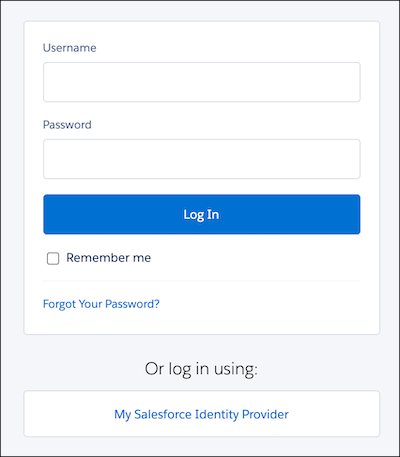
To give users the option to log in directly to the service provider, select Login Form and your identity provider. With both of these options selected, your identity provider appears as a login option on the service provider's login page. Users can decide whether to log in to the service provider directly or log in with SSO.
- To define your other orgs as service providers, repeat these steps. Use the SAML metadata from your identity provider to complete SSO settings for your service providers.
Integrate Service Providers as Connected Apps
To define the service provider to the identity provider, create a connected app in the identity provider.
- From Setup in the identity provider, enter External Client Apps in the Quick Find box, then select Settings in the External Client App section.
- Turn on Allow creation of connected apps, if it's off.
- Click New Connected App.
- Complete the connected app's basic information.
-
Under Web App settings, select Enable SAML. Remember the
Entity ID and Login URL values that you saved when you configured your service provider?
You need them now to complete the connected app settings.
- For Entity ID, paste the Entity ID from the service provider.
- For the ACS URL, paste the Login URL for the org or site.
- For Subject Type, select Federation ID.
- Save the settings.
- To give your users access to this service provider, click Manage on the connected apps page. Select Manage Profiles or Manage Permission Sets and add the profiles or permission sets you want to access the service provider. For more information on profiles and permission sets, see Manage Data Access and Manage Other Access Settings for a Connected App.
- Each service provider needs its own connected app in the identity provider. To define your other service providers, repeat these steps.
Test the SSO Connection
Map a test user from the identity provider to the service provider and confirm that the test user can log in with SSO.
- In the identity provider, create a test user.
- From Setup, in the Quick Find box, enter Users, then select Users.
- Click New User.
- Complete the test user's basic information and assign the user a profile that can access the service provider.
- Under Single Sign On Information, enter a unique Federation ID. The Federation ID can be any value. For more information on identifying and mapping users, see Map Salesforce Users to the SAML Service Provider.
- Save the settings.
- In the service provider, create the same test user. To bind the users together, use the same Federation ID that you entered for the test user in the identity provider.
- In an incognito browser, enter the My Domain URL for the identity provider.
- Log in to the identity provider as the test user.
- In a new incognito browser tab, enter the My Domain URL for the service provider.
If SSO is successful, you're redirected to the identity provider. Because you're already authenticated, you're then redirected back to the service provider and logged in.