Example: Configure an Amazon Authentication Provider
Configure Amazon as an authentication provider to allow users to log in to their Salesforce org using their Amazon credentials.
Required Editions
| Available in: Lightning Experience and Salesforce Classic |
| Available in: Enterprise, Performance, Unlimited, and Developer Editions |
| User Permissions Needed | |
|---|---|
| To view the settings: | View Setup and Configuration |
| To edit the settings: | Customize Application AND Manage Auth. Providers |
Complete the steps that follow to configure Amazon as an authentication provider.
- Set up a registration handler.
- Set up an Amazon application.
- Create an Amazon Auth. Provider in Salesforce
- Update the Amazon application with the Salesforce callback URL.
- Test the connection.
- Test Salesforce SSO with Amazon.
Set Up a Registration Handler
To use an authentication provider for single sign-on, you must create a registration handler. The registration handler creates users and updates existing users who access Salesforce via the identity provider. You can set up a registration handler with Apex or Flow Builder. For more information, see Create an Authentication Provider Registration Handler.
Set Up an Amazon Application
The Amazon application lets your users log in to a Salesforce org using their Amazon credentials.
- Go to https://login.amazon.com/manageApps and log in to your Amazon developer account.
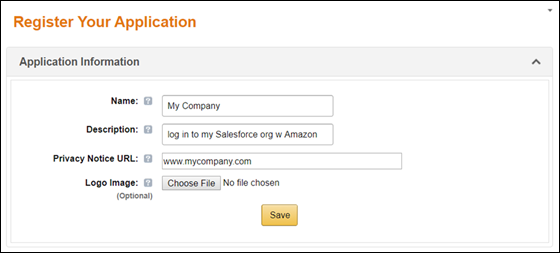
- Click Register new application.
-
Enter and save your application information.
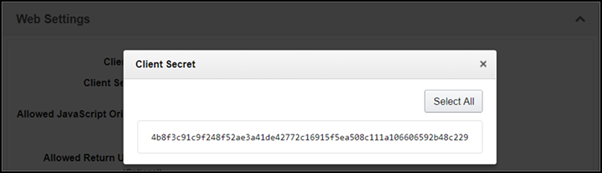
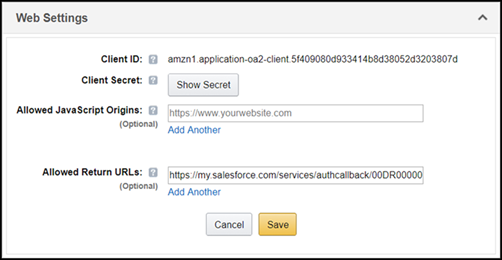
- Expand Web Settings.
-
Copy the Client ID and the Client Secret.

- Leave Allowed Return URLs blank. Later, you populate this field with the Salesforce callback URL. This URL is the address your org uses to reply to the Amazon authorization service during a login.
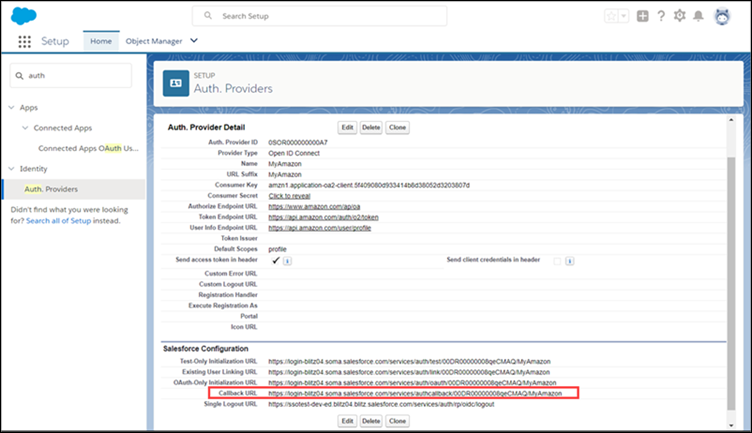
Create an Amazon Auth. Provider in Salesforce
Configure your Salesforce org to recognize Amazon as the external authentication provider. This step tells your org to use Amazon credentials at login.
- From Setup, enter Auth. Providers in the Quick Find box, and select Auth. Providers | New.
- For the provider type, select Open ID Connect.
-
Enter a name for your Auth. Provider, such as MyAmazon.
Salesforce configures this name as the URL suffix in the callback URL, which is how the
application responds to a Salesforce authentication request. For example, if the name
and suffix combination is MyAmazon, your SSO URL is similar to
https://mydomain_login_url or
site_url/services/auth/sso/MyAmazon.
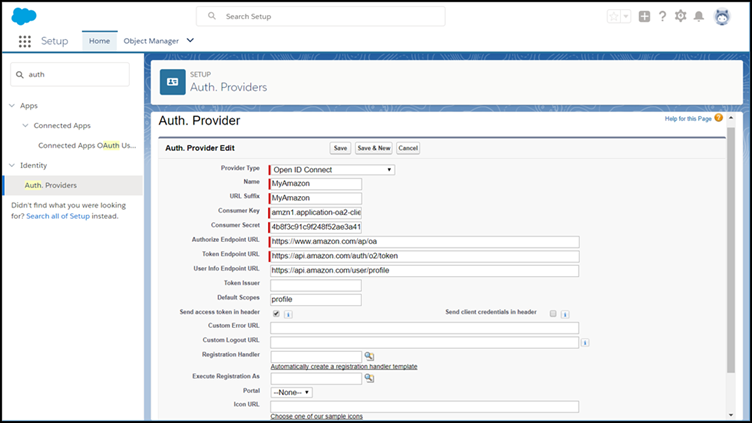
- For Consumer Key, enter the Client ID that you copied earlier.
- For Consumer Secret, enter the Client Secret.
-
Enter the Amazon endpoints:
- Authorize Endpoint URL—https://www.amazon.com/ap/oa
- Token Endpoint URL—https://api.amazon.com/auth/o2/token
- User Info Endpoint URL—https://api.amazon.com/user/profile
- Default Scopes—profile
To learn about endpoints, see Using the Authorization Endpoint Parameter.
-
To use an Apex registration handler, take these steps.
- For Registration Handler Type, select Apex.
-
For Registration Handler, select an existing Apex class that implements the
Auth.RegistrationHandlerinterface. Or, to create an template for the registration handler, click Automatically create a registration handler template. Edit this class later, and modify the default content before using it.
-
To use a flow for your registration handler, take these steps.
- For Registration Handler Type, select Flow.
- For Registration Handler, select an existing flow of the Identity User Registration flow type.
-
Select a default profile. A default profile is required to run the registration
handler. If you don't specify a default profile here, set the default profile in the
flow itself.
If you use the Authentication Provider User Registration flow template, the profile that you set here is automatically stored in the defaultProfileId variable.
-
Select a default account. If you use your authentication provider for Experience
Cloud sites, this account stores new internal users.
If you use the Authentication Provider User Registration flow template, the profile that you set here is automatically stored in the defaultAccountId variable.
-
For Execute Registration As, select an execution user to run the Apex class or flow.
The user must have the Manage Users permission.
Execute Registration As provides the context in which the registration handler runs. In production, you typically create a system user for the Execute Registration As user. This way, operations performed by the handler are easily traced back to the registration process. For example, if a contact is created, the system user creates it.
- Save the settings.
Update Your Amazon Application with the Salesforce Callback URL
-
On the Salesforce Auth. Provider page for Amazon, copy the callback URL.
-
On the Amazon application page, click Edit under Web Settings.
For Allowed Return URLs, enter the Salesforce callback URL. Save the setting.
Test the SSO Connection
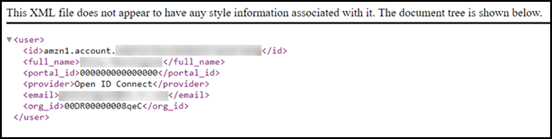
The Auth. Provider page in Salesforce lists a Test-Only Initialization URL. You can use this URL to check that the configuration is set up correctly without logging in to the Salesforce org. When you open the URL in a browser and sign in to Amazon, you’re redirected back to Salesforce with a set of user attributes.
- In Salesforce, go to the detail page for the Amazon Auth. Provider.
- Copy the Test-Only Initialization URL.
- Open a browser and enter the test URL. You’re redirected to Amazon.
- Choose an account, log in, and approve access to the Amazon application.
- Click Okay. After successful login, you’re redirected to the callback registered with Amazon. Amazon returns information about the user and the application.
Test SSO with Amazon AD
Now it’s time to test the end-to-end SSO configuration, including the registration handler, the authentication process, and log in to your Salesforce org.
-
Test SSO into your Salesforce org.
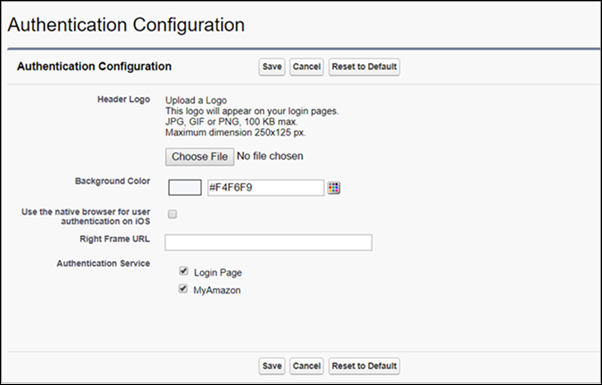
- In Setup, on the My Domain page under Authentication Configuration, click Edit.
-
Select your Amazon authentication service, and save the settings.
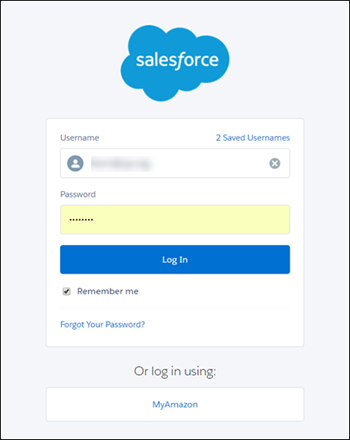
- Log out and go to your Salesforce org’s login page for your subdomain.
- Choose the Amazon authentication service, and enter your Amazon credentials.
-
Test SSO into your Salesforce Experience Cloud site.
- If you haven’t done so already, create the Amazon authentication service account.
- Make sure that you have enough licenses for site users.
- From Setup, in the Quick Find box, enter Digital Experiences, and then select All Sites.
- Click Workspaces next to the site you’d like to edit.
-
From the Experience Workspaces menu, select Administration
and then select Login & Registration.
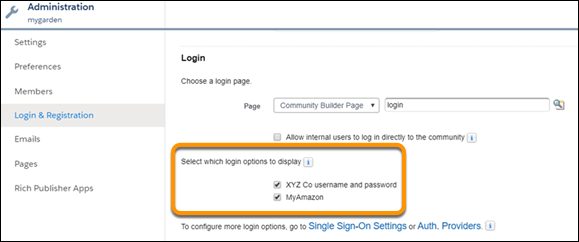
- Under Login, select the option to display the Amazon Auth. Provider, and save the settings.
- Log out, and go to the site login page.
-
Choose the Amazon authentication service, and log in with your Amazon
credentials.