
You are here:
Set Up Marketing in Starter and Pro Suite
Before users can start working with campaigns and send emails in Starter and Pro Suite, you must enable Marketing and complete additional setup tasks required to meet email privacy regulations and give users access to the Marketing app.
Required Editions
| Available in: Lightning Experience |
| Available in: Starter and Pro Suite Editions. |
| User Permissions Needed | |
|---|---|
| To manage settings in Salesforce Setup, create communication subscriptions, and create a consent import: | View Setup and Configuration AND Marketing Manager permission set AND Other permissions. See User Permissions in Salesforce Suites |
Note When you add an org-wide email address in Advanced Setup,
the email address is reformatted with a Salesforce domain before it’s used in the From field
in email campaigns. For example, an org-wide email address name@example.com can appear as
name_at_example.com@400.mx.salesforce.com in the From field of campaigns. The Salesforce
domain can vary, and reformatting helps improve email deliverability.
Turn on Marketing
Enable the Marketing app.
- From Advanced Setup, in the Quick Find box, enter Marketing and select Marketing Features.
-
From the Setup Marketing Features page, select Turn On.
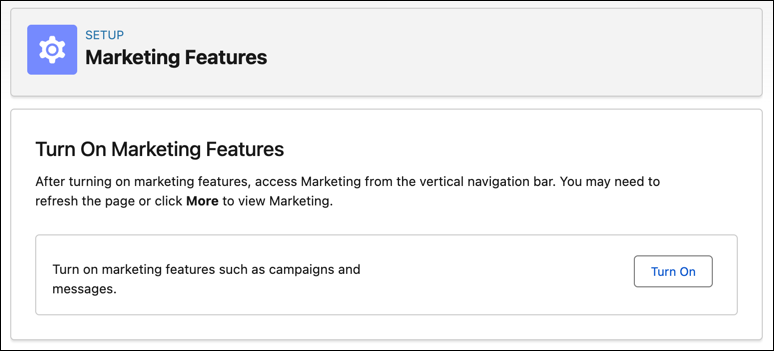 It can take up to one hour for the Marketing app to be available.
Configure Marketing Email and Consent Settings
Define an org-wide email address and add the Privacy Consent Status component to the contact and lead pages.
-
From Quick Settings, enter your physical business address.
This address populates the required Physical Address merge field in each promotional email.
- Select Business Details and enter your address.
- Save your changes.
-
From Advanced Setup, add at least one email address in org-wide email address
settings.
After it’s reformatted with a Salesforce domain, a rewritten version of the email address populates the From field in email campaigns.
- In the Quick Find box, enter Addresses, and then select Organization-Wide Email Addresses.
- Complete the Display name, Email Address, Purpose, and Profiles fields.
- Tell each email address owner to check their inbox for a verification email.
-
Add the consent component to the lead and contact page layouts.
- In the Quick Find box, enter Manager, and then select Object Manager.
- Select Contact, and then click Lightning Record Pages.
- Edit the page by dragging the Privacy Consent Status component onto a section on the page.
- Repeat steps 3b to 3c for the Lead object.
-
(Optional) Create communication subscriptions to categorize consent data by marketing
content type, such as product updates.
Starter and Pro Suite come with a default communication subscription so you can get started quickly. See Create a Communication Subscription.
-
From the Consent tab in the Marketing app, import consent data for your leads and
contacts.
Only contacts who opted in to marketing messages can receive promotional emails. See Import Consent Data.
-
(Optional) Turn on Einstein Send Time Optimization (STO).
Einstein STO uses engagement data to predict optimal times when your subscribers are likely to engage with your emails.
- In the Quick Find box, enter Optimization, and then select Einstein Send Time Optimization.
- Click Activate.
Provide Your Team Access to Marketing Features
Assign the General Users permission set group to users and share Marketing folders.
-
Assign one of the standard permission set groups to give users access to the
Marketing app.
If you’re in Starter, all users assigned permissions from the Quick Settings menu automatically get the General Users permission set group.
- From Quick Settings, select Users.
- Assign the General Users permission set group to users to grant access to all features and functionality or the Marketing User permission set group to grant access to only marketing features and functionality.
-
Share engagement dashboard folders with users.
- From the Analytics tab in the Marketing app, select Browse, then Folders.
-
For each folder or dashboard, click
 and select Share.
- Search for users and apply the correct role.
- Save your changes.
Did this article solve your issue?
Let us know so we can improve!