You are here:
Create a DKIM Key
DomainKeys Identified Mail (DKIM) is a security standard that attaches a digital signature to your emails to prove that they came from you. With this signature, the receiving server can verify that the message content wasn’t altered or faked during transit. DKIM builds trust with email providers, so your messages are more likely to land in the inbox instead of the spam folder. An active DKIM key verifies your domain ownership so that Salesforce can send email for your users.
Required Editions
| Available in: Salesforce Classic and Lightning Experience |
| Available in: all editions except Database.com |
| User Permissions Needed | |
|---|---|
| Manage DKIM keys: | Customize Application |
When you sign your emails digitally with a DomainKeys Identified Mail (DKIM), the key proves that the message came from your domain. For more information, see Considerations for DKIM Keys.

This video discusses the three main components of email trust and antispoofing: DKIM, SPF (sender policy framework) and DMARC (domain-based message authentication, reporting and conformance). It demonstrates setting up a DKIM key.
Add a DKIM Key in Setup
- From Setup, use the Quick Find box to find and select DKIM Keys.
-
Click Create New Key.
The new DKIM key pair defaults to the Inactive state.
-
Select the RSA key size.
Select 2048-bit unless a specific application requires smaller keys.
- For Selector, enter a unique string of up to 62 letters, digits, and hyphens to identify this key. Start with a letter or number. For example, example-sf-a.
-
For Alternate Selector, enter another unique string of up to 62 letters, digits, and
hyphens. Start with a letter or number. For example,
example-sf-b.
Salesforce uses the alternate selector to auto-rotate your keys. See Considerations for DKIM Keys.
-
Enter the domain name used to send email from Salesforce.
After you save a DKIM key, you can’t edit the domain name.
-
For domain match pattern, enter a comma-separated list of domain patterns that the
domain name must match before Salesforce signs an email with this DKIM key.
Here are two examples of a recommended domain match pattern value.
- Domain: example.com and Domain Match Pattern: example.com
- Domain: mail.example.com and Domain Match Pattern: mail.example.com
ImportantTo send and sign emails for a subdomain that you own, such as mail.example.com, create a separate DKIM key for each subdomain.
Don’t use wildcards in the domain match pattern list for DKIM keys for domains that you own. Although wildcards are permitted in this field, we no longer recommend that option.
-
Save your changes.
Salesforce publishes two DKIM public keys to DNS TXT (text) records for a Salesforce-owned domain: a primary and alternate key. The alternate key is used during key rotation.
Salesforce also generates corresponding canonical domain name (CNAME) records for your domain, which become the second half of the DKIM key pair. This process usually finishes within 15 minutes.
Update DNS
Add the CNAME and Alternate CNAME records to your domain’s DNS record.
- From Setup, use the Quick Find box to find and select DKIM Keys.
-
To view the key details, click the selector of the key.
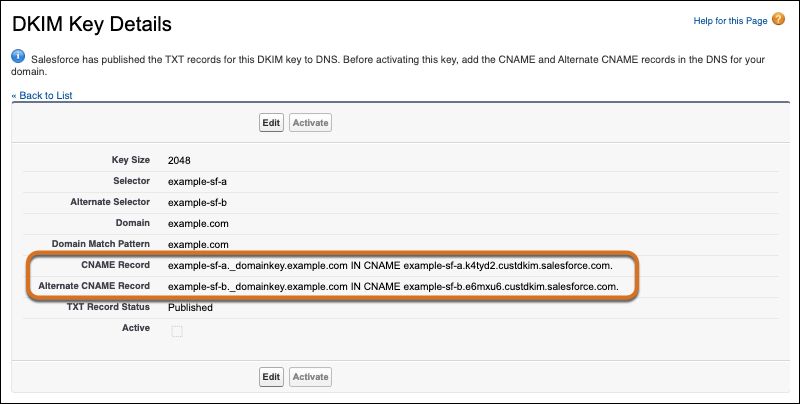
When Salesforce has finished publishing the TXT records for the private key, the CNAME Record and Alternate CNAME Record fields are shown.
If the TXT Record Status is “Publishing in progress”, wait a few minutes and try again. Refresh the page in your browser, or reload the DKIM key list in Setup and click the selector again.
-
Add the CNAME and Alternate CNAME records to DNS for your domain.
 Note
NoteWork with your DNS provider to complete this step.
If you enter this information via your DNS provider’s website, check their documentation for their expected formats. Some DNS providers require the domain name when you enter the name value, and some omit it. In our example, the .example.com string is the domain name.
Here’s an example of DNS CNAME records for a DKIM Key with a domain of example.com and selectors example-sf-a and example-sf-b.
NAME                          TTL   CLASS  TYPE   VALUE
--------------------------------------------------------------------------------------------------------
example-sf-a._domainkey.example.com. 3600   IN    CNAME   example-sf-a.k4tyd2.custdkim.salesforce.com.
example-sf-b._domainkey.example.com. 3600   IN    CNAME   example-sf-b.e6mxu6.custdkim.salesforce.com.
This example is a raw CNAME record. The trailing dot in example-sf-a._domainkey.example.com. and example-sf-a._domainkey.example.com. tells the DNS server that the names are absolute, stopping the provider from appending anything to the domain names. Usually your DNS provider adds that dot to your domain name for you. Check with your DNS provider to determine how to enter the name in their system to get this result.
Wait for the DNS changes to propogate, then activate the DKIM key.
