
Explore the Legacy Agentforce Builder
The Legacy Agentforce Builder is a visual workspace for creating, customizing, and managing agents that support both employee and customer use cases. Use the builder to create agents for helpdesk, deal support, or product assistance and define how they communicate and perform actions. The builder provides a unified workspace for streamlined configuration and testing.
Required Editions
| Available in: Lightning Experience |
| Available in: Enterprise, Performance, Unlimited, and Developer Editions. Required add-on licenses vary by agent type. |
Agentforce Builder is designed to support both common and custom use cases. With its guided templates, intuitive subagent editor, and access to standard and custom actions, Agentforce Builder allows you configure agents that are purpose-built for your organization’s needs without writing code.
Agentforce Builder improves productivity by helping you build task-specific agents that operate within your business rules and respond securely with grounded, trustworthy data. The builder offers:
- Guided setup for fast agent creation
- Tools to preview, test, and troubleshoot agent behavior
- Customization options for subagents, actions, language, tone, and channels
- A scalable way to deploy agents across teams and use cases
What You Can Do in Agentforce Builder
Design, build, and deploy AI agents in Agentforce Builder to automate customer interactions, resolve inquiries, and scale your support operations efficiently. Here’s what you’ll do:
- Create agents from templates or build your own from scratch
- Assign subagents to define what the agent can do—like handling helpdesk requests or summarizing accounts
- Connect actions to subagents using the Asset Library, including flows, invocable Apex, and Prompt Builder templates
- Customize agent settings such as language, tone, and session context
- Preview conversations using the built-in Conversation Preview or Testing Center
- Review event logs to debug and improve agent behavior
- Control deployment by managing channel availability and access permissions
Launch the Agentforce Builder
To launch the builder, go to Setup, enter Agent in the Quick Find box, and select Agentforce Agents. Open an existing agent or create a new one, then click Open in Builder to access the Agentforce Builder. When the builder opens, the left navigation sidebar lists all key configuration areas for your agent. For details about each section, see Navigation Bar.
Agentforce Builder Tour
Learn how each panel in the Agentforce Builder supports agent setup, from defining subagents and connecting actions to configuring settings and reviewing test results. The Agentforce Builder provides a single workspace for streamlined configuration and testing.
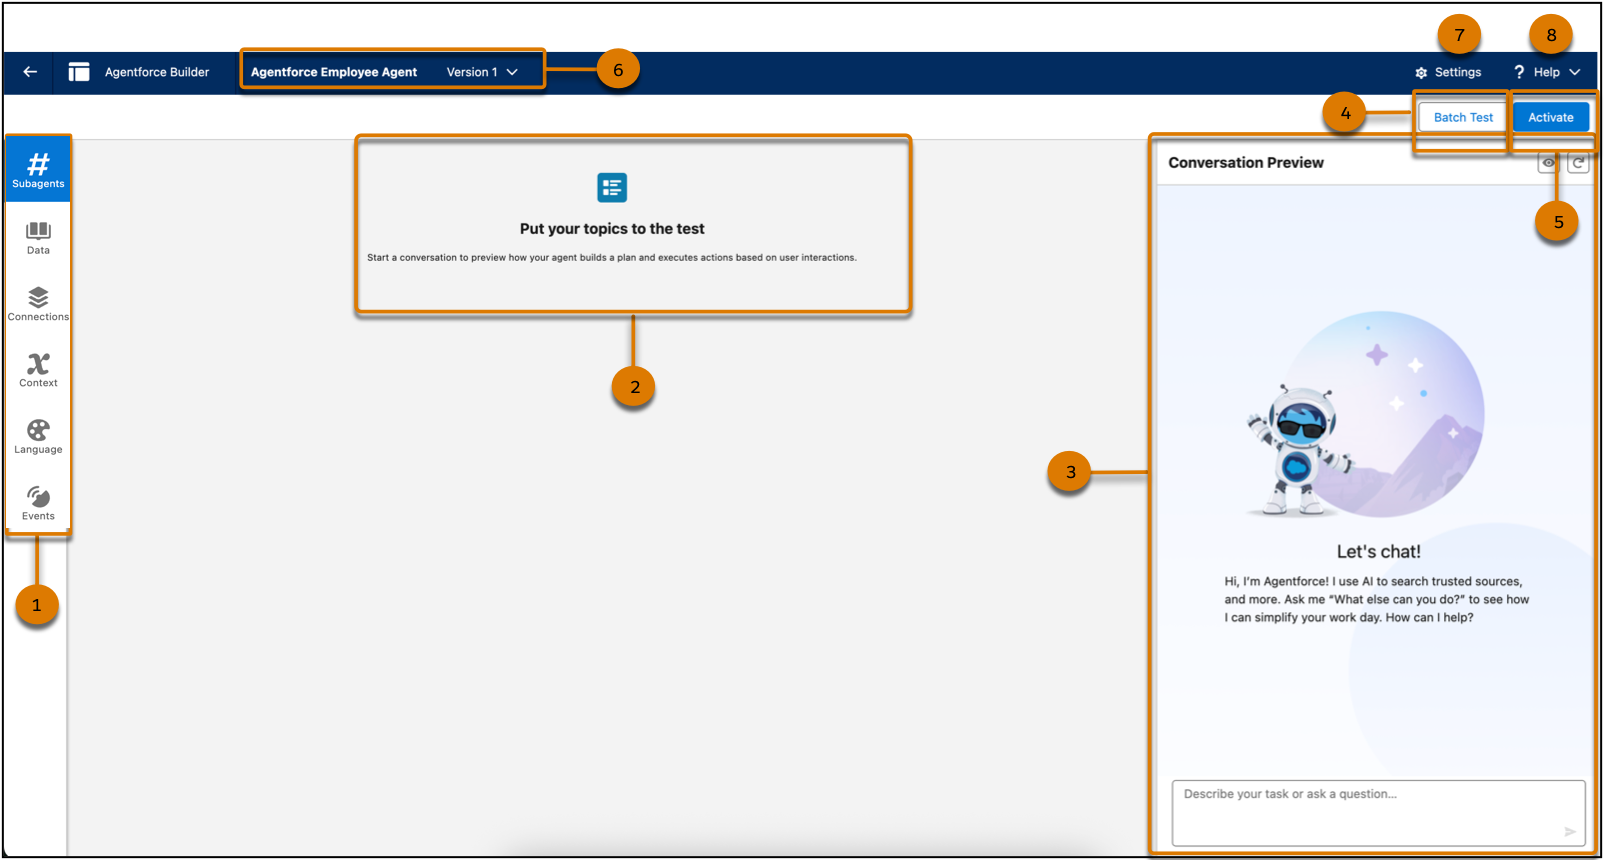
- Navigation Sidebar (1) : Access essential configuration areas to define the jobs an agent can do, the data it can access, the channels it connects to, and the variables and filters that control how it operates securely.
- Plan Canvas (2): Start a test conversation to preview how your agent builds a plan and responds to input. The canvas displays cards such as the selected subagent, reasoning panel, prompt used, selected action, input and output, and agent response so that you can view how the agent generated its reply.
- Conversation Preview Panel (3): Simulate real-time user interactions to see how your
agent responds to prompts. This panel helps you validate subagent behavior, response
accuracy, and the overall experience before deploying the agent.
- Edit Preview Conditions: Click
 to simulate different user scenarios and test how your agent responds based
on specific context values.
to simulate different user scenarios and test how your agent responds based
on specific context values. - Refresh: Click
 to refresh the conversation to test updates from the beginning without
starting a new session.
to refresh the conversation to test updates from the beginning without
starting a new session.
- Edit Preview Conditions: Click
- Batch Test (4): Launch automated testing across multiple subagents to verify agent performance at scale. Use this feature to identify issues and ensure consistency across expected interactions. See Create a Test.
- Activate (5): Activate your agent to make it available to employees or customers. To make changes, your agent must be inactive. When active, the button label changes to Deactivate. See Activate or Deactivate Your Agent.
- Agent Name and Version (6): View the name of the selected agent and switch between available versions. See Manage Agent Versions.
- Settings (7): Edit Agent Details such as the name, role, description, and other configuration settings.
- Help (8): Access comprehensive support by viewing Salesforce Help and Trailhead modules in a new tab for more information.
Navigation Bar
The vertical navigation panel provides quick access to key areas for agent setup—subagents, data sources, connections, context variables, language settings, and event logs. Use this panel to move between each configuration step.
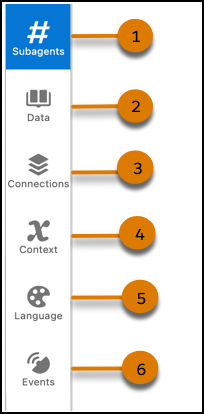
- Subagents (1): Define what your agent can do by assigning instructions and grouping related actions under each subagent. You can further expand your agent's capabilities by adding a subagent from the asset library.
- Data (2): Connect structured data sources that your agent can reference. Begin by creating a data library and then assigning a data library to your agent.
- Connections (3): Configure channels such as Slack or other APIs to enable your agent to interact with external systems. See Connecting an Employee Agent to Slack.
- Context (4): Define variables to customize how your agent responds for personalized interactions, and apply filters to control its access to specific subagents and actions. Learn more about create a custom variable for your agent and create a filter to control access to subagents and actions.
- Language (5): Configure language support and system messages for LLM responses. Update language settings to refine your agent’s communication.
- Events (6): View agent event logs to analyze performance and interactions. Enable Enhanced Event Logs to include conversation data for deeper insights.