
You are here:
Configure Inbound Call Transfers Using SIP
To illustrate how to configure inbound call transfers that happen via SIP, this subagent describes how to accomplish these tasks with Genesys.
See Also
Create the Voice Call Record Using the voiceCalls Telephony Integration API
To create the voice call record, use the voiceCalls Telephony Integration API.
For more information about the API, see voiceCalls Telephony Integration API. Set these request parameters as needed.
| Request Parameter | Description |
|---|---|
to |
The contact center inbound number that the customer dials. |
from |
The customer’s phone number. For Genesys, you can use the data variable
Call.Ani. |
callcenterApiName |
The API name of the contact center created in Salesforce and associated with the voice call record. |
scrtBaseUrl |
The SCRT2 URL for the org. Format: <org_domain>.my.salesforce-scrt.com/telephony/v1 Example: mycompany.my.salesforce-scrt.com/telephony/v1 |
orgId |
The 15-digit ID of the Salesforce org. Format: <Salesforce_org_ID> Example: 00XXXXX00000QMC |
callAttributes |
Additional attributes to include in the voice call record, where each key-value pair corresponds to a standard or custom field and its values. Format: {'<field_name>':'<field_value>'} Example of a Department custom field: {'Department__c':'Support'} |
vendorCallKey |
A unique key that identifies the voice call record within the telephony system. For
example, this value is the contact ID in Amazon Connect. To get the call key for Genesys,
use the Genesys interaction ID data variable Call.ConversationId. |
UUI Header for a SIP Trunk
When Salesforce sends a SIP invite, it sends the UUI header that contains parameter settings. Set the UUI header to provide your Salesforce org ID, the Salesforce domain, partner voice call ID, JWT token, and, if needed, other parameters that you pass into your inbound flow.
Specify these parameters in the UUI header. Note that a SIP header can have a maximum of 1,024 characters.
| UUI Parameter | Description | Max Length |
|---|---|---|
orgId |
Format: <Salesforce org ID> String. Required if token isn’t provided. Custom header. The 15-character ID of the Salesforce org. If you provide a token, Example: 00DZ70000000XXX |
15 characters |
scrt2Domain |
Format: <ccaas_partner_my_domain>.salesforce-scrt.com String. Required. Custom header. The unique Salesforce domain in the format. Example: mycompanyname.my.salesforce-scrt.com |
128 bytes |
token |
String. Required. The encrypted key used for authentication. The runtime authentication requires a JSON Web Token (JWT). This token length may change as we adopt other encryption algorithms. Note that a SIP header can have a maximum of 1,024 characters. If your telephony provider reuses tokens across multiple calls, to prevent authentication from failing too soon, change the JWT token expiration to the maximum, 24 hours. If the public key or JWT expires before the request is sent, the SIP transfer fails. When constructing the JSON claims set for the JWT, you can use these parameters:
Sample JSON claim set for a Salesforce Voice with Telephony Providers customer: Sample JSON claim set for a non-Salesforce Voice with Telephony Providers customer: |
No max limit |
callid |
Format: <voice_call_record_id> String. Optional. This field is for non-Salesforce Voice with Telephony Providers customers only. Custom header. The 18-character ID of the Salesforce VoiceCall record that’s used to link the conversation between the agent and the customer with the conversation between the rep and the customer, giving everyone better insight into the full call history. |
18 characters |
transactionId |
Format: <unique_id> String. Optional. Custom header. A unique ID of any length used to provide additional context, like customer information, to the Omni-Channel flow. The flow uses this information to route the call or update related records in Salesforce. This parameter is typically used when integrating Agentforce Voice without being a Salesforce Voice with Telephony Providers customer. Example: order-2026-0122-5489 |
No max length |
Sample UUI header:
{
"orgId": "00XX70000000XXX",
"scrt2Domain": "mycompanyname.my.salesforce-scrt.com",
"token" : "adbcdefgsdfsdJSUzI1NiIsInR5cCI6IkpXVCJ9.eyJpc3MiOiIwMERTQjAwMD[THIS IS A SAMPLE TOKEN]5h AwZFBWR2ciLCJzdWIiOiJhc2FzaXBvcmczc2RiMyIsImV4cCI6MTc2OTcxOTcyOSwiaWF0IjoxNzY5NzE2MTI5LCJqdGkiOiI5OGE1YjcyZS1mOTFhLTQzMmItYjUwYy05Nzg[THIS IS A SAMPLE TOKEN]3847ufpawiu4f3hapwu93gbpawiu3hrao283938w4t34t m_HWOZDjb82UObqk_nR_6IhvDB7JA5v3Ov2icmZsR3NgT_uaweiur3h498rh2334984htg34o[THIS IS A SAMPLE TOKEN]3948 4VoFjDsie6N9lAlc0fZgdnT_j89mMl4rFaSNY9m",
"callId": "50130000009xYZ1AAM",
"transactionId": "order-2026-0122-5489"
}
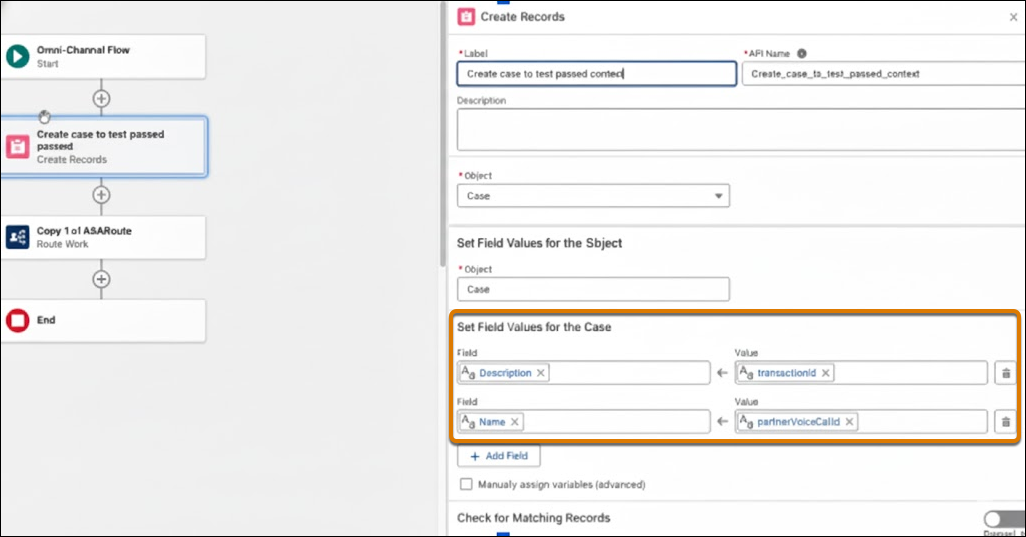
When Salesforce sends a SIP invite, it sends the UUI header that contains
these parameter settings. When the SIP transfer is executed, the callId and transactionId
variables are passed to Salesforce and can be used in the Omni-Channel inbound flow to update
data related to the voice call. To use this UUI header information in an Omni-Channel flow, use
the transactionId and partnerVoiceCallId flow variables for
the transaction and call IDs, respectively.
Sample Genesys Inbound Flow
To illustrate how to create VoiceCall records, set the UUI header, and configure inbound call transfers and escalations in a telephony system, review the steps used to create this Genesys flow.
- Procure an inbound phone number from Genesys that will trigger the Genesys inbound flow. When the customer calls your organization using this number, the inbound flow routes the call to the Agentforce agent.
-
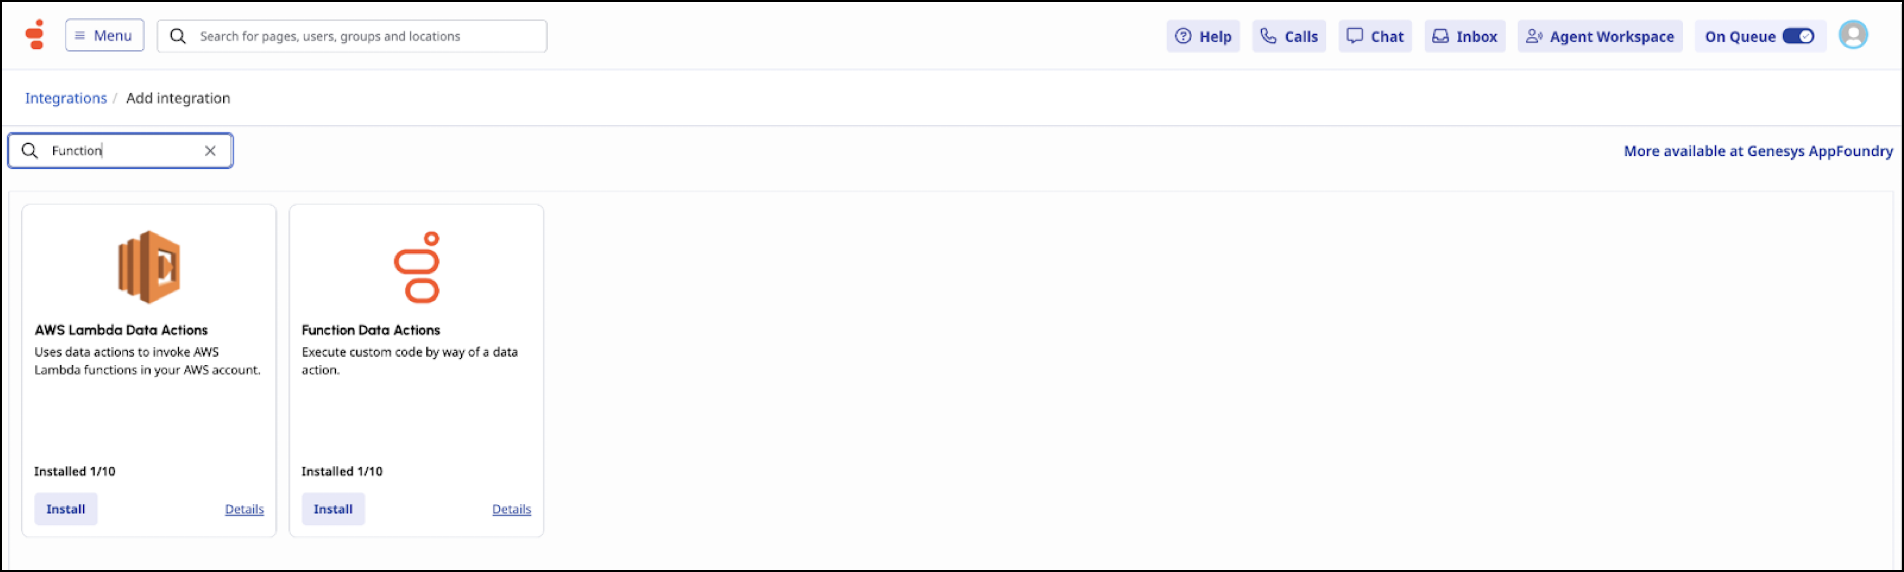
Install the Function Data Action in your Genesys Cloud and ensure all required permissions are added.
-
In Genesys, go to IT and Integrations |
Integrations, and click Install for Function
Data Actions.
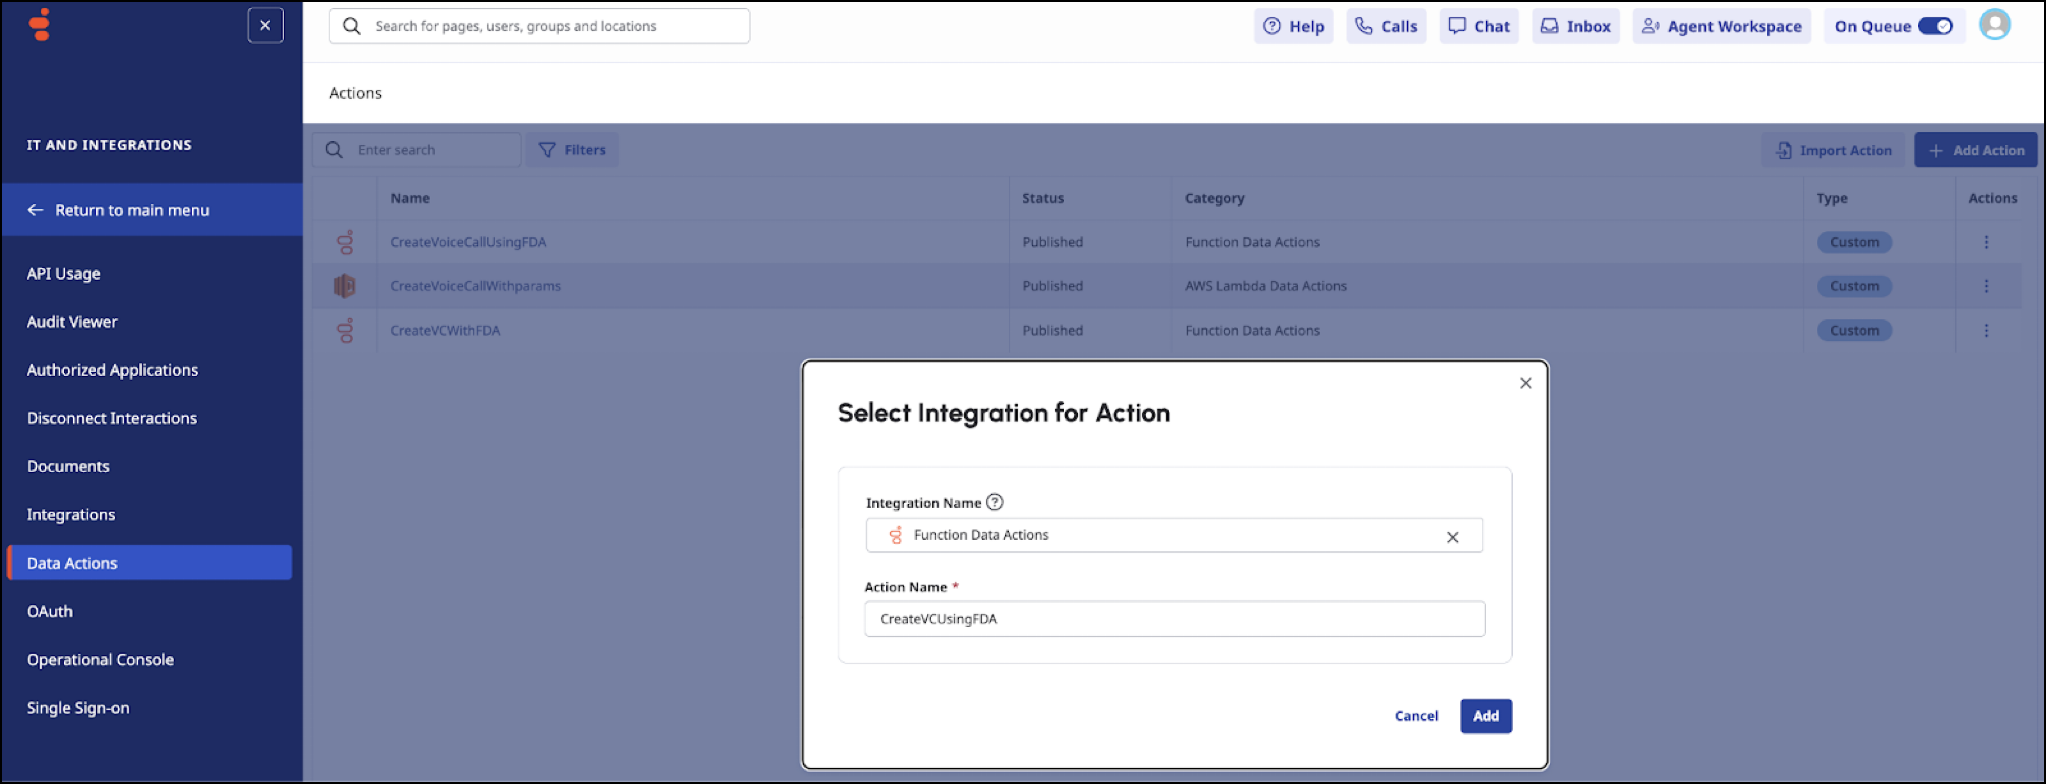
- To add an action that creates a voice call, in the Data Actions section, click Add Action.
-
In the Action Name field, enter the name of the action and click
Add.
-
Define the contract as shown here.
Input contract:
{
  "type": "object",
  "properties": {
    "to": {
      "type": "string"
    },
    "from": {
        "type": "string"
    },
    "callCenterApiName": {
        "type": "string"
    },
    "scrtBaseUrl": {
        "type": "string"
    },
    "orgId": {
        "type": "string"
    },
    "privateKey": {
        "type": "string"
    },
    "callAttributes": {
        "type": "string"
    },
    "vendorCallKey": {
        "type": "string"
    }
  }
      }
Output contract:
{
  "type": "object",
  "properties": {
    "voiceCallId": {
       "type": "string"
    }
  }
}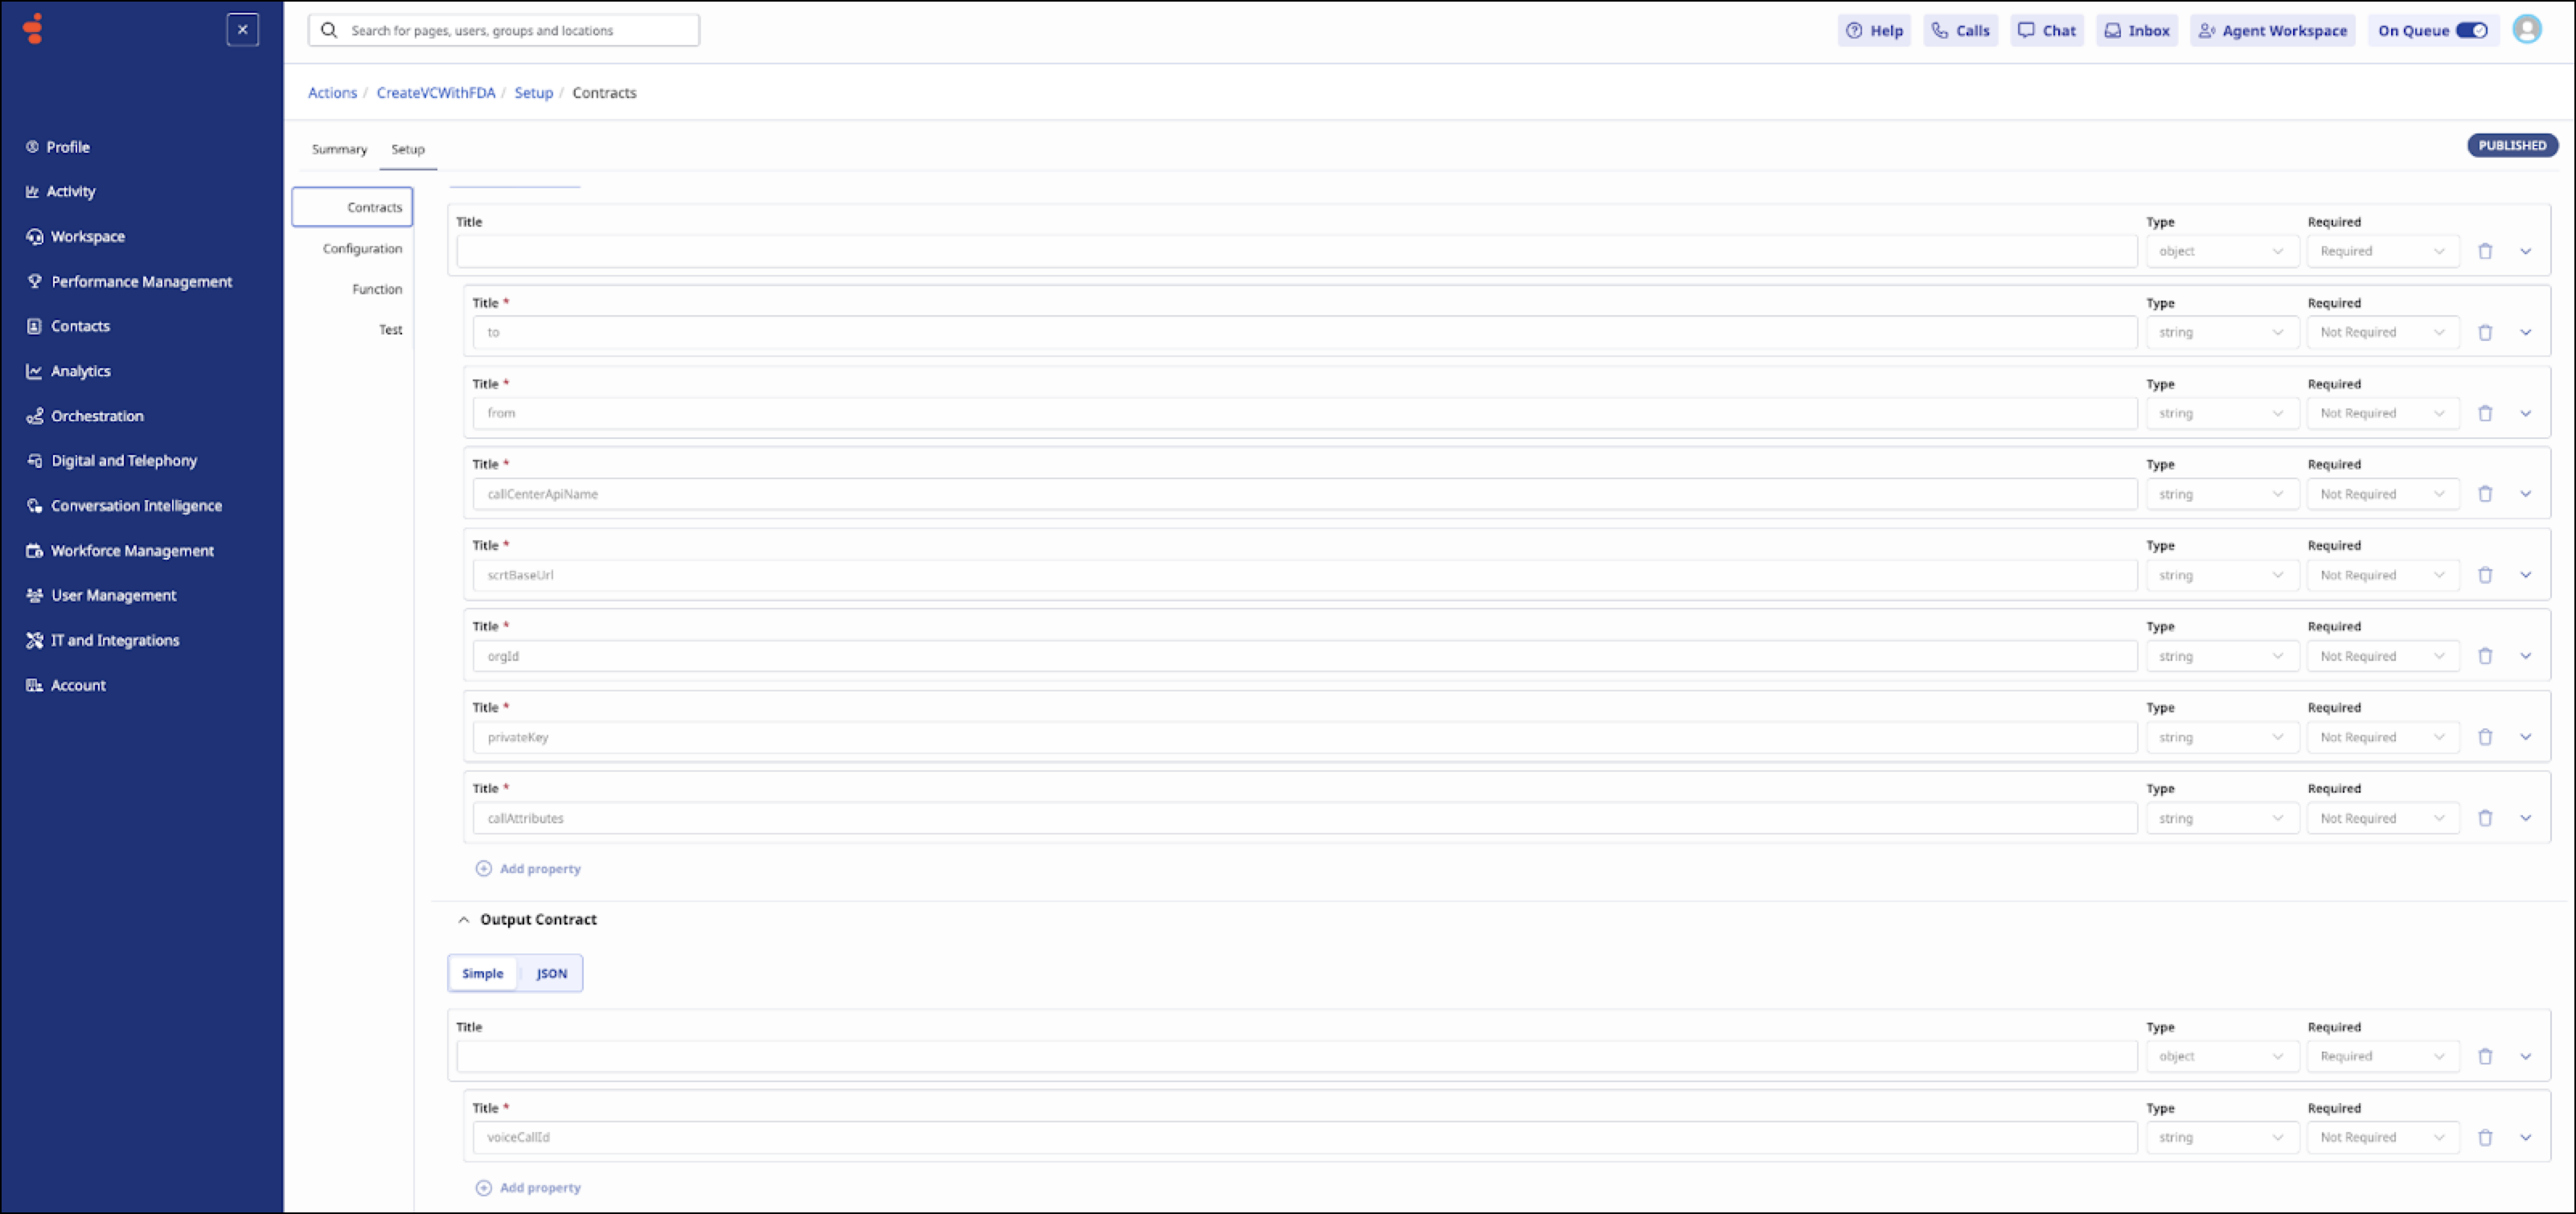
- To create voice calls, use this Lambda inside your function definition.
-
To test the function, in the Test Menu Action, replace the new line with
\nin your private key.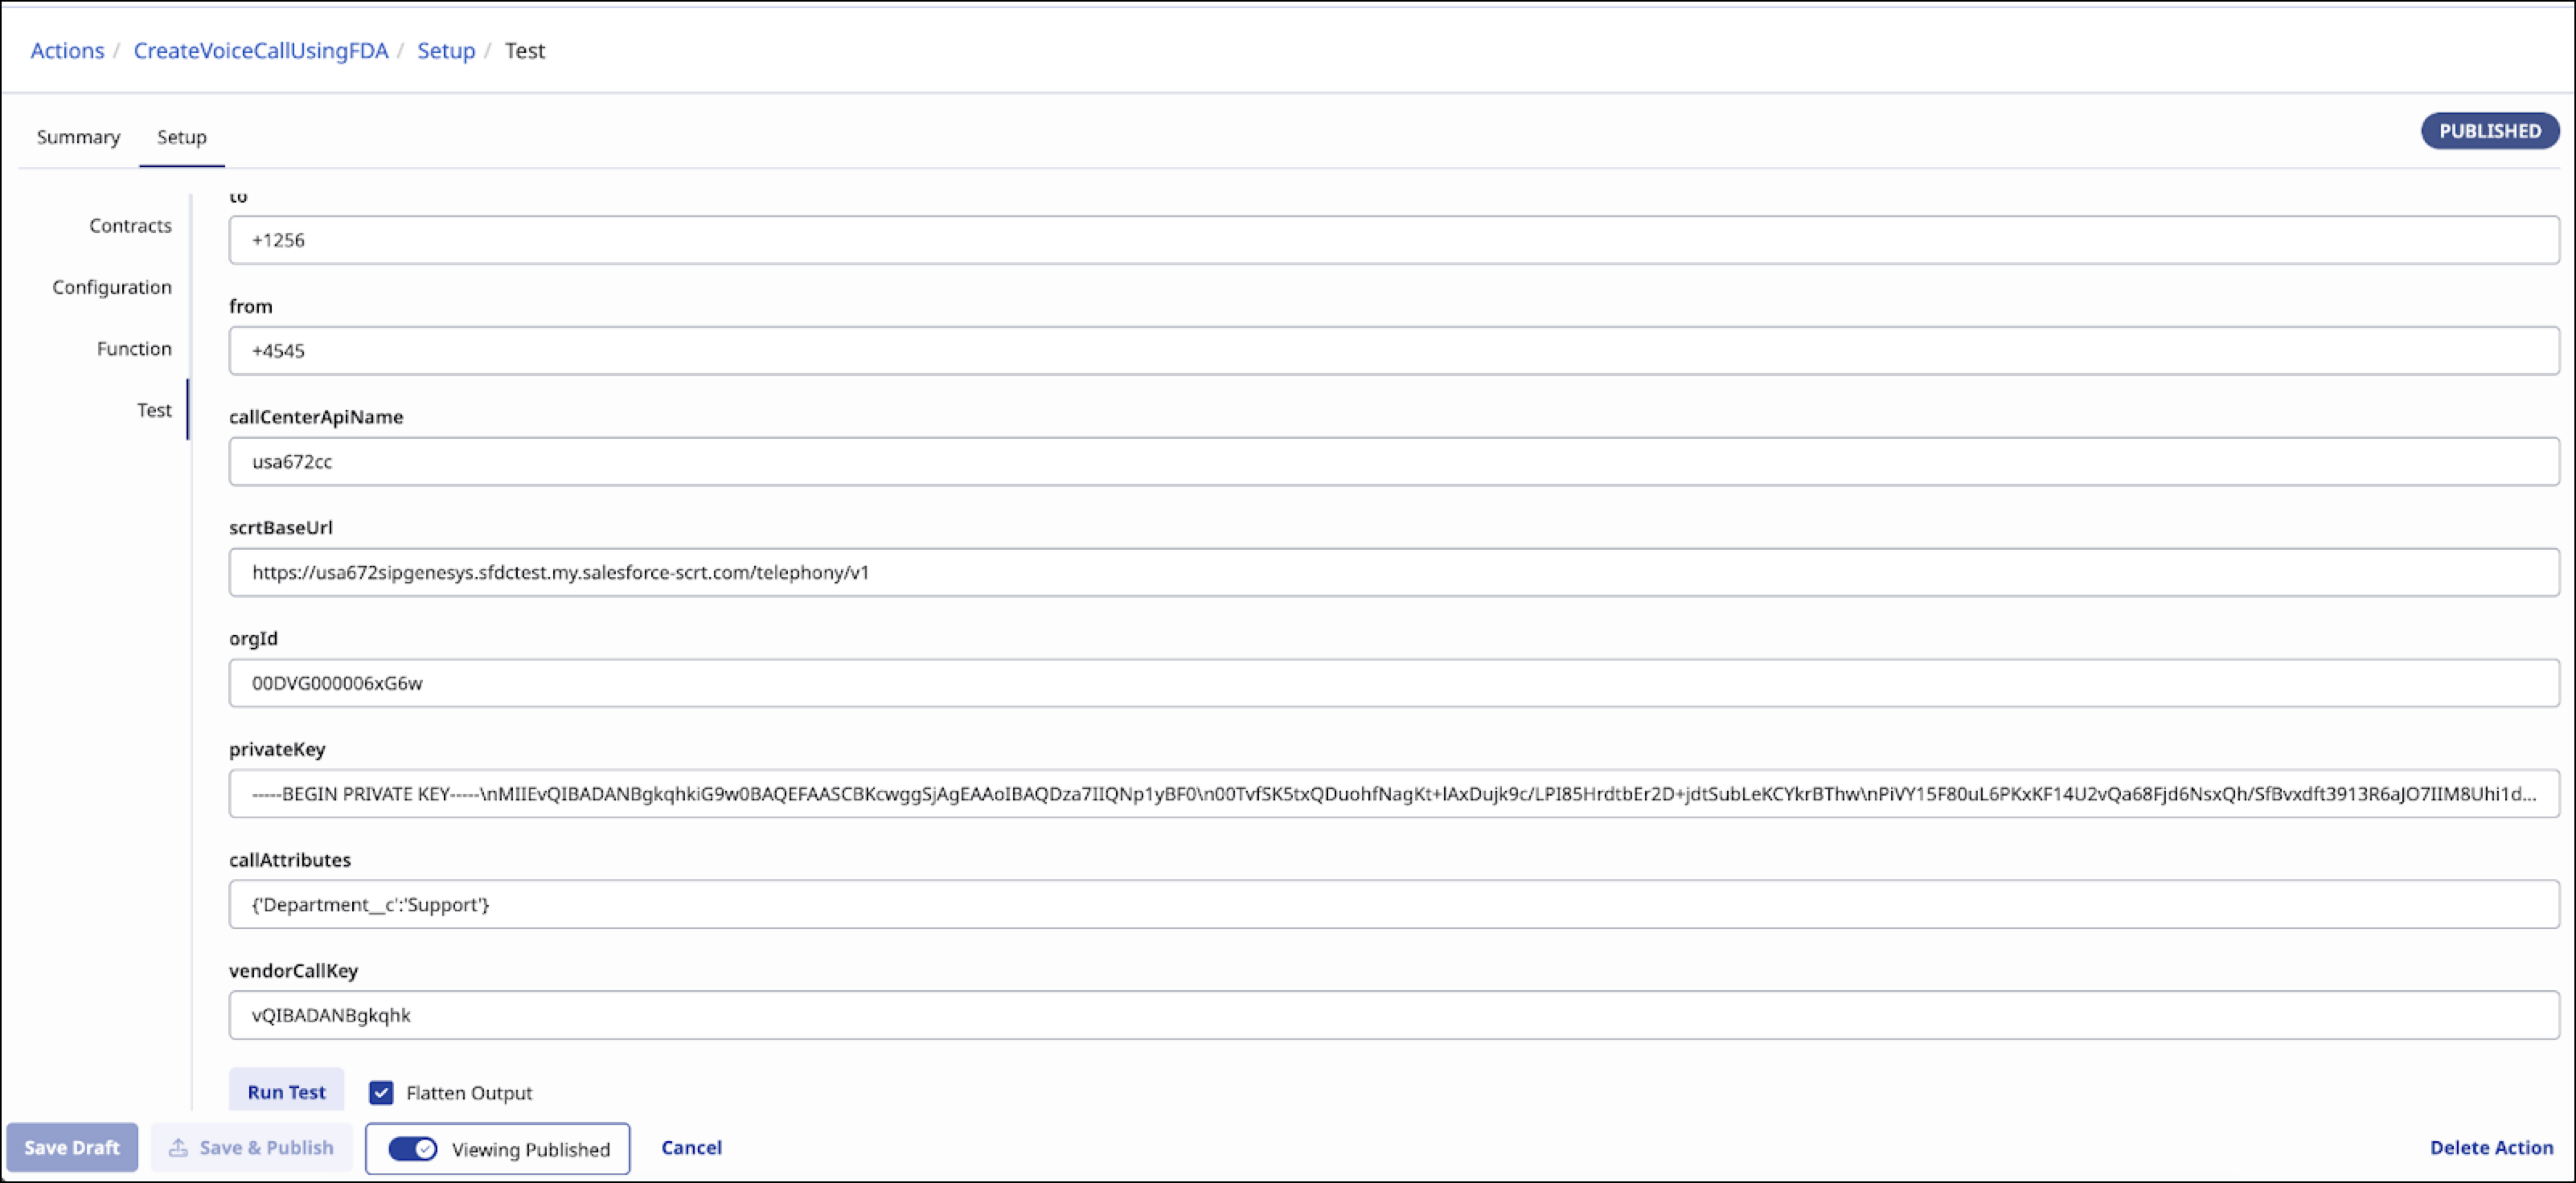
- If the test is successful, publish your Function Data Action.
-
In Genesys, go to IT and Integrations |
Integrations, and click Install for Function
Data Actions.
-
In Genesys Cloud Architect, create an inbound flow.
An inbound flow handles incoming calls to your organization’s Genesys instance and routes the calls to their correct destination, such as a rep, a queue, or even an Agentforce agent.
- To enable call transcription, add a Transcription action.
- To enable call recording, add an Enable Participant Recording action.
- To greet the customer, add a Play Audio action.
-
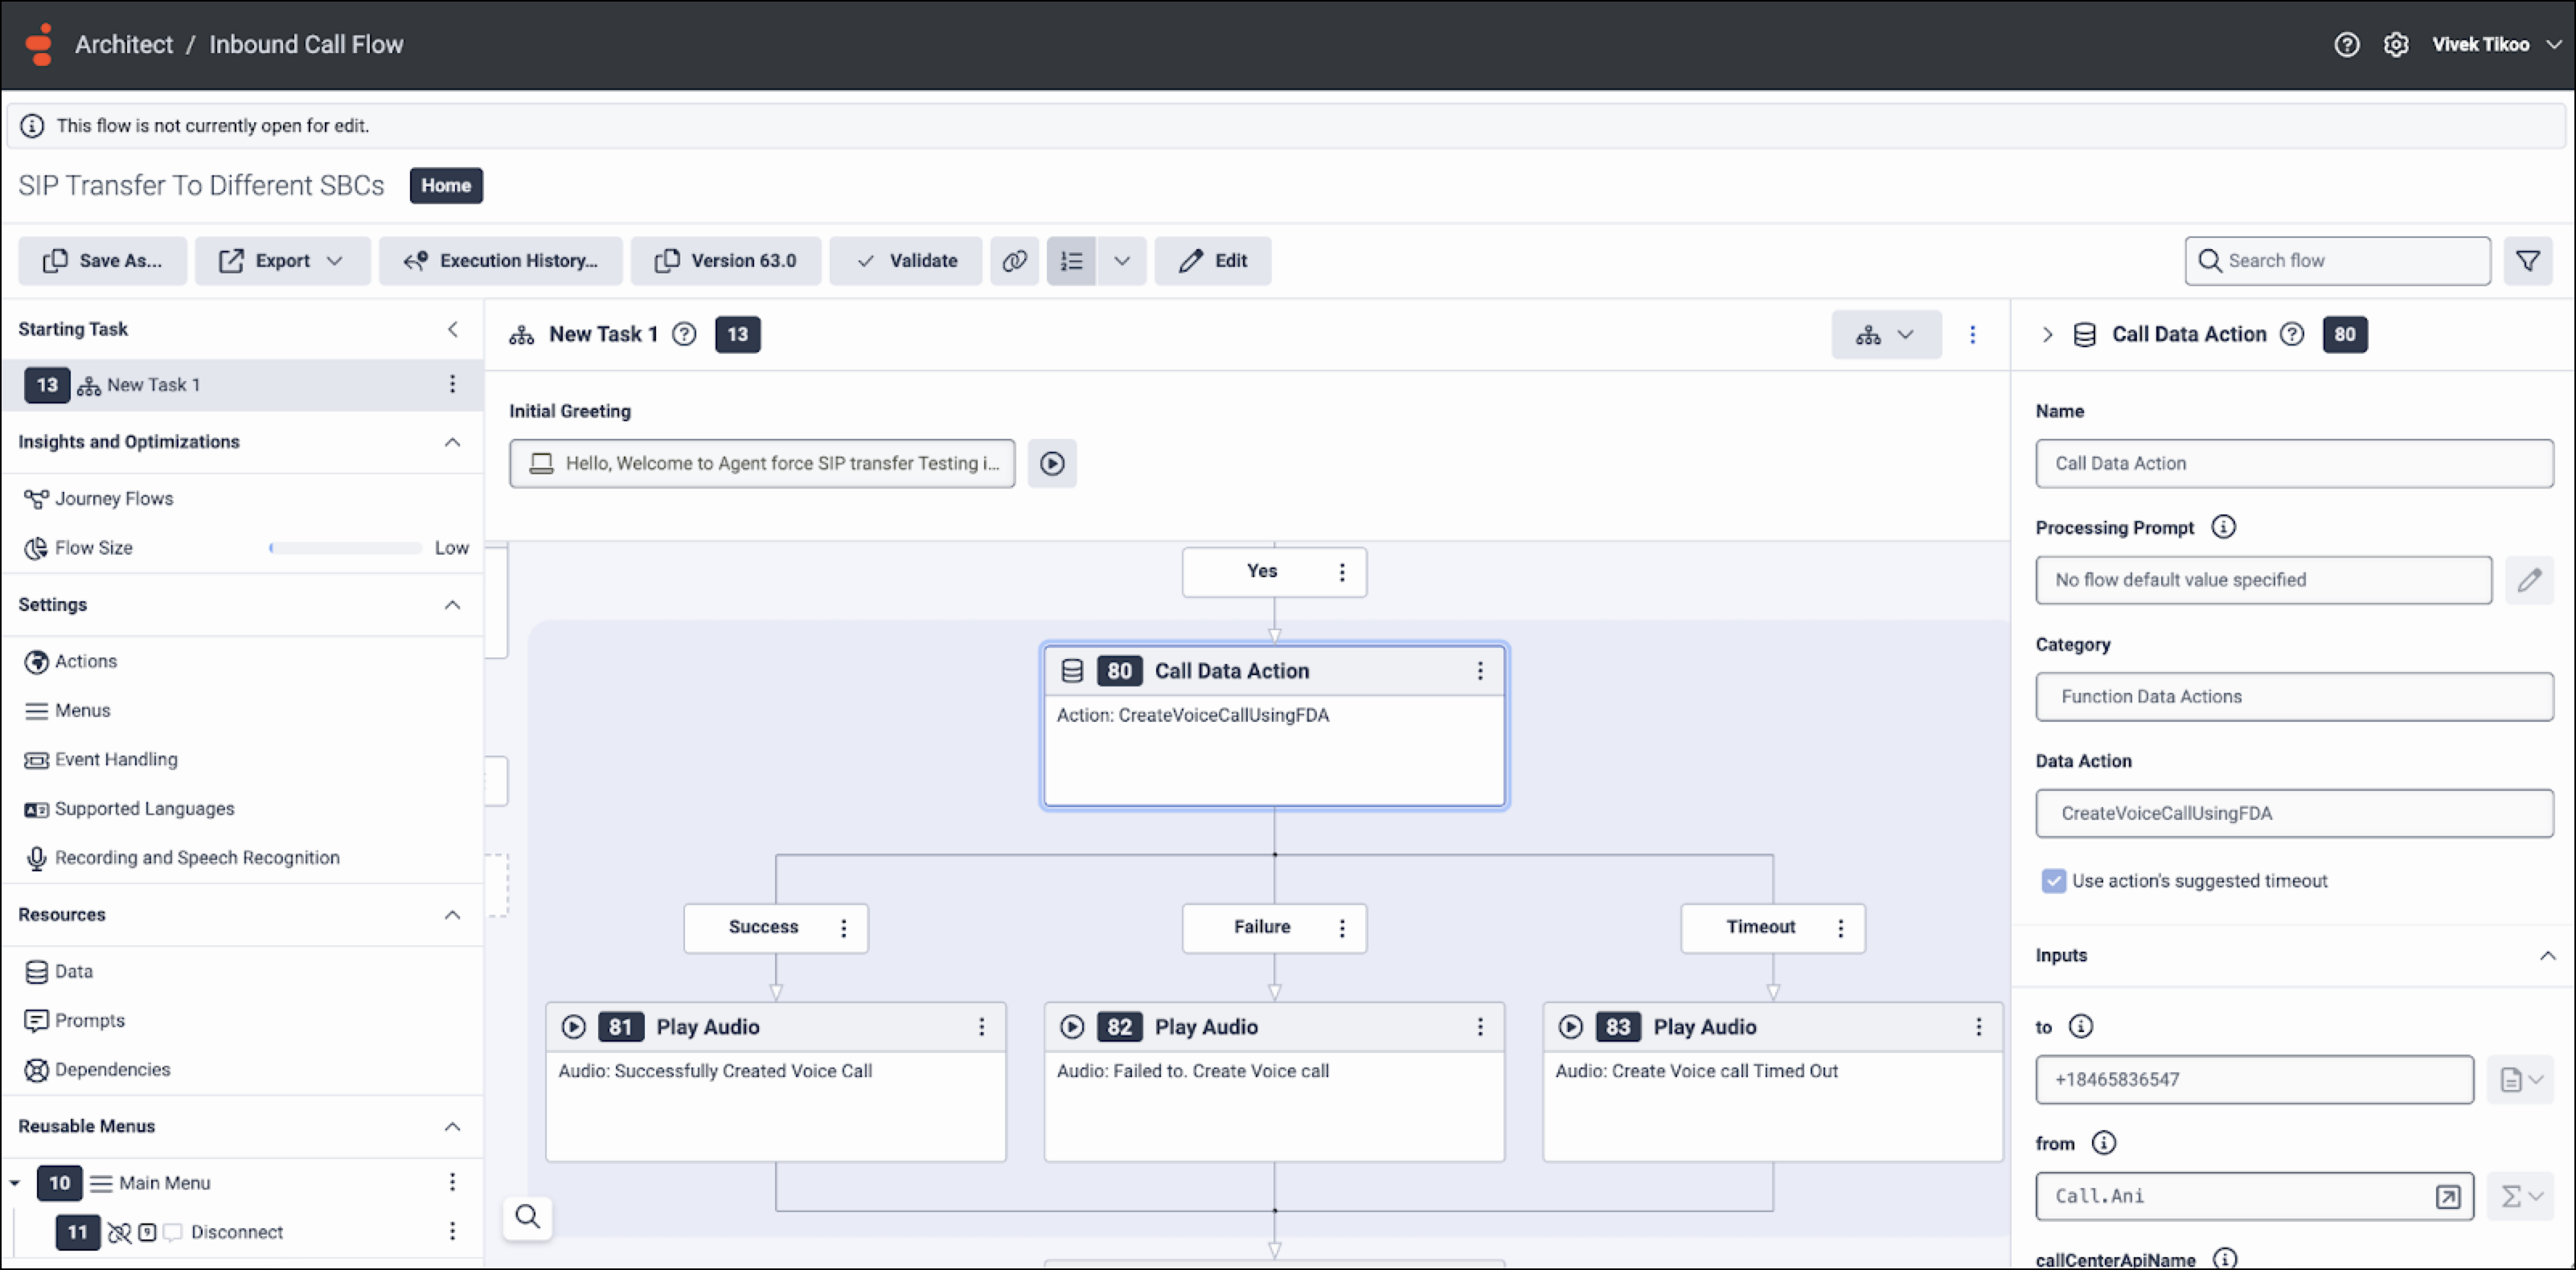
To create the voice call record that will be transferred to the Agentforce agent, add a
Call Data Action with these properties. This call outputs the voice call ID as
partnerVoiceCallId.- In the Name property, enter Call Data Action.
- In the Category property, select Function Data Actions.
-
Set the request parameters as needed. For a list and description of the parameters, see
the "Configure Inbound Call Transfers in the Telephony System" section in Configure Telephony Vendor Settings for Call Routing and
Escalation.
-
To create a voice call using the Function Data Action that you previously installed,
configure the Call Data Action to output the voice call ID to a parameter with name
voiceCallId. You must create the VoiceCall record and set the VoiceCall ID for the record before you route the call.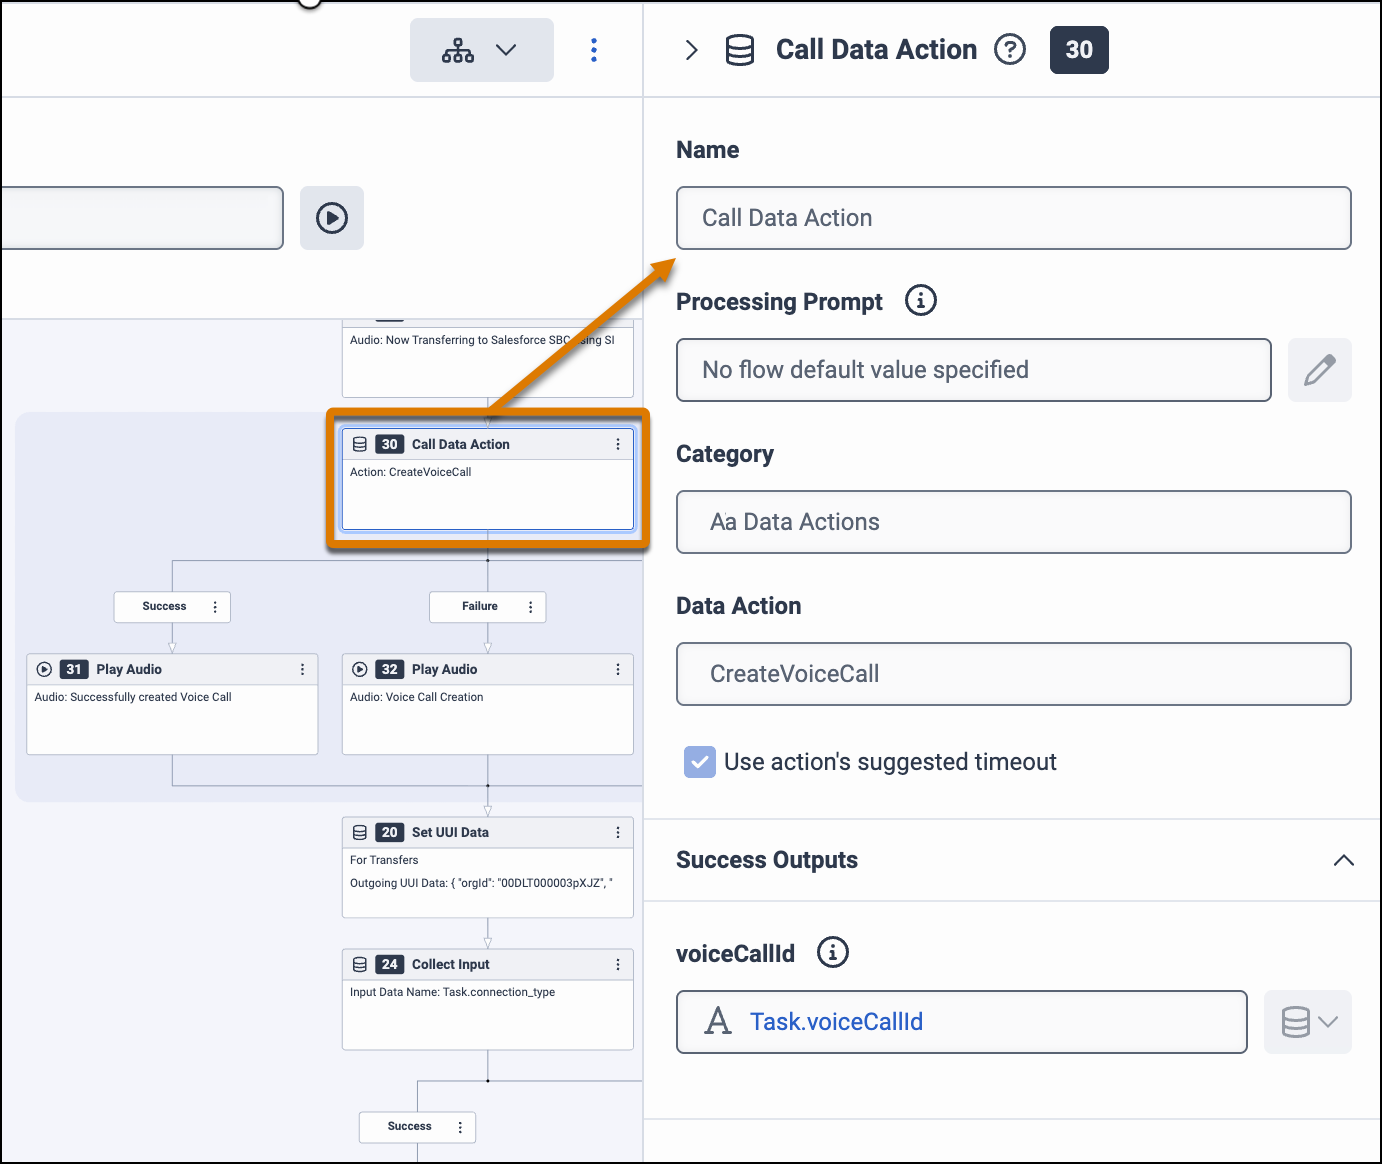
- To determine what happens based on whether the creation of the voice call succeeds, fails, or times out, add a Decision action.
-
To set the UUI header parameters, add the Set UUI Data action. For a list and description
of the parameters, see the "Configure Inbound Call Transfers in the Telephony System" section
in Configure Telephony Vendor Settings for Call Routing and
Escalation.
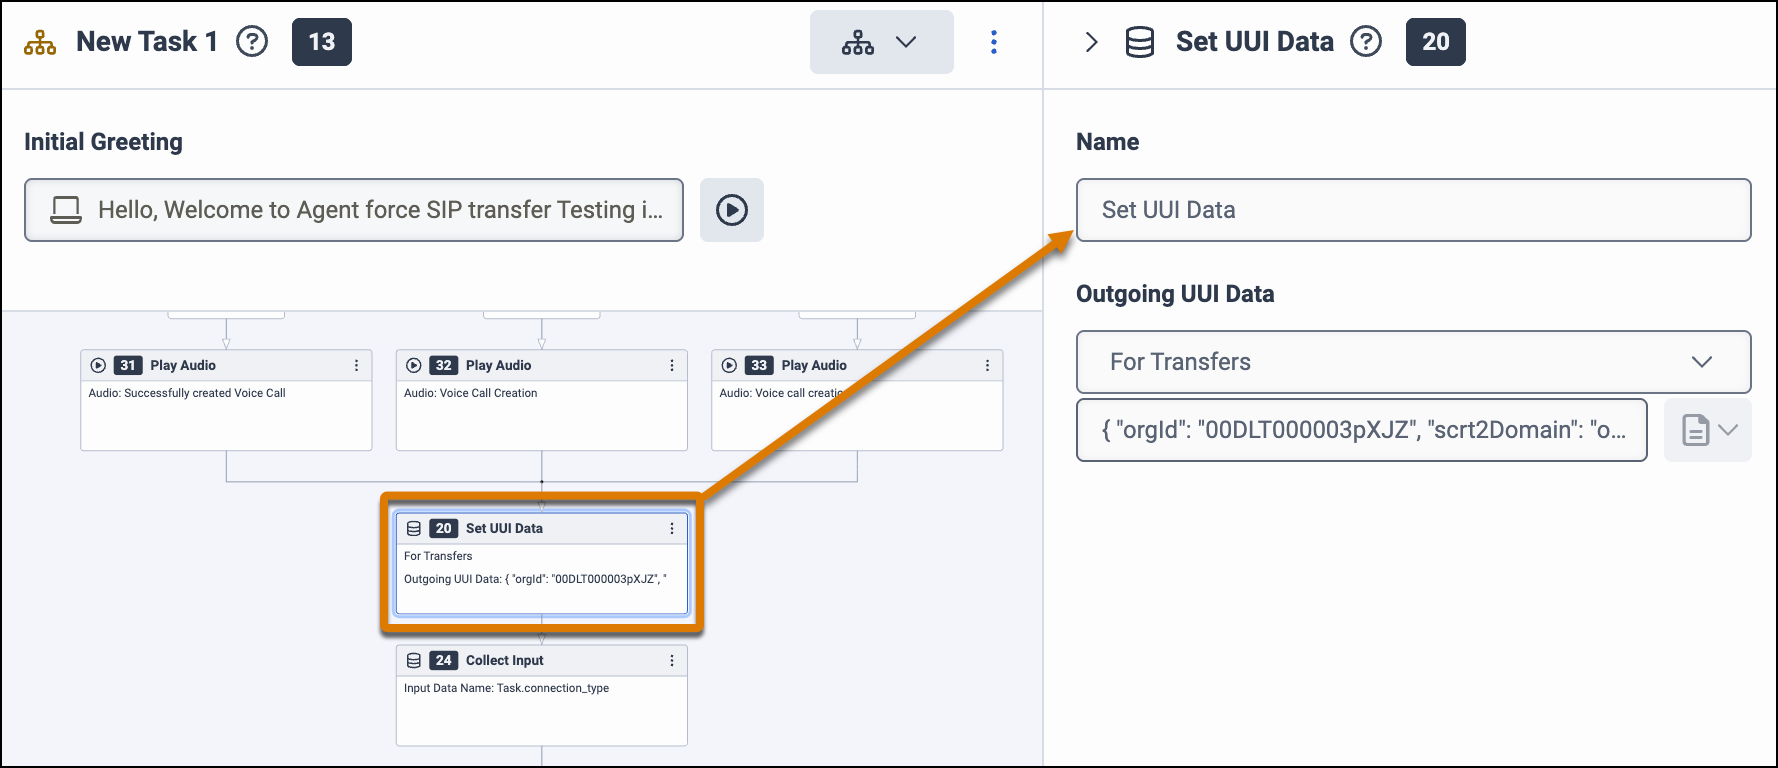
- Enter the name of the action.
-
In the Outgoing UUI Data, select For Transfers and enter the UUI
parameters in a JSON object consisting of key-value pairs. For example, enter:
{
"orgId": "00XX70000000XXX",
"scrt2Domain": "mycompanyname.my.salesforce-scrt.com",
“token” : ”adbcdefgsdfsdJSUzI1NiIsInR5cCI6IkpXVCJ9.eyJpc3MiOiIwMERTQjAwMD[THIS IS A SAMPLE TOKEN]5h AwZFBWR2ciLCJzdWIiOiJhc2FzaXBvcmczc2RiMyIsImV4cCI6MTc2OTcxOTcyOSwiaWF0IjoxNzY5NzE2MTI5LCJqdGkiOiI5OGE1YjcyZS1mOTFhLTQzMmItYjUwYy05Nzg[THIS IS A SAMPLE TOKEN]3847ufpawiu4f3hapwu93gbpawiu3hrao283938w4t34t m_HWOZDjb82UObqk_nR_6IhvDB7JA5v3Ov2icmZsR3NgT_uaweiur3h498rh2334984htg34o[THIS IS A SAMPLE TOKEN]3948 4VoFjDsie6N9lAlc0fZgdnT_j89mMl4rFaSNY9m”,
"callId": "50130000009xYZ1AAM",
"transactionId": "order-2026-0122-5489”
}
Select the User-to-User option. If you have multiple environments, such as development and test environments, add a UUI Data action for each environment.
-
To route inbound calls to the agent, add a Transfer to Number action. For the number,
specify the SIP address that you specified when creating the messaging channel for Agentforce Voice. Although this is
not an actual phone number, the value must be in the E.164 phone number format.
When we send a SIP invite with the Transfer to Number action, we send the UUI header that contains the UUI parameter settings. This action triggers the channel’s Omni-Channel flow, which routes the call to the Agentforce agent defined in the flow.
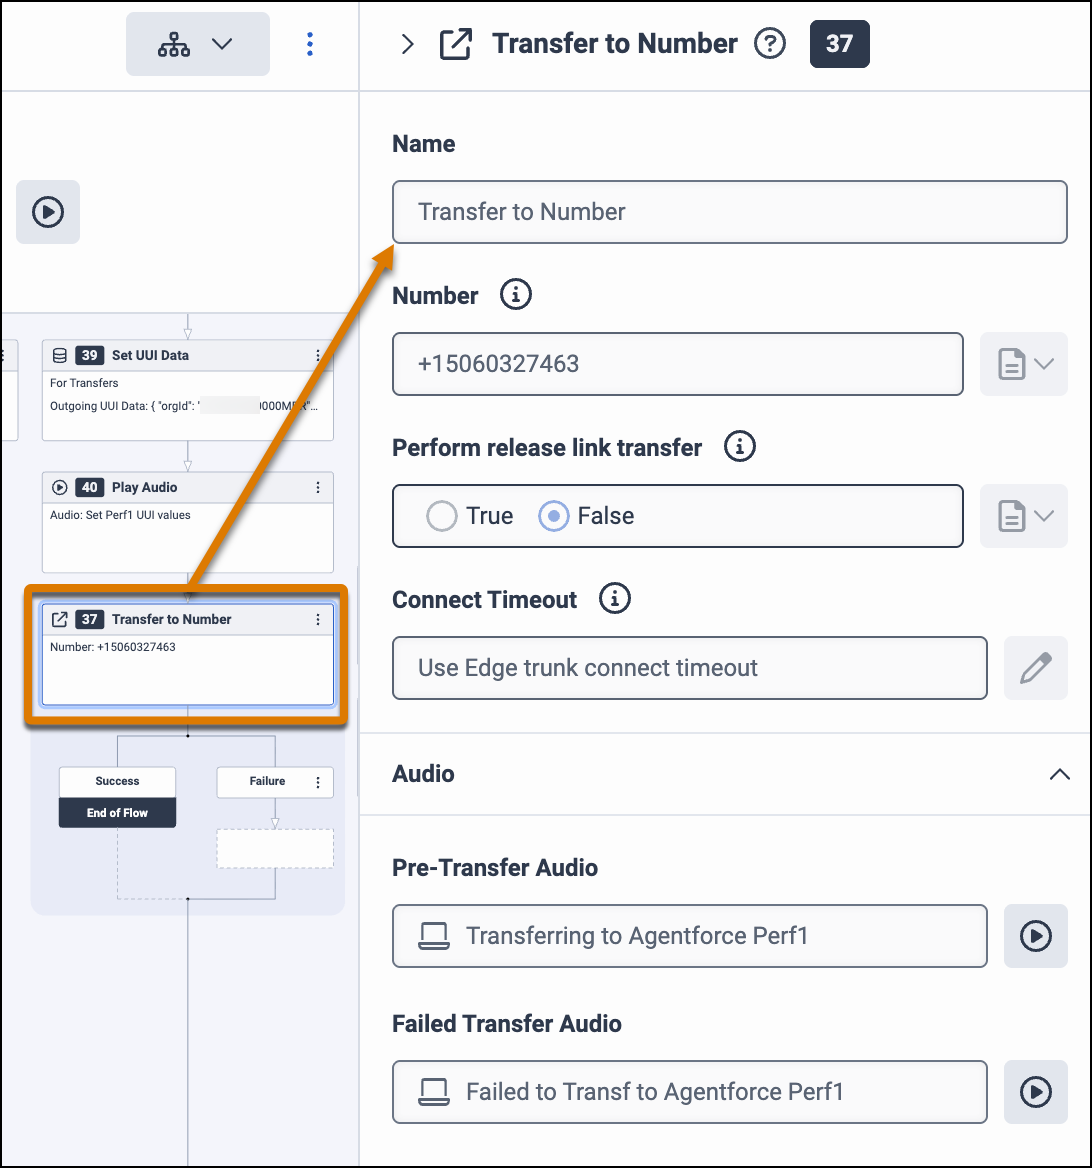
- To notify the customer that you are routing them to an Agentforce agent, enter the pre-transfer and failed transfer audio in the Transfer to Number properties or add a Play Audio action.
-
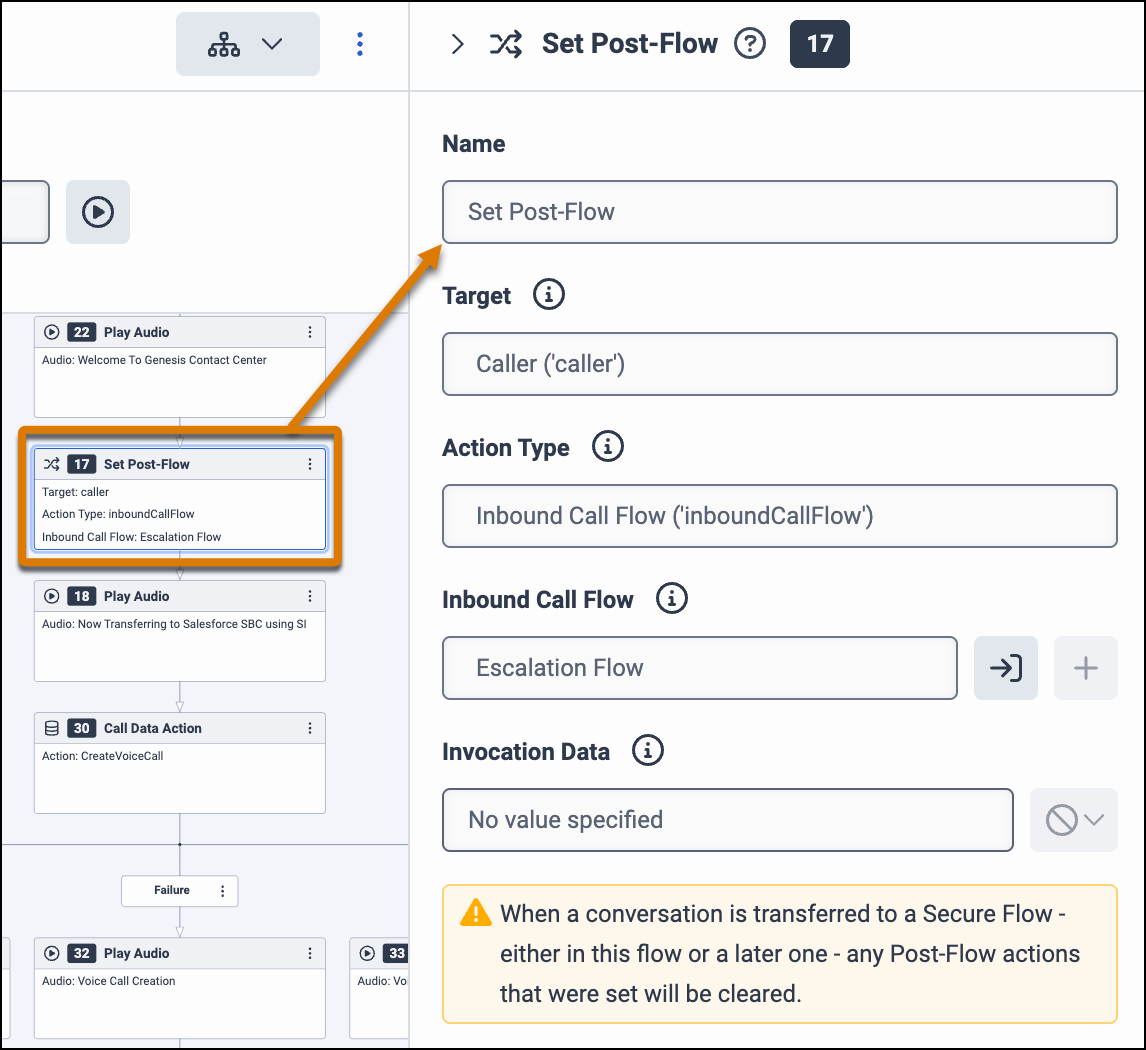
To route the call to the escalation flow when the Agentforce agent disconnects, add a Set
Post-Flow action. Set the Target field to Caller.
-
Add a Disconnect action at the end of the flow.

- Save, validate, and then publish the flow.
Add call routing in Genesys Admin to route calls using this flow. To learn how to configure the telephony system to handle call escalations from the agent to a rep, see Configure Telephony Vendor Settings for Call Routing and Escalation.