
You are here:
Amazon Redshift Private Connection
Pull your data securely from Amazon Redshift into Data Manager using the virtual private connection (VPC) for Redshift input connector for CRM Analytics. To use the Amazon Redshift Private connector, you configure an outbound network connection, external credential, and named credential.
Prerequisites
- Requires Salesforce Private Connect.
- CRM Analytics only supports Redshift VPC endpoint services. Redshift-managed VPC endpoints are not supported by Salesforce Private Connect. For more information on Redshift VPC endpoint services, see Create a service powered by AWS PrivateLink.
- In Amazon Redshift,
- Create an EC2 target group using the Redshift VPC information and private node IP address.
- Create an EC2 network load balancer using the Redshift VPC information and the target group.
- Create a VPC endpoint service using the load balancer and Redshift VPC information. We recommend that you disable Acceptance required to prevent manual acceptance for connection requests to the service.
- Make note of the VPC endpoint service name. The name is used in the Salesforce Private Connect setup and the outbound network connection.
For help with configuring this connection so that it’s consistent with your organization’s security requirements, contact your network security or IT department.
Allowlist the Salesforce AWS Account for Redshift Private Connect
To verify your AWS account is on the allowlist for Salesforce private connect, see Verify Salesforce AWS Account for Private Connect.
Create an Outbound Network Connection
To create an outbound network connection, see Create the Outbound Network Connection.
Create an External Credential and Principal Access
- From Setup, in the Quick Find box, enter Named, and then select Named Credentials.
- On the External Credentials tab, click New.
- Enter a label and name.
- For Authentication Protocol, select No Authentication.
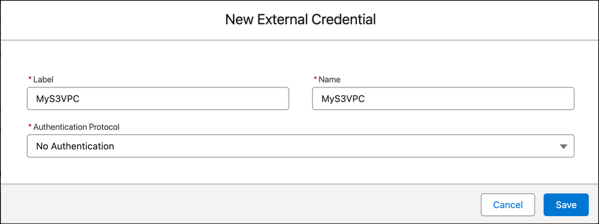
- Save your external credential.
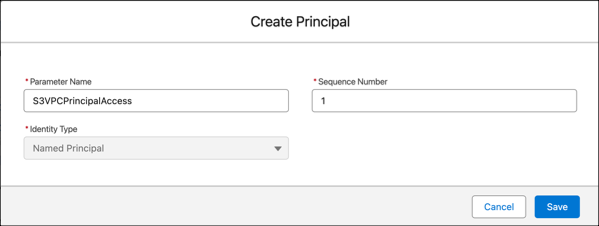
Add a principal to the external credential.
- Open the new external credential
- In the Principals section, click New.
- Enter a parameter name and 1 for the sequence.
Now update your user profile with external credential principal access.
- From Setup, in the Quick Find box, enter Profiles, and then select Profiles.
- Select the profile for the Analytics Cloud Integration User.
- Click Enabled External Credential Principal Access at the top of the profile page.
- Click Edit and add the principal parameter name.
- Click Save.
Ensure your user has principal access.
- From Setup, in the Quick Find box, enter Named, and then select Named Credentials.
- On the External Credentials tab, select your credential, and click Edit for your external credential. Verify you see your user in the Principal Access section.

Create a Named Credential
- From Amazon Redshift, find the endpoint URL for your target cluster. The URL looks like
[cluster-name].[random-hash].[region].redshift.amazonaws.com. - From Setup, in the Quick Find box, enter Named, and then select Named Credential.
- On the Named Credentials tab, click New.
- Enter a label and name.
- For URL, enter https://[cluster-name].[random-hash].[region].redshift.amazonaws.com.
- Select the external credential and outbound network connection that you created.
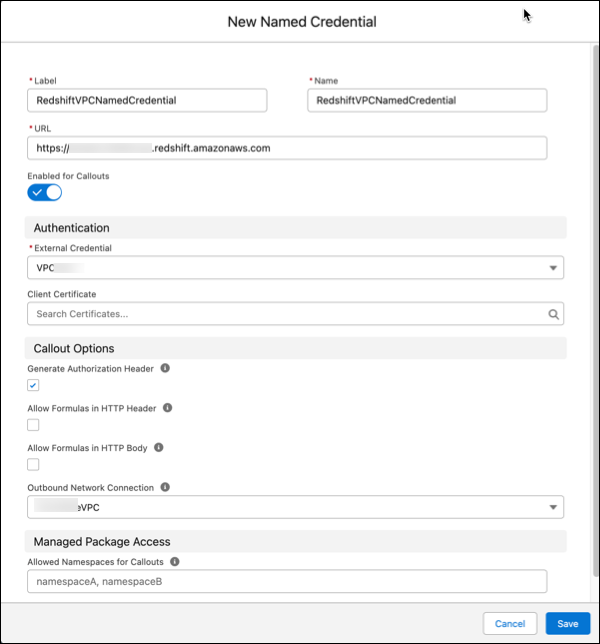
- Save your named credential.
Create a Redshift VPC Connection
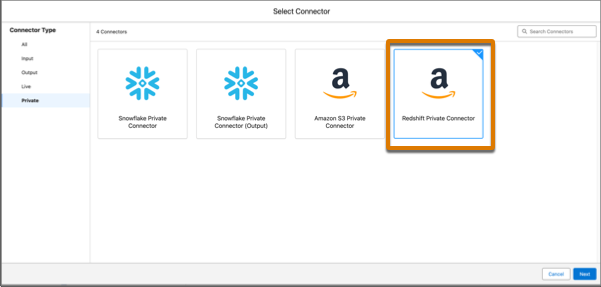
- On the Data Manager Connections tab, click New Connection.
- Select Private, then the Redshift Private Connector, and click
Next.
- Enter the connector settings.

- To validate your settings and test the connection, click Save & Test. If the connection fails, CRM Analytics shows possible reasons.
All settings require a value, unless otherwise indicated.
| Setting | Description |
|---|---|
| Connection Name | Use a name that lets you easily distinguish between different connections. |
| Developer Name | The API name is used in your recipes to reference data extracted through this connection. This name can’t include spaces. You can’t change the API name after you create the connection. |
| Description | Description of the connection for internal use. |
| Named Credential | The Name field from the named credential stored in your Salesforce org. |
| Username | Your Redshift cluster username, if any. |
| Password | Your Redshift cluster password, if any. |
| Schema | Your Redshift cluster schema name. |
| AWS Access Key ID | Your Redshift cluster access key id, if any. |
| AWS Secret Access Key | Your Redshift cluster secret access key , if any. |
| Master Symmetric Key | Optional setting for managing client-side encryption. You can connect to objects encrypted with customer master keys stored in the AWS Key Management Service or a customer-generated key in the 256-bit AES format. See Amazon’s documentation for details. |
| Cluster Node Type | Your Redshift cluster node type. |
| Number of Nodes in Cluster | The number of nodes in your Redshift cluster. |
| JDBC URL | Your Redshift cluster JDBC URL. |
| S3 Bucket Name | Your S3 bucket name, if any. |
| Region Name | Amazon Code |
|---|---|
| US East (Ohio) | us-east-2 |
| US East (N. Virginia) | us-east-1 |
| US West (N. California) | us-west-1 |
| US West (Oregon) | us-west-2 |
| Africa (Cape Town) | af-south-1 |
| Asia Pacific (Hong Kong) | ap-east-1 |
| Asia Pacific (Mumbai) | ap-south-1 |
| Asia Pacific (Osaka) | ap-northeast-3 |
| Asia Pacific (Seoul) | ap-northeast-2 |
| Asia Pacific (Singapore) | ap-southeast-1 |
| Asia Pacific (Sydney) | ap-southeast-2 |
| Asia Pacific (Tokyo) | ap-northeast-1 |
| Canada (Central) | ca-central-1 |
| China (Beijing) | cn-north-1 |
| China (Ningxia) | cn-northwest-1 |
| EU (Frankfurt) | eu-central-1 |
| EU (Ireland) | eu-west-1 |
| EU (London) | eu-west-2 |
| Europe (Milan) | eu-south-1 |
| EU (Paris) | eu-west-3 |
| EU (Stockholm) | eu-north-1 |
| Middle East (Bahrain) | me-south-1 |
| South America (Sao Paulo) | sa-east-1 |
| AWS GovCloud (US-East) | us-gov-east-1 |
| AWS GovCloud (US-West) | us-gov-west-1 |
For more information on Redshift connector considerations, see Amazon Redshift Connection.