
You are here:
Amazon S3 Connection
Create a remote connection using the Amazon S3 connector to sync CSV data from an S3 bucket to CRM Analytics.
Connection Details
Knowing your S3 bucket folder hierarchy is important to configuring this connector. Set the S3 bucket settings and parent’s folder path when creating the connection. Then select one or more objects, which are the subfolders under the parent’s folder path, that contain the CSV files you want to sync to CRM Analytics. When you sync the connected object, CRM Analytics looks for a CSV file called schema_sample.csv to detect the schema of the CSV data in the folder and to display a data preview. Note, however, that no data is imported from the schema_sample.csv file. From the preview, you can view and change field attributes for all the files that you’re loading from the folder.
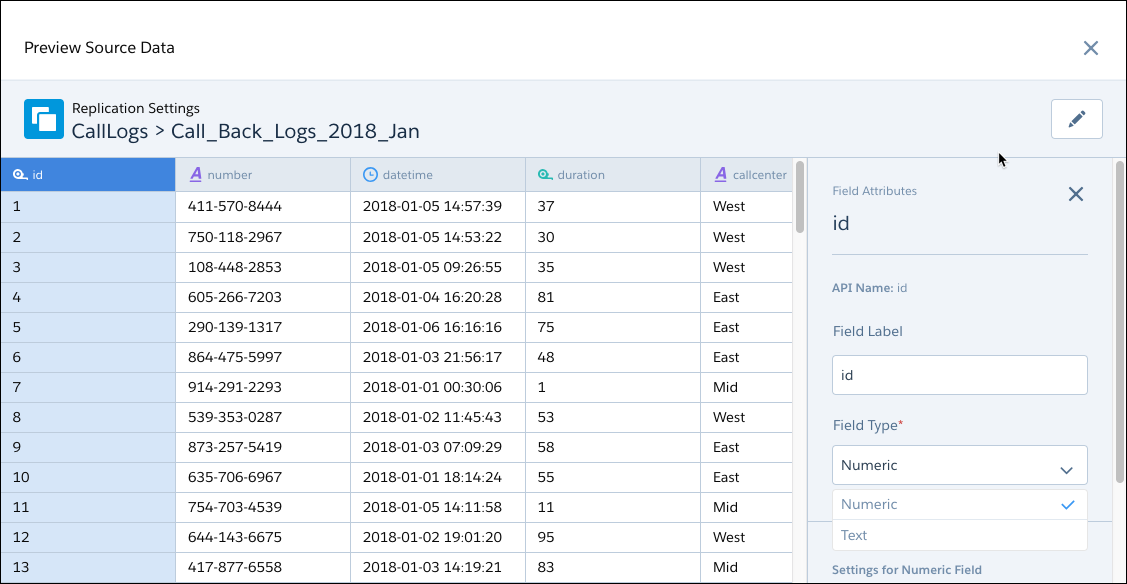
CRM Analytics uses the schema_sample.csv to derive the available fields, so you can select the fields you want. Then, the connector loads the CSV files that match the selected field set in a subfolder, and appends the rows in a single object.
The permissions for the Amazon S3 account used to create this connection must include ListBucket and GetObject. Permissions must include resource grants to the bucket and either "any object" or, if you chose to be specific, the appropriate ARNs that represent the path and objects being referenced. For example:

Create the Connection
- On the Data Manager Connections tab, click New Connection.
- Click the name of the connector, and click Next.
- Enter the connector settings.
- To validate your settings and attempt to connect to the source, click Save & Test. If the connection fails, CRM Analytics shows possible reasons.
All settings require a value, unless otherwise indicated.
| Setting | Description |
|---|---|
| Connection Name | Identifies the connections. Use a convention that lets you easily distinguish between different connections. |
| Developer Name | API name for the connection. This name can’t include spaces. The API name is used in your recipes to reference data extracted through this connection. You can’t change the developer name after you create the connection. |
| Description | Description for the connection. |
| Authentication Type | For standard authentication, enter Root. For AWS Identity Access Management (IAM) authentication, enter IAM. For granular access to AWS data, use IAM authentication, setting up IAM users and roles in AWS. For more information on AWS IAM, see Getting Started with IAM on AWS |
| Access Key | Your Amazon S3 bucket access key ID. |
| Secret Key | Your Amazon secret access key. |
| AWS Role ARN | For IAM authentication only, the ARN of the IAM role. You can find it on the IAM Role Setup in AWS. |
| Folder Path | Path to the folder that you want to connect to. The path must start with the bucket name and can’t include the name of the subfolder whose data you want to sync. |
| Master Symmetric Key | Optional setting for managing client-side encryption. You can connect to objects encrypted with customer master keys stored in the AWS Key Management Service or a customer-generated key in the 256-bit AES format. See Amazon’s documentation for details. |
| Region Name | Region of your S3 service, for example EU (Ireland). For the list of region names, see the S3 Region Names in CRM Analytics below. |
| Region Name | Amazon Code |
|---|---|
| US East (Ohio) | us-east-2 |
| US East (N. Virginia) | us-east-1 |
| US West (N. California) | us-west-1 |
| US West (Oregon) | us-west-2 |
| Africa (Cape Town) | af-south-1 |
| Asia Pacific (Hong Kong) | ap-east-1 |
| Asia Pacific (Mumbai) | ap-south-1 |
| Asia Pacific (Osaka) | ap-northeast-3 |
| Asia Pacific (Seoul) | ap-northeast-2 |
| Asia Pacific (Singapore) | ap-southeast-1 |
| Asia Pacific (Sydney) | ap-southeast-2 |
| Asia Pacific (Tokyo) | ap-northeast-1 |
| Canada (Central) | ca-central-1 |
| China (Beijing) | cn-north-1 |
| China (Ningxia) | cn-northwest-1 |
| EU (Frankfurt) | eu-central-1 |
| EU (Ireland) | eu-west-1 |
| EU (London) | eu-west-2 |
| Europe (Milan) | eu-south-1 |
| EU (Paris) | eu-west-3 |
| EU (Stockholm) | eu-north-1 |
| Middle East (Bahrain) | me-south-1 |
| South America (Sao Paulo) | sa-east-1 |
| AWS GovCloud (US-East) | us-gov-east-1 |
| AWS GovCloud (US-West) | us-gov-west-1 |
Keep these behaviors in mind when working with the Amazon S3 connector.
- Connected object names must start with a letter and contain only letters, digits, or underscores. Object names can’t end with an underscore.
- Only field names with combinations of alphanumeric, dot, underscore, or dash characters are supported. If a connector includes field names that contain other characters, such as spaces or brackets, the sync fails.
- The connector can sync up to 100 million rows or 50 GB per object, whichever limit is reached first. When using the connector, Salesforce Government Cloud org data is protected in transit with advanced encryption and can sync up to 10 million rows or 5 GB for each connected object, whichever limit is reached first.
- To avoid Amazon S3 connector setup timeout, choose a Folder Path with fewer than 5,000 entry options. An entry is the folder you intend to sync, the files within the folder, as well as all subfolders and subfiles. Recommended best practice is to create a bucket or folder within the bucket dedicated to Data Sync, populated with only the files to sync.
- Each connection can support up to 512 columns. For data with more columns, split the data, create multiple connections, and use a recipe to combine the datasets.
- Surround fields that contain quotes and commas in double quotes. Some CSV generators automatically double quote text fields when needed, while others do not. Due to inconsistent generator behavior, we recommend you surround all text fields in double quotes to ensure characters such as ' or , do not cause data sync issues
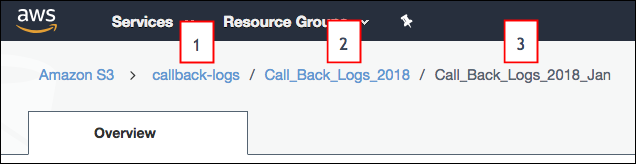
- The folder path that you specify in the connection settings must start with the bucket
name and the parent folder. Don’t include the folder that you want to connect to. Let’s
look at an example. You want to load files from the Call_Back_Logs_2018_Jan in S3. The
folder path appears above the folder when you open it in S3.The folder path in S3 starts with the bucket name (1), followed by a folder name (2). In this example, subfolder (3) contains CSV data that you want to sync. When you specify this connection’s folder path setting, you include only the bucket (1) and parent folder (2), not the subfolder (3) that you’re syncing. After you create the connection, all subfolders directly under the parent folder (2), including Call_Back_Logs_2018_Jan, appear as possible objects that you can sync using this connection.

- Folder names in S3 must follow developer naming conventions, with no spaces or special characters.
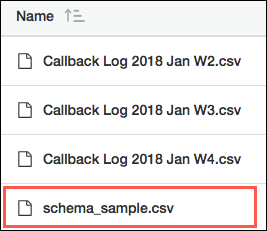
- Copy one of the files in the subfolder and rename it
schema_sample.csv. Delete all rows in
schema_sample.csv except the header row and one row of sample data
in the correct format for each column. CRM Analytics uses this file to
detect the schema of the CSV data and doesn’t import any data from this file.
- Each file that you want to load from the S3 subfolder must have a file name ending in .csv. Each file must also have a header row and the same fields as the schema_sample.csv file. A file can have extra fields, but these fields aren’t loaded. CRM Analytics ignores files that don’t meet these requirements.
- Field names in the header row of each file must follow developer naming conventions, with no spaces or special characters. The header rows in your schema file and data files are case-sensitive, so use the same capitalization throughout.
- You can load only whole files, not parts of files.
Connection Example
To better understand how the S3 connector works under more complex scenarios, consider the following hierarchy in S3. The hierarchy has two buckets: Quarterly_Financial_Data and Call_Logs. The first bucket has one level of folders. The second bucket has two levels: parent folders and subfolders. Here’s the S3 hierarchy.
- Quarterly_Financial_Data
- 2018
- 2018_quarter1_results.csv
- 2018_quarter2_results.csv
- 2018_quarter3_results.csv
- 2018_quarter4_results.csv
- 2019
- 2019_quarter1_results.csv
- 2019_quarter2_results.csv
- 2019_quarter3_results.csv
- 2019_quarter4_results.csv
- 2018
- Call_Logs
- 2018_Call_Logs
- Q1_2018
- call_logs_2018_01.csv
- call_logs_2018_02.csv
- call_logs_2018_03.csv
- Q2_2018
- call_logs_2018_04.csv
- call_logs_2018_05.csv
- call_logs_2018_06.csv
- Q3_2018
- call_logs_2018_07.csv
- call_logs_2018_08.csv
- call_logs_2018_09.csv
- Q4_2018
- call_logs_2018_10.csv
- call_logs_2018_11.csv
- call_logs_2018_12.csv
- Q1_2018
- 2018_Call_Logs
Let’s look at how you can set up connections and connected objects to accomplish the following goals.
| Goal | Action |
|---|---|
| Extract data from multiple buckets into CRM Analytics. | Because each connection is associated with a single bucket, create a separate connection for each bucket. For example, to extract data from the Quarterly_Financial_Data and Call_Logs buckets, create two connections, one for Quarterly_Financial_Data and another for Call_Logs. For each connection, set the appropriate bucket name in the Folder Path connection property. |
| Extract specific folders, but not all subfolders, from a parent folder. | Create a connection for the parent folder, and then use the connection to connect to specific subfolders. For example, to extract call logs from Q1_2018 and Q2_2018 folders, create one connection with folder path Call_Logs/2018_Call_Logs. Then create connected objects for Q1_2018 and Q2_2018. |
| Extract data from a subset of the CSV files under a folder. | Move the subset of files into a subfolder, create the connection on the parent folder, and then use the connection to connect to the subfolder. For example, to extract data from call_logs_2018_11.csv and call_logs_2018_12.csv, move these CSV files under a new subfolder under Q4_2018. Next, create a connection with folder path Call_Logs/2018_Call_Logs/Q4_2018. Finally, create a connected object based on the new subfolder. |