
You are here:
Sync Out for Snowflake
Sync Out for Snowflake exports your raw local Salesforce data via CRM Analytics to Snowflake using the CRM Analytics output connector for Snowflake. With Sync Out for Snowflake, keep your Salesforce data in Snowflake up to date using scheduled Data Sync without the need for a third-party ETL tool. Fresh Salesforce data is vital if you maintain a central Snowflake data lake for processing, analysis, business automation, or storage. For example, give your shipping logistics team the freshest data by merging your account data from your system of record, Salesforce, with your ERP’s shipping data in your data lake.
Required Editions
| Available in Salesforce Classic and Lightning Experience. |
| Available with CRM Analytics, which is available for an extra cost in Enterprise, Performance, and Unlimited Editions. Also available in Developer Edition. |
Enable Sync Out
- From Setup, enter Analytics in the Quick Find box.
- Select Settings under Analytics.
- Select Enable Snowflake output Connection and Save.
- Turn on and configure the Snowflake output connector as described in Snowflake
Output Connection. The output connection is used to linkCRM Analytics to Snowflake. You don’t add or update a Data Prep recipe output node to use Sync Out,
as the push happens during Data Sync.
 Note The Snowflake account used for the output connection needs privileges to create and own tables; insert, update, truncate, and merge data; and create temporary stages.
Configure Sync Out for a Salesforce Local Connection
- On the Connections tab of the Data Manager, select the down arrow next to the
Salesforce Local Connection you want to use with Sync Out.
 Tip Do you want to sync out only some of this connection’s objects? Add another local connection, then reassign the objects for sync out objects to the new local connection. Each object can only exist in one local connection.
 - Click Sync Out.
- Click the slider to enable Sync Out.
- Choose the target connection.
- Select Save.
With Sync Out enabled, data writes to Snowflake with each manual or scheduled run of Data Sync. You don’t set up or modify a Data Prep recipe.
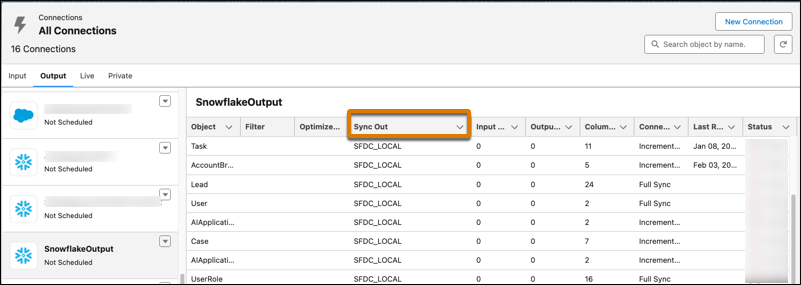
To view the Sync Out source and status, open your target connection on the Output tab.
Connect to Snowflake with OAuth
To use the CRM Analytics Snowflake connector with an OAuth connection, you must configure Snowflake, Salesforce, CRM Analytics, and an external OAuth authorization server.
These high-level instructions help you navigate the steps involved. Remember to contact your Network Security or IT department for help with configuration consistent with your organization’s security requirements.
- Configure Snowflake and your selected external authorization server. Here’s Snowflake's help, with detailed instructions for connecting to services like Okta and Microsoft Azure AD.
- With the authorization server is configured, follow the steps under Define an
Authentication Provider in Salesforce from Configure an Authentication Provider
Using OpenID.
- If you’re using Okta, here are Okta's instructions for adding their service to Salesforce.
- With the authentication provider added to Salesforce, define a named credential in Salesforce. Select the OAuth 2.0 authentication protocol and Named Principal identity type. Use of External Credentials isn't supported.
- Add the Snowflake connection. For Authentication Type setting, enter OAuth.
Turn Off Sync Out for a Salesforce Local Connection
- On the Connect tab of the Data Manager, select the down arrow next to the Salesforce Local Connection you want to turn off Sync Out.
- Select to disable Sync Out.
- Select Save.
Keep these behaviors in mind when working with the Snowflake output connector and using a Data Prep recipe output node.
- Sync Out is only available for your local Salesforce objects. To sync data from other objects, use the Snowflake output connection and a Data Prep recipe.
- Sync Out for Snowflake extends Data Sync runs. Evaluate your Data Sync run times, then update scheduled recipes to begin after Data Sync completes.
- Datasets created during the Sync Out workflow are found on the Connected tab of the Data Assets page.
- When the prior run’s data is deleted in preparation for the current run, the earlier version of the data becomes inaccessible. Set up a process to copy or use the output after each run.
- Don’t modify or delete the Snowflake schema. Sync Out creates and manages the tables in Snowflake. Tables are recreated with each full sync.
- Use periodic full sync to avoid data drift.
- Object data pushed in Sync Out uses Salesforce’s field attributes, like precision and scale, instead of the attributes defined in Data Sync.
- To investigate Sync Out run status, expand the Data Sync nodes on the Monitor page.
- To receive updates about Sync Out, change your Data Sync Notifications to All instead of Warning.
- A Sync Out failure doesn’t always cause the Data Sync run to fail. View the Sync Out status and message on the Monitor page by expanding the Data Sync job.
- To remove a field from Sync Out, remove it from Data Sync.
- When you access your Snowflake table, reserved keywords are shown in uppercase and double quotes. This presentation includes all Snowflake reserved keywords except those described as “Can’t be used as an identifier in a SHOW command (for example, ‘SHOW … IN <identifier>’).”
- When you use Sync Out for an incrementally updated object, there could be a discrepancy in the pushed rows between CRM Analytics (viewed in the Monitor tab) and Snowflake (viewed in the Snowflake History interface in the [ROWS] column). Depending on your Snowflake setup, inserting one row could impact a partition with thousands of rows, so reporting doesn’t show a direct one-to-one relationship. To verify the rows sent and processed in Snowflake, examine the Profile off of the Query ID.