
You are here:
Configure the Dataflow Through the Definition File
You can configure the dataflow by adding transformations directly to the dataflow definition file.
Required Editions
| Available in Salesforce Classic and Lightning Experience. |
| Available with CRM Analytics, which is available for an extra cost in Enterprise, Performance, and Unlimited Editions. Also available in Developer Edition. |
| User Permissions Needed | |
|---|---|
| To edit the dataflow definition file: | Edit CRM Analytics Dataflows |
A dataflow definition file is a JSON file that contains transformations that represent the dataflow logic. The dataflow definition file must be saved with UTF-8 encoding.
Before you can configure a dataflow to process external data, you must upload the external data to CRM Analytics.
- In CRM Analytics, click the gear icon (
 ) and
then click Data Manager.
) and
then click Data Manager. - Click Open Data Manager (Legacy).
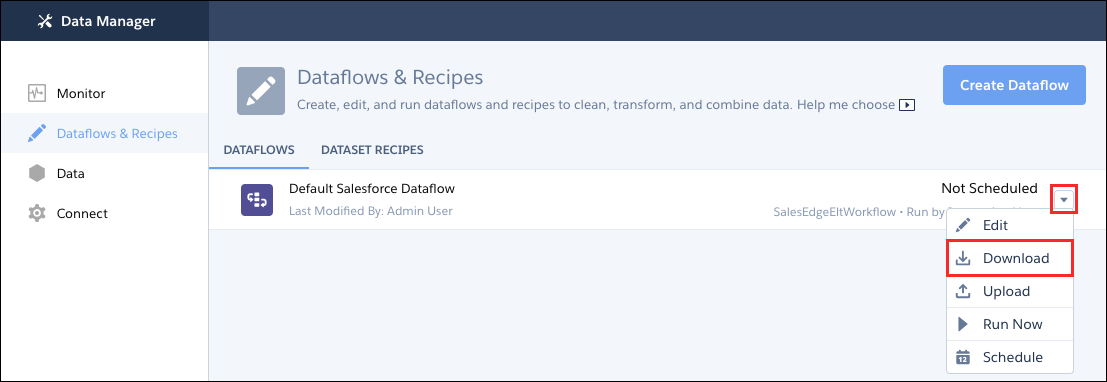
- Click the Dataflows & Recipes tab.
- Download the existing dataflow definition file by clicking
Download in the actions menu.
- Make a backup copy of the existing dataflow definition file before you modify it. CRM Analytics doesn’t retain previous versions of the file. If you make a mistake, you can upload the previous version to roll back your changes.
- Add each transformation as a node in the dataflow definition file, using a JSON
editor.For example, based on the design in the previous stepprevious step, you can add the following transformation nodes:
{
   "Extract_Opportunities": {
      "action": "sfdcDigest",
      "parameters": {
         "object": "Opportunity",
         "fields": [
            { "name": "Id" },
            { "name": "Name" },
            { "name": "Amount" },
            { "name": "StageName" },
            { "name": "CloseDate" },
            { "name": "AccountId" },
            { "name": "OwnerId" }
         ]
      }
   },
   "Extract_AccountDetails": {
      "action": "sfdcDigest",
      "parameters": {
         "object": "Account",
         "fields": [
            { "name": "Id" },
            { "name": "Name" }
         ]
      }
   },
   "Transform_Augment_OpportunitiesWithAccountDetails": {
      "action": "augment",
      "parameters": {
         "left": "Extract_Opportunities",
         "left_key": [ "AccountId" ],
         "relationship": "OpptyAcct",
         "right": "Extract_AccountDetails",
         "right_key": [ "Id" ],
         "right_select": [
            "Name"
         ]
      }
   },
   "Transform_Filter_Opportunities": {
      "action": "filter",
      "parameters": {
         "filter": "StageName:EQ:Closed Won",
         "source": "Transform_Augment_OpportunitiesWithAccountDetails"
      }
   },
   "Register_Dataset_WonOpportunities": {
      "action": "sfdcRegister",
      "parameters": {
         "alias": "WonOpportunities",
         "name": "WonOpportunities",
         "source": "Transform_Filter_Opportunities"
      }
   }
}
See Transformations for CRM Analytics Dataflows for more about each transformation and its JSON.
 Note The JSON keys and values are case-sensitive. Each bolded key in the example JSON is the node name for a transformation. Each node contains an action value, which identifies the transformation type. The order in which you add the transformations to the dataflow definition file doesn’t matter. CRM Analytics determines the order in which to process the transformations by traversing the dataflow to determine the dependencies among them.
 Important Node names must be unique in a dataflow definition file, and can’t contain space or tab characters. Consider that node names are not treated as case sensitive, so names such as “Extract_Opportunities” and “extract_opportunities” aren’t unique in the same definition file.
 - Before you save the dataflow definition file, use a JSON validation tool to verify that
the JSON is valid.An error occurs if you try to upload the dataflow definition file with invalid JSON. You can find JSON validation tools on the internet.
- Save the dataflow definition file with UTF-8 encoding, and then close the file.
- In the Dataflow view of the Monitor tab, click Upload from the
action menu to upload the updated dataflow definition file. Note
- Uploading the dataflow definition file doesn’t affect any running dataflow jobs and doesn’t automatically start the dataflow job.
- The maximum length of a dataflow definition file is 1,000,000 characters.
You can now start the dataflow on demand or wait for it to run on the schedule. Users can’t query the registered dataset until the dataflow runs.
To create dataflows, you must have Data Sync enabled. If your org’s first license was provisioned before the Winter ’20 release, you can manually enable Data Sync.