
You are here:
Set and Send Smart Notifications
Set up CRM Analytics to notify you about changes to your important business metrics, when and where you choose. Attach notification criteria to widgets in dashboards, and select when to run the queries. You can see notifications in CRM Analytics, Lightning Experience, CRM Analytics for iOS, and email. Add recipients from your org to the email’s distribution list to notify colleagues at the same time as yourself.
Required Editions
| Available in Salesforce Classic and Lightning Experience. |
| Available with CRM Analytics, which is available for an extra cost in Enterprise, Performance, and Unlimited Editions. Also available in Developer Edition. |
| User Permissions Needed | |
|---|---|
| To set notifications on CRM Analytics dashboard widgets: | Use CRM Analytics Run Reports |
| To email additional recipients: | Add Recipients to CRM Analytics Notifications |
To set up a CRM Analytics notification, follow these steps.
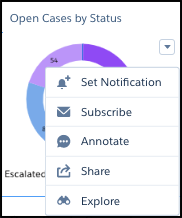
- Locate a dashboard widget that shows information you want to be notified about. You can set notifications on any chart except timeline or values table. If needed, you can use the dashboard’s selectors to create a more personalized query of your data.
-
Select Set Notification from the widget’s dropdown list.
-
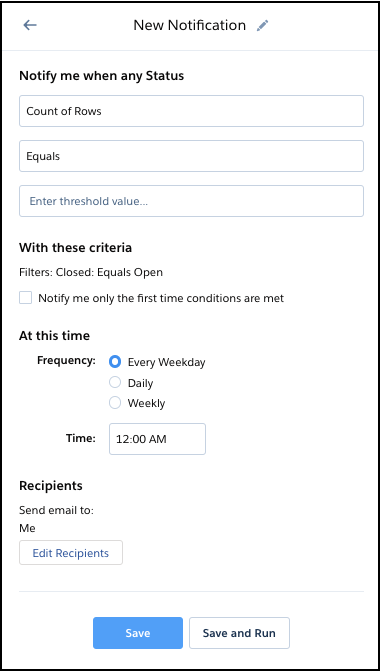
In the Notifications panel, enter a name for your notification, if needed.
-
Set the value that you want to know about as soon as your widget query returns it. Depending on
the chart, the panel provides relevant options to select for creating a notification. You
can include up to four groupings. If the chart has multiple measures, select the one you
want from the list of options.
For example, if you wanted to know when your team has reached 75% of quota, you’d click Set Notification on the Quota Attainment number widget. In the Notifications panel, you’d select Equals or is greater than from the dropdown list and enter 75 for the threshold value.
Notifications read roughly like a sentence. For example, “Notify me when any channel’s sum of open cases is less than 20.” Or, “Notify me when any product or reason count of cases is greater than 30.”
- Select the frequency and time when you want the query to run.
- If the dashboard is in a shared app, then you can add people to your email distribution list. Click Edit Recipients to add users who have access to the dashboard.
- Test your notification on the spot with Save and Run, or simply click Save.
A tracking tile appears in the Notifications section of your CRM Analytics home page.
When the conditions you’ve set for the notification are met, you get the message on
the tile. You’re also notified via email, and in CRM Analytics and Lightning Experience, the
bell icon ( ) alerts you with a number in red.
In CRM Analytics, the dropdown list from the bell includes the option to open the
Manage CRM Analytics Notifications dialog box. You can also manage notifications on the
dashboard. The bell icon with the plus ( ) opens the All Notifications panel and shows numbers
in blue (
) opens the All Notifications panel and shows numbers
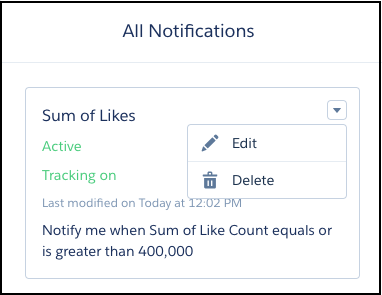
in blue ( ) on widgets that have notifications. In the All
Notifications panel, each notification has a dropdown action list for editing and deleting
the notification.
) on widgets that have notifications. In the All
Notifications panel, each notification has a dropdown action list for editing and deleting
the notification.
Clicking the link in a notification email, the notification manager, or a notification tile on your CRM Analytics home page, takes you to the dashboard view relevant for the notification. You immediately see the dashboard page with your filters and selections, and with the notification set up in the side panel. If you want to make any changes, click the Edit button. In edit mode, you can also activate or deactivate the notification, and select whether to show the tracking tile on the CRM Analytics home page.
Take note of these considerations for CRM Analytics notifications.
- Each user can set up to 10 notifications.
- Notifications are available on all widgets except timeline charts and values tables.
- A notification is based on a snapshot of the query behind the widget. If the dashboard is later edited, the notification isn’t automatically updated. The notification continues to use the query as it was at the time when the notification was set.
- For queries with groupings, all results are evaluated for the notification criteria, not just the first row.
- Notifications for widgets with queries based on results bindings aren’t supported, including dynamic widget titles.
- Notifications for widgets based on SOQL, Apex, Salesforce Direct, and CRM Analytics Direct queries, such as direct queries on Salesforce objects, CDP, Snowflake, and Google BigQuery, aren’t supported.
- Notifications aren't supported in dashboards that were created in orgs enabled with CRM Analytics Time Zones.
- If a notification is created in the Analytics Studio, the link in the notification email opens the dashboard in Analytics Studio. If a notification is created on an embedded dashboard or in Analytics Tab, the link in notification email navigates the user to the Analytics Tab.
- Notification tracking is available in the CRM Analytics app for iOS, but it isn’t available in the CRM Analytics app for Android or in the Salesforce mobile app.
- Notification tracking tiles use flat gauge or bar chart visualizations to show progress toward the conditions set in the notifications. The tiles are separate from the dashboard and don’t use the dashboard’s chart types and widget properties.
- Adding recipients doesn’t create personal notifications for them. The added recipients don’t get in-app notification via the bell icon, and they don’t see the notification on their home page. Recipients get the notification email sent from the email address of the user who set up the notification.
- Once added to the notification email distribution list, recipients can’t remove themselves and must ask the email sender to be removed.
- If a notification is on a widget that's based on a SAQL query or a compare table, and filters have been applied, the filters aren’t listed in the Notifications panel.
- Notification emails are typically sent from the email address of the user who created the CRMA notification. To use an organization-wide email address, in Setup, select Use Org-Wide Email Address for Subscriptions and Notifications, and then select the organization-wide email address to use from the dropdown list. The dropdown displays only the email addresses with purpose set as Default No-Reply Address in the Organization-Wide Addresses page in Setup. Org-wide email addresses with purpose set as User Selection are displayed only when the System Administrator role is selected.