
You are here:
Upload Dataset
Upload the plain_quota Dataset to view relevant metrics in the Home dashboard.
Required Editions
| Available in: Developer edition and for an extra cost in Enterprise, Performance, and Unlimited editions. |
Optionally, you can upload quota data by overriding the plain_quota dataset in your app by following these instructions. The plain_quota dataset is used to provide you with quota attainment metrics in the Opportunities section of the Home dashboard. If you don’t want to see this metric, you can skip this section.
Note When you work with .CSV files you want to import to CRM Analytics Comms-Business, create
and open them using only a UTF-8-compliant text editor. Opening them in Microsoft Excel or
other spreadsheet software reformats .CSV files and makes them unusable in CRM Analytics
Comms-Business.
Important When you create the .CSV file, be sure it contains the following fields,
in this order, with exactly these names. Field names are case-sensitive:
- StartDate (in yyyy-mm-dd format)
- QuotaAmount
- OwnerName
- Username
- Create a .CSV file to include the fields described, that is StartDate (in yyyy-mm-dd format), QuotaAmount, OwnerName, Username. For an example, see Sales Analytics Example .CSV File.
- Save the file to a location that you can easily remember.
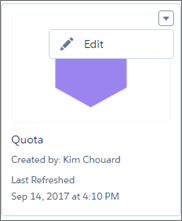
- In Salesforce, go to the CRM Analytics home page and find the plain_quota dataset.
-
Click the arrow at the upper right corner of the dataset panel and select
Edit.
-
Salesforce displays the dataset editing screen for the plain_quota dataset. Look for
Replace Data in the upper right corner and click it.

- In the dialog box that opens, navigate to the .CSV file you created in Step 1, and double-click it.
- To open the Replace Dataset Data page, click Next.
-
If your fiscal period is different than calendar period, that is if it starts on a
date other than January 1, update the plain_quota Metadata file. If your fiscal period
starts on January 1, skip to the next step.
- Copy the JSON from Sales Analytics Quota Dataset JSON File and paste it into a text editor of your choice.
-
Change the value of
"fiscalMonthOffset"from 4 to a number that represents the month your fiscal period starts. In metadata, the numeral “0” stands for January, “1” stands for February, and so on, up to “11,” which stands for December. Save the file to your desktop. - In CRM Analytics Studio, go to the Replace Dataset Data page and locate the Data Schema File area of the page. Click the arrow next to Quota .JSON file, select Replace File, find the file you saved and upload it to CRM Analytics.
-
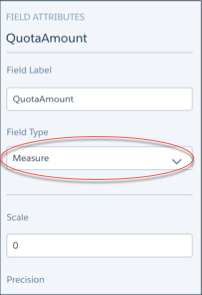
On the Replace Dataset Data page, click Next to open the Edit Field
Attributes page. The first column —QuotaAmount— is selected. If not, select
it. In the Field Attributes panel on the right, make sure
Field Type is set to Measure.
-
After uploading your quota data, rerun the recipe to update the dashboards.
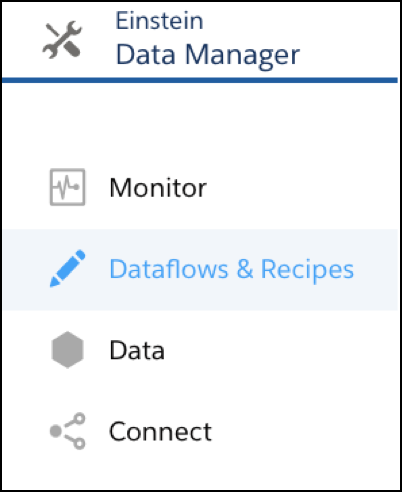
- Click the Gear menu at the upper right of the CRM Analytics Comms for Business screen and select Data Manager.
-
Select the Dataflow & Recipes view from the menu at the top left of the Data
Manager screen and click the Recipes tab in the main pane.
- Find your app’s recipe. Open the menu on the far right of the screen next to the app icon and name, and click Run now.
Did this article solve your issue?
Let us know so we can improve!