Loading
Salesforce now sends email only from verified domains. Read More
Tableau Next
Table of Contents
Select Filters

          No results
          No results
          Here are some search tips

          Check the spelling of your keywords.
          Use more general search terms.
          Select fewer filters to broaden your search.

          Search all of Salesforce Help
          Add a Salesforce Flow Action to a Dashboard

          Add a Salesforce Flow Action to a Dashboard

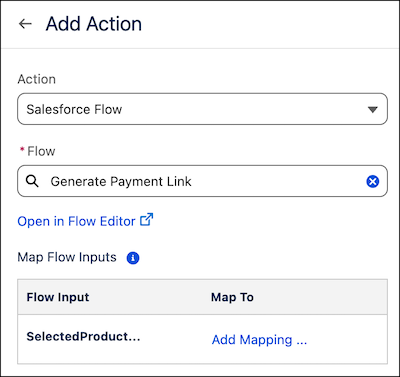
          Add a Salesforce Flow action to a widget to execute flows using the Tableau Next dashboard context. Flows empower your users to seamlessly create follow-up tasks, dispatch reminder emails, or refresh records directly from their dashboard insights. For example, add a flow action that lets sales reps create a follow-up task directly from a dashboard widget showing at-risk opportunities.

          Required Editions

          View supported editions.
          User Permissions Needed
          To edit Tableau Next dashboards and run and manage flows: Tableau Unmetered Platform Analyst or Tableau Next Platform Analyst permission set
          Note
          Note Only standard screen and autolaunched flows are supported. For more information, see Automate Tasks with Flows.
          The Salesforce Flow action with a selected flow and inputs for mapping.
          1. Select Salesforce Flow as the action type.
          2. Select a flow.
            If no flows are listed, verify that the flow you want is active and a supported flow type.
          3. To view the flow, click Open in Flow Editor.
          4. Map the required flow inputs to values in the dashboard. For each flow input, click Add Mapping.
            Each input mapping describes the input type. Select whether to pass the input as a static string or a dynamic data field.
            1. Select Static String to pass a static string value as the input. Enter a custom input string in the text box.
            2. Select Dynamic Widget Field to pass a dynamic value as input. Select a widget on the dashboard, a field from the widget, and the interaction type.
              For interaction type, a selection interaction passes an input value based on a user selection in the widget. A result interaction passes an input value based on the results of a query.
            3. Click Done.

          Test your flow action to ensure the input values are passed in as expected. When a flow action is triggered, a confirmation message displays the input values and allows user confirmation before starting the flow.

          After a flow starts, a confirmation or error message displays to let the user know the status of the flow.

           
          Loading
          Salesforce Help | Article