Loading
Salesforce now sends email only from verified domains. Read More
Tableau Next
Table of Contents
Select Filters

          No results
          No results
          Here are some search tips

          Check the spelling of your keywords.
          Use more general search terms.
          Select fewer filters to broaden your search.

          Search all of Salesforce Help
          Use Parameters to Explore Data Dynamically in Tableau Next

          Use Parameters to Explore Data Dynamically in Tableau Next

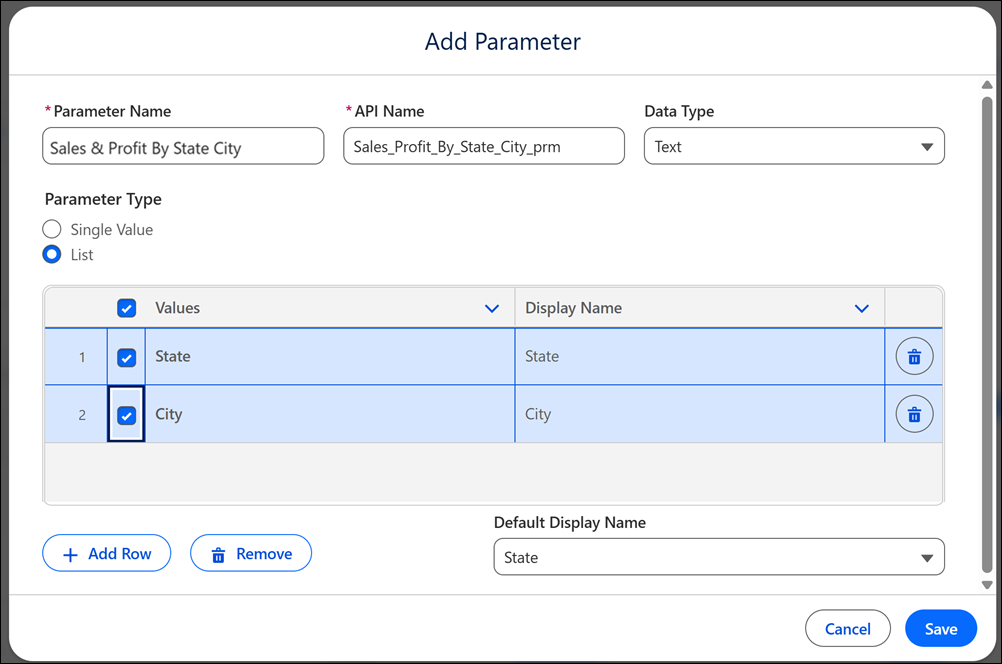
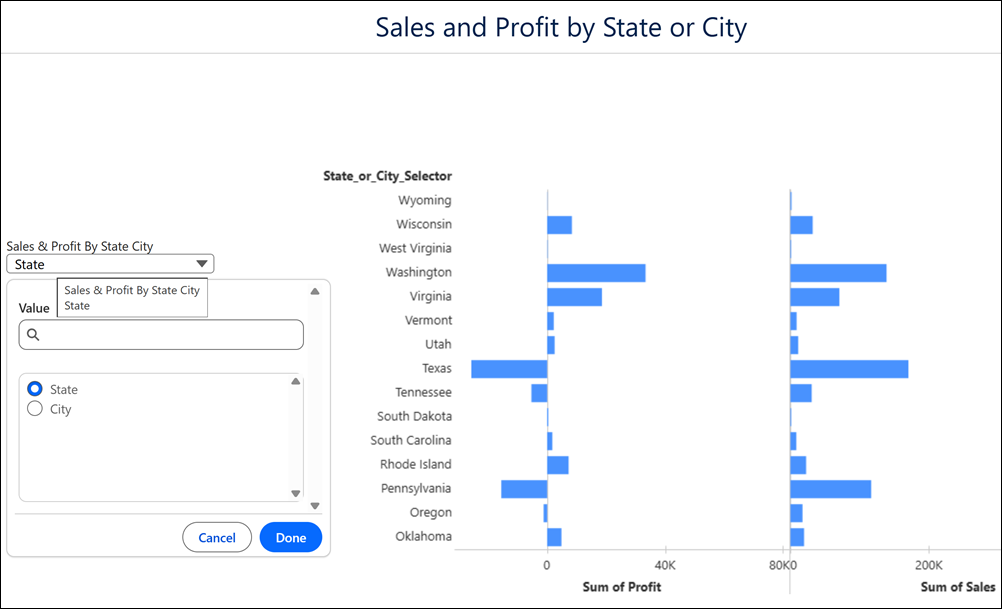
          Define parameters in Tableau Next to explore what-if scenarios in dashboards and see how different inputs affect your business. Create a parameter on any field type and use it with a calculated field, filter, or reference line to update the visualization interactively. Use a parameter list to switch between fields or field values, such as countries, to compare each value’s impact separately. You can also create parameters for values outside the dataset, such as discount percentages, to see how they affect results.

          Required Editions

          View supported editions.
          User Permissions Needed
          To define parameters in Tableau Next: Tableau Unmetered Platform Analyst or Tableau Next Platform Analyst permission set

          For example, create a parameter to switch the sales and profit breakdown between city and state. In a chart visualization that shows sales and profit as columns, follow these steps.

          1. Create a parameter.
            1. From the Data pane, click Tableau Next plus sign in the Data pane to create parameter and calculated field and select Create Parameter.
            2. Enter a name for the parameter and select its data type.
            3. Choose List as the parameter type.
            4. Add the list values to include in the parameter list.
            5. Click Save.
            Add Parameter settings in Tableau Next

            The parameter now appears in the Data pane.

          2. Create a calculated field to use with the parameter.
            1. From the Data pane, click Tableau Next plus sign in the Data pane to create parameter and calculated field and select Create Calculated Field.
            2. In the calculated field editor, define the formula that specifies how the calculation responds to the selected parameter value.
            3. Validate the formula and click OK.
            The calculated field now appears in the Data pane.
          3. Drag the calculated field onto Rows.
          4. Optionally, you can reflect the parameter’s name in the calculated field’s name.
            1. From the calculated field’s drop-down menu, click Edit Field Label.
            2. In the Field Label box, click Tableau Next plus sign in the Edit Field Label box
            3. Select the parameter’s name and click Apply.
          5. To add the visualization to a dashboard, click + Add to Dashboard .
          6. Choose the dashboard you want to add the visualization and click Select.
          7. Add a list widget to the dashboard.
          8. Click Add List.
          9. Choose the parameter and click Select.
          10. To review the parameter in the dashboard, click Preview.
          11. To apply your changes to the dashboard, click Save.

          Tableau Next parameter selector in a dashboard

           
          Loading
          Salesforce Help | Article