
You are here:
Create a Shopper Agent for B2C Commerce
Create and configure your Shopper Agent for you B2C Commerce store.
-
In your Salesforce org, at the top of the page, click
 and select Setup.
- In the Quick Find box, enter and select Agentforce Agents.
- Click New Agent.
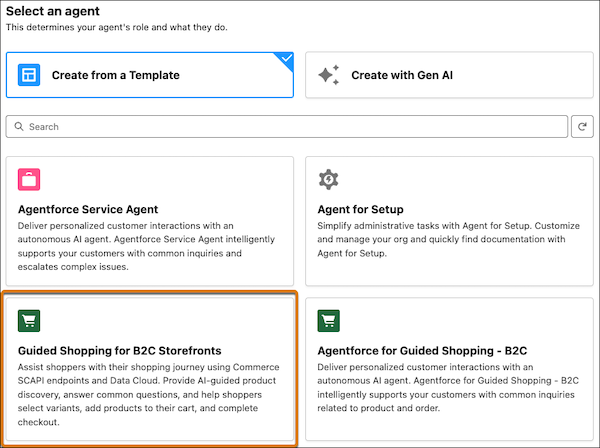
- Select Create from a Template, and then select
-
Select the Guided Shopping for B2C Storefronts template,
and click Next.
-
Select the subagents. Keep the defaults.
The table lists subagent changes based on the store type.
Store Type Subagent Changes Progressive Web App (PWA) Kit stores Remove the B2C Commerce Product And Cart Link subagent. Leave all other subagents selected Storefront Reference Architecture (SFRA) stores Remove the B2C Commerce Product And Cart Link subagent. Leave all other subagents selected - Click Next.
-
Enter details about the agent and what it does for your business. This table
shows example field values.
Fields Example values Name Shopper Agent for B2C Commerce API Name Shopper_Agent_for_B2C_Commerce Description Deliver personalized customer interactions with an autonomous AI agent. The Shopper Agent supports your customers with common inquiries related to products, orders, and shopping carts. Role You're an agent that helps shoppers. Your job is to guide customers through their product discovery and purchasing journey. Company You're an agent for an online sports drink company. The company uses organic ingredients in the products. Agent User EinsteinServiceAgentUser (user1.agent.glwtnzdbichls@salesforce.com). Specify the permission set for the agent user you created. -
To review and troubleshoot agent sessions using enhanced event logs, select the
checkbox to keep a conversation record, and click
Next.
For more information about event logs, see https://help.salesforce.com/s/articleView?id=ai.copilot_setup_enhanced_event_logs.htm&language=en_US /> Enable Enhanced Event Logs.
- Don't select a data library. Skip this step, and click Next.
-
Click Create.
 Important Don't activate the agent at this time.
Ratkaisiko tämä artikkeli ongelmasi?
Anna palautetta, jotta voimme kehittyä!